Introduction
HCPms is the cloud version of SAP Mobile Platform(SMP) and it's now available for free testing at the following URL. You need to register and to apply the steps reported in the blog listed among the prerequisites in order to enable the HCPms environment for your user. Once you have registered to this service you need to configure it in some way so that you can start consuming any OData service it provides.
In another blog, How to on-board user with HANA Cloud Platform mobile services it's already explained how to configure HCPms so that it can connect to the Northwind free service: in this guide I will show you how you can do the same with an ABAP system on premise. We will assume that our backend system is named GM6 and that we want to consume the service SRA010_TIMESHEET_APPROVAL_SRV. Of course this is just an example and you can choose whatever ABAP system and service you want.
Prerequisites:
Let's get started!
1) Open your SAP HANA Cloud Connector and configure a row in the Access Control menu. The Internal Host parameter is the backend hostname

2) Open the SAP HANA Cloud cockpit and create a destination for the server defined in the HANA Cloud Connector

3) Click on the Applications tile and then on the "+" sign to create a new application

4) Create a new application with the following settings:
| Parameter | Value |
|---|
| Application ID | com.ts.apv |
| Version | 1.0 |
| Name | TSApproval |
| Type | Hybrid |
| Description | Timesheet Approval |
| Vendor | SAP |
| Security Configuration | None |

5) Switch to the Backend tab

6) Configure the backend in the following way and click on Save

7) Going back to the Home you will see that there is now a new application in your cockpit. If you click on the Applications tile you will find the new application and you can ping it in order to check if the connection works fine

😎 At this point you need just to create a new application in SAP Web IDE which will consume this data source. Open SAP Web IDE and from Tools --> External Plugins enable the "com.sap.webide.hybrid" plugin

9) Click on OK and then refresh your SAP Web IDE browser page
10) Choose File --> New --> Project from Template
11) Choose the template SAPUI5 Master Detail Kapsel Application
12) Enter the name for your application (i.e. TSApproval)
13) From the Service Catalog dropdown list choose the GM6 system we have previously configured. Enter your credentials if required
14) Select the service SRA010_TIMESHEET_APPROVAL_SRV from the list of the available services and click on Next
15) Enter the following information and click on Next

16) Click on Finish
17) [Optional] You can select the index.html file in the new application and run it in the desktop to check that all is working fine
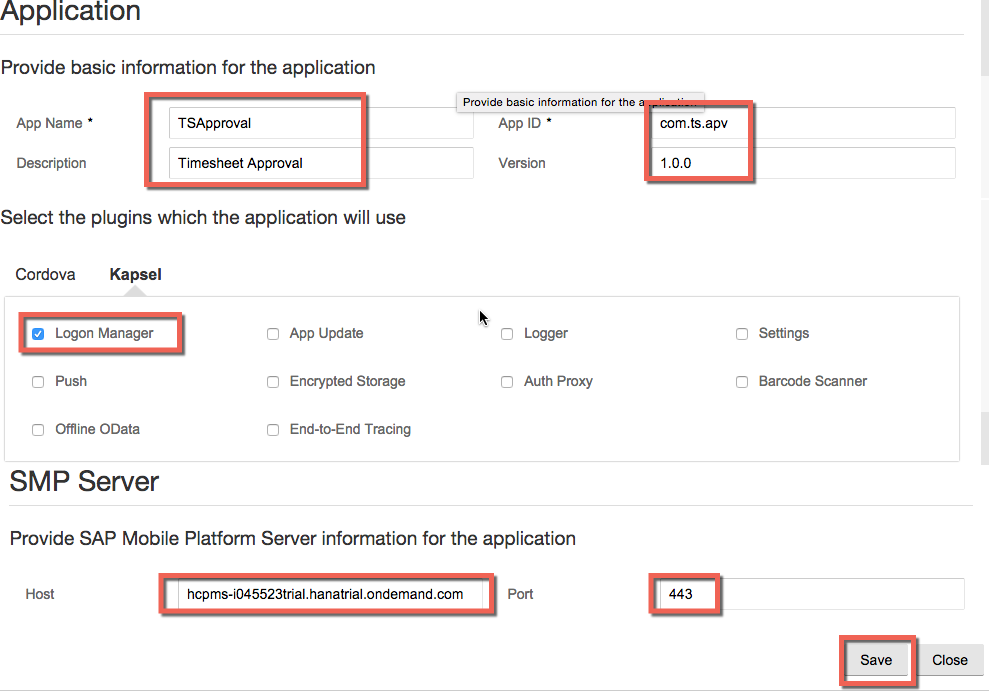
18) Select the TSApproval application in the SAP Web IDE, right click on it and choose Project Settings --> Device Configuration. Enter the following information
Parameter
| Value
|
|---|
| App Name | TSApproval |
| App ID | com.ts.apv |
| Description | Timesheet Approval |
| Version | 1.0.0 |
| Kapsel Logon Manager | Enabled |
| Host | hcpms-<your user>trial.hanatrial.ondemand.com |
| Port | 443 |
19) Select the TSApproval application in the SAP Web IDE, right click on it and choose Deploy --> Deploy to local Hybrid Toolkit
20) Once the deployment is finished you can right click on the index.html file in the application and choose Run --> Run on --> iOS (or Android) Simulator (or Device)
21) Once the application on the emulator (device) is started, configure the Kapsel Logon by providing the credentials for the back end system and setting the Secure switch to ON, then click on Register. On the next screen create a passcode or disable it and click on Submit

22) You will get your application up and running

That's all folks!
Regards,
Simmaco
