
- SAP Community
- Products and Technology
- Supply Chain Management
- SCM Blogs by Members
- SCM Core Interface- Handbook (PART-1)
Supply Chain Management Blogs by Members
Learn about SAP SCM software from firsthand experiences of community members. Share your own post and join the conversation about supply chain management.
Turn on suggestions
Auto-suggest helps you quickly narrow down your search results by suggesting possible matches as you type.
Showing results for
former_member22
Discoverer
Options
- Subscribe to RSS Feed
- Mark as New
- Mark as Read
- Bookmark
- Subscribe
- Printer Friendly Page
- Report Inappropriate Content
01-21-2015
4:56 PM
1. Introduction
APO core interface (CIF) is a standard interface which connects an APO & a standard R/3 system. CIF interface enables the data exchange between an SAP ERP system (SAP R/3, SAP R/3 Enterprise, or SAP ECC), and a connected SAP SCM system. CIF enables the integration of master data from SAP ECC to SCM APO (one way only) and the integration of transactional data in both ways, from ECC to APO and vice versa. The basic idea of the integration is to write events for each planning relevant change – e.g. the creation of an order – and use these as trigger point for the data transfer. Technically the transfer is performed via qRFC. Which objects (i.e. planned orders, stock) should be transferred from SAP ECC to SCM APO is controlled by the integration models, which could be regarded as something like the master data of the CIF.
2. Business Objective
The main objective of configuring the ECC core interface is to integrate the centralized source of master data from ECC to APO & publishing planning result from SCM planning system (APO) to SAP OLTP system (ECC) & vice versa. It is essential to maintain the consistent data & its flow between planning and execution system for better planning result & optimum inventory level. This configuration also suffices the objective of real time transactional data transfer between planning and execution system & delta transfer for master data changes.
CIF provides the following central functions:
- Supply the master and transaction data, relevant for planning, in SCM APO system.
- Techniques for initial, incremental, and real-time data transfers from ECC to SCM APO
- Techniques for publishing planning results back from SCM APO to ECC system
3. Key Design Areas
- Technical Integration between ECC and APO (CIF Configuration)
- Integration of Master data and Transactional data (Design of Integration Models)
- CIF Error Handling and Queue Management
4. Technical Integration between ECC & APO (CIF Configuration)
- As of SAP ECC 6.0, CIF is an integrated part of the system. (If you use SAP SCM 5.0 with ERP systems up to SAP ECC 5.0, you receive CIF via the relevant SAP R/3 Plug-In. The SAP R/3 Plug-In is a combined Plug-In used to link SAP components such as SAP SCM to the ERP system up to and including SAP ECC 5.0) .
- SAP ERP Central Component 6.0 (SAP ECC 6.00) and later releases will directly contain all the interfaces necessary for the technical integration with other SAP components. These interfaces were previously part of the SAP R/3 Plug-In.

5. CIF Set-up & Related Configuration Task
5.1. Configuration in R/3
- Define logical system (Transaction code- BD54)
We defined logical system for both ECC and APO system. To enable the transfer of data via APO Core Interface (CIF), you need to name both the ERP system in which you are working and the SAP APO system to which you want to transfer data as logical systems.

Note:-The above activity is dependent upon the target system concerned. For this reason, there is no transport to the production system. As a result, you need to also make the settings for the relevant target system in the production system manually, Or Alternatively, you can maintain the entire ECC & APO logical system name (as per SAP system landscape & client strategy) in Development client and include them in a transport. This will make all the logical system available across ECC system landscape & minimize the manual activities.
- Assign logical system to client (Transaction code- SCC4)
In this step, assign the logical system to a client. All the fields like City, Std. currency, logical system should be maintained. Otherwise there will be some futile CIF error during the data transfer from ECC to APO.

Note: - These settings cannot be transported. When a new system is being set up, these settings must be made after the system installation has been completed.
- Specify APO release (Transaction code- NDV2)
In this step, you have to specify the release level of the SAP APO system that is defined as the target system. The release level will activate the compatible functionality for the data transfer.

Note: - The above activity is dependent upon the target system concerned. For this reason, there is no transport to the production system. As a result, you need to also make the settings for the relevant target system in the production system manually or
Alternatively, you can maintain the all of the logical system name (as per SAP system landscape) in Development client and include them in a transport. This will make all the logical system available across ECC system landscape & minimize the manual activities.
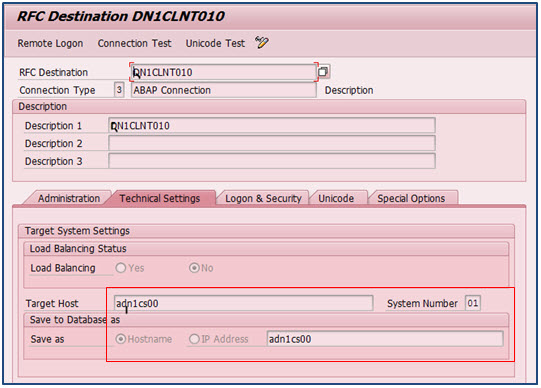
- Setup RFC destination (Transaction code- SM59)
In this step, create the RFC destination which has the same name as the target logical system. This RFC enables the connection to the SCM APO system.
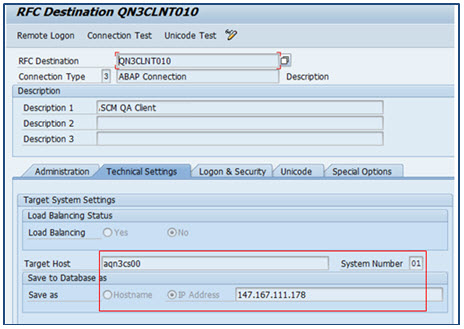
Performance Tip: - By activating the load balancing & defining the logon group, you can use the load balancing procedure while connecting to the APO system. This logon group needs to be assigned to the various servers in transaction code RZ12.
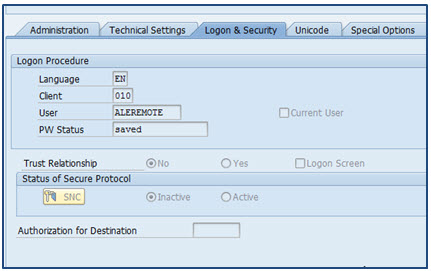
When ECC is connected to APO system it always uses ALEREMOTE user in order to process any CIF queues.
- Assign RFC destinations to various application cases (Transaction code- CFC7)
You assign various application areas to the logical system and the RFC destination. This is optional configuration & purely depends on the business requirement & guidelines for the type of RFC user to be used for security reasons. Some of the applications only work with RFC dialog user e.g. GATP availability check, but from security point of view, most of the clients e.g. life science, FMCG doesn’t allow to create the RFC user as dialog user which can be misused.
To meet the business requirement, there is a need to create a new RFC destination with different RFC user of type either Dialog or Service user with very limited & restricted authorization. The authorization has to be provided for the type of application to be use.
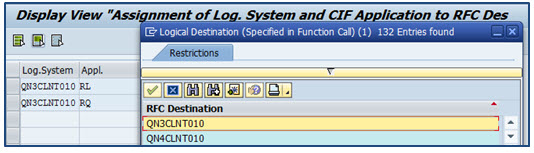
The below applications can be triggered from ECC into APO

- Set target system and queue type (Transaction code- CFC1)
In this step, you can set the queue type for the target system specified. It is always recommended to use the inbound queues in the target system to control the processing of the CIF queues with heavy data load.
The queue type (inbound or outbound) determines whether the queues processing is controlled by the sending or receiving system

- Set user parameter (Transaction code- CFC1)
In this IMG activity, you can make user-specific entries for the following parameters:
- You can use this to set whether and how data records should be logged in the application log for the user specified
- User can use this functionality to debug in case of any queues get created for that user. Any master data or transactional date created by that user will be stuck in the CIF queue which the user can debug and analyze the issue
- Here, you should maintain entry for user name as “*” for normal or detailed logging of the application log.
- RFC user should be maintained with the normal logging.
- CIF administrator id should be maintained for detailed logging along with Debugging mode “ON”.

- Determine Number Ranges for Parallelization (Transaction code- CFC8)

- Define filter and selection block size (Transaction code- CFC3)
- You determine the number of filter objects that are processed in one block in the APO Core Interface.
- Also you determine the number of data objects that are transferred to SAP APO in a remote function call (RFC) at the initial data transfer.
- In normal cases, it is recommended not to change the above Filter & Block size.
- You can use these settings to improve system performance during the initial data transfer. The optimum values for improved performance vary from case to case and are largely dependent upon the client data situation. Therefore, you are recommended to experiment with the settings in individual cases in your system.


Note: - Refer to OSS note # 436527 for the block size recommendation.
- Configure Change transfer for master data (Transaction code- CFC9)
- All the master data changes e.g. material, customer, vendor & resources are configured as periodic transfer to APO.
- During the initial transfer of the resource, it is defined to create external capacity for the resource for 30 days in past and 730 days in future.
- It is recommended to create single-mixed resource in APO for the resources having single capacity and for which the indicator “can be used by several operation” is not set.
- It is recommended to configure to create Multi-Mixed resource in APO for the resources having multiple capacities or for capacities for which the indicator “can be used by several operations” is set.

Note: -
- Master data change transfer from ECC to APO can be configured as immediate or periodic, which is completely depends on client requirement.
- If SNP & PP/DS both are in scope then it is always recommended to use the resource type as mentioned above. This is very critical setting & cannot be altered later neither in ECC nor in APO. You need to delete the resource in APO to change the resource type. This cleanup can be a mini project.
- Activate ALE Change Pointers Generally (Transaction code- BD61)
This configuration is a prerequisite for transferring master data changes with change pointers.

- Activate ALE Change Pointers per Message Type
The following change pointers are important to be activated e.g. Vendor master, Customer master, Set-up group and Source of supply, material MRP area, Subcontracting PDS.

Note: - Activation of change pointer is only needed if the corresponding master data is used in system.
- Activate online Transfer Using BTE (Transaction code- BF11)
- We activate BTE for the integration with SAP APO in order to activate the online transfer of both transaction data changes and some master data changes like Material master and Resource. We Set the ND-APO (New Dimension Plug-In APO) and NDI (New Dimension Integration) application indicators to active.
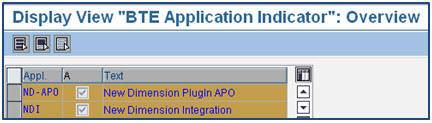
Note: - This is not the default setting; hence make sure both the above mentioned indicators are set.
- QIN Scheduler (Transaction code- SMQR)
- When APO sends the planning results to the connected ECC system, it generates the CIF queues in the inbound of the ECC system as per the configuration. Those inbound Queues that are to be automatically processed by the target system must be registered in the QIN scheduler.
- The below settings used for QIN scheduler worked for most of the clients. Changes can be done based upon the queue processing.

- QOUT Scheduler (Transaction code- SMQS)
- Outbound qRFCs (outbound queues) are processed by the QOUT scheduler. The QOUT scheduler is configured using transaction code SMQS. The targets system to which the outbound qRFCs are to be sent are registered in the QOUT scheduler.
- The below settings used for QOUT scheduler worked for most of the clients. Changes can be done based upon the queue processing.

5.2. Configuration in SCM APO System
- Define Logical System (Transaction code- BD54)
We defined logical system for both ECC and APO system. To enable the transfer of data via APO Core Interface (CIF), you need to name both the ERP system in which you are working and the SAP APO system to which you want to transfer data as logical systems.

Note: - The above activity is dependent upon the target system concerned. For this reason, there is no transport to the production system. As a result, you need to also make the settings for the relevant target system in the production system manually, Or
Alternatively, you can maintain the all of the logical system name (as per SAP system landscape) in Development client and include them in a transport. This will make all the logical system available across ECC system landscape & minimize the manual activities.
- Assign logical system to the Client (Transaction code- SCC4)
In this step, assign the logical system to a client. All the fields like City, Std. currency, logical system should be maintained. Otherwise there will be some futile CIF error during the data transfer from ECC to APO.

Note: - These settings cannot be transported. When a new system is being set up, these settings must be made after the system installation has been completed.
- Setup RFC Destination (Transaction code-SM59)
In this step, create the RFC destination which has the same name as the target logical system. This RFC enables the connection to the ECC system.
Performance Tip: - By activating the load balancing & defining the logon group, you can use the load balancing procedure while connecting to the ECC system. This logon group needs to be assigned to the various servers in transaction code RZ12.

When APO is connected to ECC system it always uses ALEREMOTE user in order to process any CIF queues.
- Assign RFC Destinations to Various Application Cases (Transaction code- SPRO)
- You assign various application areas to the logical system and the RFC destination. This is optional configuration & purely depends on the business requirement & guidelines for the type of RFC user to be used for security reasons. Some of the applications only work with RFC dialog user e.g. display application log from APO into ECC system, but from security point of view, most of the clients e.g. life science, FMCG doesn’t allow to create the RFC user as dialog user which can be misused.
- To meet the business requirement, there is a need to create a new RFC destination with different RFC user of type either Dialog or Service user with very limited & restricted authorization. The authorization has to be provided for the type of application to be use. So that while accessing the data from the target system through a Remote function call, the system will use the specified RFC destination specified in the configuration of “Assign RFC destinations to various Application cases”.

- Maintain Business System Group (Transaction code- /SAPAPO/C1)
- This configuration determines the assignment to a business system group of this system and the respective ECC systems that are to be connected.
- If this APO system is connected with multiple ECC system using the same number range of material master, plant, vendor & customer master, then we need to define multiple BSG groups to bring master data from each system.

- Assign Logical system to Business System Group (Transaction code- /SAPAPO/C2)
In this step, to enable error-free communication, every source system (ERP system) must be assigned to a BSG. We assign the logical system to the BSG group & the queue type.
Here, we have also activated the CIF post processing functionality for CIF error handling of transaction data.
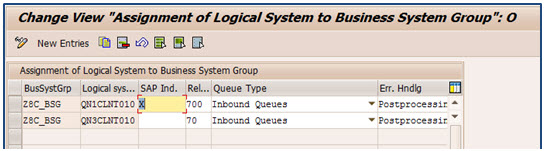
Note: - It is recommended to use the Inbound Queues if transferring a large amount of data to the ERP system to ensure an even load on the ERP system. Ensure to maintain settings for the Queue-In (QIN) Scheduler in the qRFC monitor on the ERP side.
- Set User Parameter (Transaction code- /SAPAPO/C4)
In this IMG activity, you can make user-specific entries for the following parameters:
- You can use this to set whether and how data records should be logged in the application log for the user specified.
- User can use this functionality to debug in case of any queues get created for that user. Any master data or transactional date created by that user will be stuck in the CIF queue which the user can debug and analyze the issue.
- Here, you should maintain entry for user name as “*” for normal or detailed logging of the application log.
- RFC user should be maintained with the normal logging.
- CIF administrator id should be maintained for detailed logging along with Debugging mode “ON”.

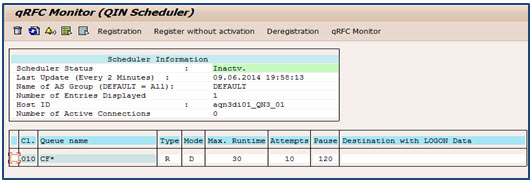
- QIN Scheduler (Transaction code- SMQR)
- When ECC sends the master and transaction data to the connected ECC system, it generates the CIF queues in the inbound of the APO system as per the configuration. Those inbound Queues that are to be automatically processed by the target system must be registered in the QIN scheduler.
- The below settings used for QIN scheduler worked for most of the clients. Changes can be done based upon the queue processing.
- QOUT Scheduler (Transaction code- SMQS)
- Outbound qRFCs (outbound queues) are processed by the QOUT scheduler. The QOUT scheduler is configured using transaction code SMQS. The targets system to which the outbound qRFCs are to be sent are registered in the QOUT scheduler.
- The below settings used for QOUT scheduler worked for most of the clients. Changes can be done based upon the queue processing.

- Maintain Distribution Definition (Publication) (Transaction code- /SAPAPO/CP1)
In order to publish the planning results from APO system to ECC system, we have maintained all the publication types for the required locations forwhich we wanted to publish the order to ECC system. This is maintained for both in-house and external procurement.

Note: - If the distribution definitions are not maintained then the planning results will not transfer back to the connected ERP system. The data inconsistency between ECC & APO system will even not be captured in CCR report.
5.4. qRFC queue names for CIF
QRFC queue names for the CIF are always set up according to the following rules:
CF<CIF object ID><serialization character string>
The CIF objects that are transferred from an ERP system to the APO system are listed below:
CIF object | ID | Serialization Character string |
Batch | BTC | CHARG+(10) + MATNR+(9) |
Resources | CAPA | NAME+(18) |
Characteristic | CHR | ATNAM+(19) |
Class | CLA | KLART+(3) + CLASS+(16) |
Inspection lot | LOT | PRUEFLOS+(17) |
Material master | MAT | WERKS+(4) + MATNR+(14) |
Planned order | PLO | ORDNR+(12) |
Confirmation | PPC | ORDERNR |
Reservation | RSV | ORDNR+(12) |
Purchase order | PO | DOC+(10) |
Purchase Requisition | PO | DOC+(10) |
The CIF objects that are transferred to an ERP system from SAP APO are listed below:
CIF object | ID | Serialization Character string |
Delivery confirmation | CD | ORDERNO |
Confirmation | CF | GUID or ORDERNO |
VMI Sales order | CO | ORDERNO |
Delivery | DLV | 001 |
Purchase requisition | EP | GUID or ORDERNO |
Purchase order | EP | GUID or ORDERNO |
Planned order | IP | GUID or ORDERNO |
Process/Production Order | IP | GUID or ORDERNO |
Production campaign | PC | GUID or ORDERNO |
| RV | GUID or ORDERNO |
Shipment | SHP | 001 |
Stock transport order | TO | GUID or ORDERNO |
5.4. CIF Interface Configuration Checklist
Below is the CIF configuration checklist or tracker which can be maintained to monitor the CIF configuration in ECC & APO system simultaneously. This will avoid any configuration to get missed.
| Configuration Nodes | APO | APO Status | ECC | ECC Status |
1 | Name Logical System | Basis | Completed | Basis | Completed |
2 | Assign Logical System to a Client | Basis | Completed | Basis | Completed |
3 | Specify SAP APO Release | NA | NA | Basis/Functional | Completed |
4 | Create RFC User | Basis | Completed | Basis | Completed |
5 | Set Up RFC Destination | Basis | Completed | Basis | Completed |
6 | Set Target System and Queue Type | CIF Functional | Completed | CIF Functional | Completed |
7 | Set User Parameters | Basis/CIF Functional | Completed | Basis/CIF Functional | Completed |
8 | Configure Application Log | CIF Functional | Not Started | CIF Functional | No Change |
9 | Determine Number Ranges for Parallelization | NA | NA | Basis | No Change |
10 | Set Filter and Selection Block Size | No Change | No Change | No Change | No Change |
11 | Configure Change Transfer for Master Data | NA | NA | CIF Functional | Completed |
12 | Activate ALE Change Pointers Generally | NA | NA | CIF Functional | Not Started |
13 | Activate ALE Change Pointers for Message Types | NA | NA | CIF Functional | Not Started |
14 | Activate Online Transfer Using BTE | NA | NA | CIF Functional | Completed |
16 | Activate Cross-System Update Logic | NA | NA | CIF Functional | Completed |
17 | Maintain Business System Group | CIF Functional | Completed | NA | NA |
18 | Assign Logical System and Queue Type | CIF Functional | Completed | NA | NA |
19 | Maintain Object-Specific Settings | CIF Functional | Not Started | NA | NA |
20 | Maintain Publication Settings | CIF Functional | Not Started | NA | NA |
| Activities | APO | APO Status | ECC | ECC Status |
1 | Setup Outbound scheduler | Basis | Completed | Basis | Completed |
2 | Setup Inbound scheduler | Basis | NA | Basis | NA |
3 | Activate outbound scheduler for CIF | Functional | Completed | Functional | Completed |
4 | Activate Inbound scheduler for CIF | Functional | NA | Functional | NA |
5 | Create Integration model | NA | NA | Functional | Completed |
6 | Activate Integration model | NA | NA | Functional | Completed |
7 | Maintain Publication Settings (After Master Data transfer) | Functional | Completed | NA |
6. Integration of Master data and Transactional data (Design of Integration Models)
The integration model controls the transfer of master data and transaction data. It is generated in the ERP system and contains all data that is to be transferred to the SCM system. It is uniquely identified by name and application. There are 2 steps in integration models
- Create & Generate Integration models (Transaction code- CFM1)
When you generate an integration model, you specify which data objects are to be selected from the total dataset in the ERP system for the transfer. To create the integration model, follow the below steps:
- First select the object types (for example, material masters) to be selected on the Create Integration Model selection screen.
- Next, you select specific selection criteria (in most cases, a material/plant combination) that further restrict the object types you have already selected. If you have already selected Material Masters, for example, you could now enter an MRP controller. In this way, you define filter objects
- . Filter objects are used to select which data objects are transferred to a specified SCM system. In the example, all material masters for a particular MRP controller are selected.
- Activate Integration model (Transaction code- CFM2)
- The activation of integration models results in an initial transfer. If you work with SAP APO, the online transfer of transaction data is released.
- As standard, the integration models to be activated are compared with the integration models that are already active. You can generate multiple integration models. However, only one version can be activated for each model at a time.
- You can activate and deactivate several integration models simultaneously.
- Integration models must remain active to enable online transfer.
- Activation of master or transaction data integration model should be followed a logical sequence & recommended to grouped as below
- ATP Customizing, Setup groups (group/key) and product allocation
- Plants & distribution centers
- Change master records
- Class & characteristics
- Material master (+ classes, characteristic)
- Batches
- MRP area and material master for MRP areas
- Planning Products
- Materials for GATP check
- Product allocation
- Vendors
- Customers
- Work Centers
- Production data structure
- Purchase Info Record, scheduling agreement, contracts
Note: - Normally, there are some challenges to generate & activate the material dependent integration model for master & transaction data during initial transfer, when the master data objects to be transferred are huge. In that case we need to do some work to design the integration model to have the optimum no of data objects per IM.
The critical data objects are:
- Material master
- Purchase Info record/source list
- Sales Orders
- Stocks
- Batches
The following are the recommendations which can be used to do the initial data transfer successfully.
- Split the material master integration model by either material type / MRP controller/ material master number range or in combinations
- If the data split is not feasible then add data objects in the sequential manner. It means, first create & activate the IM for e.g. material type FERT. Next time, add some more material type in the same variant & activate it. This way, there will not be heavy load on the system at a time & it will be distributed over multiple IM transfer.
6.1. Data Flow between ECC to APO & its Frequency
- Master Data flow from SAP (ECC) --> APO
Master Data | Daily Batch Job- Once in a Day | Manually |
Plant | No | Periodic, Need basis |
Vendor, Customer | Yes; Create new, Change existing | Need basis |
Material | Yes; Create new, Change existing | Need basis |
Info Record | Yes; Create new, Change existing | Need basis |
PDS | Yes; Create new, Change existing | Need basis |
- Transaction Data Flow SAP (ECC) --> APO
Transactional Data | Daily Batch Job- Once in a Day | Real Time |
Purchase Requisition's | Yes; Activate IM for new APO relevant materials | Create, Change |
Inspection lot | Yes; Activate IM for new APO relevant materials | Create, Change |
Purchase Orders | Yes; Activate IM for new APO relevant materials | Create, Change |
Stocks | Yes; Activate IM for new APO relevant materials | Create, Change |
Stock Transfer Orders | Yes; Activate IM for new APO relevant materials | Create, Change |
Sales Orders | Yes; Activate IM for new APO relevant materials | Create, Change |
Note: - The above mentioned data flow frequency from ECC to APO is just a recommendation based on various project experiences. Still, these can vary from project to project depends on business requirements .
6.2. Publication of procurement proposal from APO to ECC (Transaction code- /SAPAPO/C5)
Transactional Data can be transferred from APO to ECC in two ways
- Periodically – it is recommended to use the periodic transfer of SNP planning result to ECC. It improves system performance, locking issues, & time to review & correct the planning results before publishing to ECC.
- Immediately/Real Time – This ensures real time data transfer and better consistency between APO & ECC. It is recommended to use this method for short term planning method e.g. PP/DS, CTM.
---------Contd... PART-2-----------------------------------------------------------------------------------------------------------------------------------------------------------------------
- SAP Managed Tags:
- SAP Advanced Planning and Optimization
12 Comments
You must be a registered user to add a comment. If you've already registered, sign in. Otherwise, register and sign in.
Labels in this area
-
aATP
1 -
ABAP Programming
1 -
Activate Credit Management Basic Steps
1 -
Adverse media monitoring
1 -
bank statements
1 -
Bin Sorting sequence deletion
1 -
Bin Sorting upload
1 -
BP NUMBER RANGE
1 -
Business partner creation failed for organizational unit
1 -
Business Technology Platform
1 -
Central Purchasing
1 -
Charge Calculation
2 -
Cloud Extensibility
1 -
Compliance
1 -
Controlling
1 -
Controlling Area
1 -
Data Enrichment
1 -
DIGITAL MANUFACTURING
1 -
Digital Transformation
1 -
Dimensional Weight
1 -
Direct Outbound Delivery
1 -
ETA
1 -
EWM
5 -
EWM - Delivery Processing
2 -
EWM - Goods Movement
3 -
EWM Outbound configuration
1 -
EWM-RF
1 -
EWM-TM-Integration
1 -
Extended Warehouse Management (EWM)
3 -
Extended Warehouse Management(EWM)
7 -
Finance
1 -
Freight Settlement
1 -
Geo-coordinates
1 -
Geo-routing
1 -
Geocoding
1 -
Geographic Information System
1 -
GIS
1 -
Goods Issue
2 -
GTT
2 -
IBP inventory optimization
1 -
inbound delivery printing
1 -
Incoterm
1 -
Innovation
1 -
Inspection lot
1 -
intraday
1 -
Introduction
1 -
Inventory Management
1 -
Logistics Optimization
1 -
Map Integration
1 -
Material Management
1 -
Materials Management
1 -
Outbound with LOSC and POSC
1 -
Packaging
1 -
PPF
1 -
PPOCE
1 -
PPOME
1 -
print profile
1 -
Process Controllers
1 -
Production process
1 -
QM
1 -
QM in procurement
1 -
Real-time Geopositioning
1 -
Risk management
1 -
S4 HANA
1 -
S4-FSCM-Custom Credit Check Rule and Custom Credit Check Step
1 -
S4SCSD
1 -
Sales and Distribution
1 -
SAP DMC
1 -
SAP ERP
1 -
SAP Extended Warehouse Management
2 -
SAP Hana Spatial Services
1 -
SAP IBP IO
1 -
SAP MM
1 -
sap production planning
1 -
SAP QM
1 -
SAP REM
1 -
SAP repetiative
1 -
SAP S4HANA
1 -
SAP Transportation Management
2 -
SAP Variant configuration (LO-VC)
1 -
Source inspection
1 -
Storage bin Capacity
1 -
Supply Chain
1 -
Supply Chain Disruption
1 -
Supply Chain for Secondary Distribution
1 -
Technology Updates
1 -
TMS
1 -
Transportation Cockpit
1 -
Transportation Management
2 -
Visibility
2 -
warehouse door
1 -
WOCR
1
Top kudoed authors
| User | Count |
|---|---|
| 2 | |
| 2 | |
| 1 | |
| 1 | |
| 1 | |
| 1 | |
| 1 | |
| 1 | |
| 1 | |
| 1 |