


- SAP Community
- Products and Technology
- Technology
- Technology Blogs by SAP
- RaspberryPi on SAP HCP - IoT blog series part 4: C...
Technology Blogs by SAP
Learn how to extend and personalize SAP applications. Follow the SAP technology blog for insights into SAP BTP, ABAP, SAP Analytics Cloud, SAP HANA, and more.
Turn on suggestions
Auto-suggest helps you quickly narrow down your search results by suggesting possible matches as you type.
Showing results for
Advisor
Options
- Subscribe to RSS Feed
- Mark as New
- Mark as Read
- Bookmark
- Subscribe
- Printer Friendly Page
- Report Inappropriate Content
01-08-2015
2:45 PM
Table of Contents
In the third blog post of this blog post series around Raspberry Pi and the SAP HANA Cloud Platform we've provided our Raspberry Pi with a Java app that can retrieve the data from the external sensor and send it to the Java app on the SAP HANA Cloud Platform we've setup in the second blog post of this series.
In this blog post we'll take care of the missing piece of our application: the user interface for the dashboard. We'll create a dashboard that can be used to monitor and keep track of the temperature sensors.

Setup the app as an HTML5 app
In a first step we need to create an HTML5 app in your SAP HANA Cloud Platform account. That's pretty straight forward and for those of you who are used to work with Git this will be a piece of cake.
Initialize your Git settings (for first-time-HTML5-app users)
In case you are creating an HTML5 app on the SAP HANA Cloud Platform you have to provide Git with some metadata first.
If you've already used the HTML5 apps on SAP HANA Cloud Platform you can jump to the next chapter around the creation of an HTML5 app in your account.
If you haven't done that, yet, this is what you need to do:
| Task | Screenshot |
|---|---|
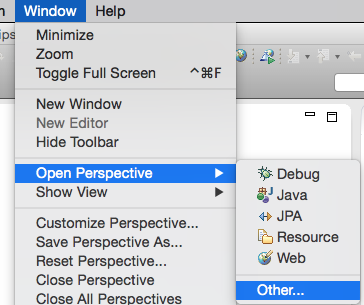
1. Start Eclipse and open the Eclipse Preferences (Window > Preferences). Once there click on Team > Git > Configuration |  |
2. Click on “Add Entry” and add as the Key the text core.autocrlf and as a Value the text false |  |
3. Click again on “Add Entry” and do the same for the following entries:
| |
| 4. At the end of these steps your setup should look similar to the screenshot. Click on Apply and after that on OK. | 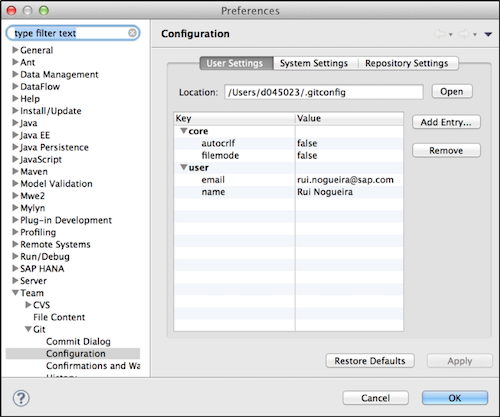 |
Create the app in your account
We need to create the app first on our account so that we get a Git repository for the app. Follow these steps:
| Task | Screenshot |
|---|---|
1. Open your cockpit for your trial account on SAP HANA Cloud Platform via the link https://account.hanatrial.ondemand.com/cockpit and switch to the HTML5 Applications navigation tab |  |
2. Click first on the button New Application… , enter the application name fishdashboard and click on the Create button. | |
| 3. Click on the name of the newly created app |  |
| 4. Click on the tab Development and copy the link of the Git repository to your clipboard |
|
Copy the code into your app
| Task | Screenshot |
|---|---|
1. Start Eclipse and switch to the Git perspective |
|
2. Click on Clone a Git Repository |  |
3. Paste the Git-URL you've copied from your cockpit into the URI field of the popped-up window, provide your user name and password of your SAP HANA Cloud Platform trial account into the fields User and Password. Don't forget to click on the option Store in Secure Store so you don't have to provide the credentials later on. Click on Next, click on Next again and click on Finish. |  |
4. Now right-click on the Git repository and select the command Import Projects |  |
5. Select Import as general project, click on Next and after that on Finish |  |
6. Switch to the Web perspective in Eclipse (similar to step 1) | |
7. Create a file called index.html. To do that right-click on the project fishdashboard and click on New and on File. After that provide the file name index.html and click on Finish. |
|
8. Now you can copy and paste the code from the index.html file I've attached to this blog post to the newly created index.html file in your Eclipse project. Be aware that you need to unzip the index.html file first. |  |
9. Save the index.html file |  |
10. Repeat the steps 7 - 10 for a file called neo-app.json. |  |
12. Right-click on your Eclipse project fishdashboard and select Team and Commit. |  |
13. Provide a short commit message, select all files and click on Commit and Push |  |
15. As a result you should get a message as response with a done message at the end. In case you get something different, something went wrong. Press OK to finish the commit and push. |  |
With this last step you already have the code of your app in your HTML5 app on your SAP HANA Cloud Platform account. There are now only a few steps missing to have everything up-and-running.
Setup the destination
The last step that is missing is the setup of a destination that the app needs to use. This is necessary due to the Same-Origin-Policy of browsers which don't let you call a resource in your Javascript-code that is outside of the domain space of your app.
| Task | Screenshot |
|---|---|
1. Now switch back to your cockpit for your trial account on SAP HANA Cloud Platform and click on your HTML5 app fishdashboard. You should see your commit message above the initial commit. As the neo-app.json file needs a destination you’ll notice that there is a message under the Referecenced Destinations… block telling you that a destination is missing. This is the next task we need to accomplish. |  |
2. Switch to account level on your cockpit and click on the Destinations tab |  |
3. Click on New Destination and provide the details for the destination. Name: fishimportsensordata Type: HTTP Description: Fish import sensor data URL: https://fishimport<your user account ID>.hana.ondemand.com/iotscenario1/ Proxy Type: Internet Cloud Connector Version: 2 Authentication: NoAuthentication At the end click on Save |  |
4. Select again the tab HTML5 Applications, click on your HTML5 app fishdashboard and click on the Development tab. As a result you should see now your new destination listed in your Destinations tab. |  |
7. Now click on the link of the commit message you've created and a new tab will be opened in your browser. You should see the app up-and-running and displaying the temperature values in a nice SAPUI5 app. |  |
But the link you’ve clicked on is only accessible to you as the developer of the application. If you want to make it accessible to others we need to version our commit and activate the version.
Create your first version
What you need to do next is to go back to your HTML5 app in the cockpit. At the very right of your commit you'll find an icon in the column Create Version. Click on that icon, provide a name like 1.0 and click on Add.
Start the dashboard
The last thing you need to do now is to switch to the tab Version Management and click on the symbol in the Activate column for the version you've created in the previous step. A popup will show-up and after confirming with clicking on Yes that you want to start the application you can access the app by clicking on the link under Application URL.

Now you can share that link with others and even try out how the app looks like on your smartphone or other devices.
Click on one of the tiles of the app and if you have followed the steps of the first, second and third blog post you can see the chart showing you the last 10 stored temperature values of a sensor that you've connected to the RaspberryPi.

What comes next?
We have now our app up-and-running. In the next blog posts will tweak a bit here and there and we'll look into other aspects of IoT around the SAP HANA Cloud Platform. Stay tuned.
Best,
Rui
- SAP Managed Tags:
- SAP Business Technology Platform
18 Comments
You must be a registered user to add a comment. If you've already registered, sign in. Otherwise, register and sign in.
Labels in this area
-
ABAP CDS Views - CDC (Change Data Capture)
2 -
AI
1 -
Analyze Workload Data
1 -
BTP
1 -
Business and IT Integration
2 -
Business application stu
1 -
Business Technology Platform
1 -
Business Trends
1,658 -
Business Trends
91 -
CAP
1 -
cf
1 -
Cloud Foundry
1 -
Confluent
1 -
Customer COE Basics and Fundamentals
1 -
Customer COE Latest and Greatest
3 -
Customer Data Browser app
1 -
Data Analysis Tool
1 -
data migration
1 -
data transfer
1 -
Datasphere
2 -
Event Information
1,400 -
Event Information
66 -
Expert
1 -
Expert Insights
177 -
Expert Insights
293 -
General
1 -
Google cloud
1 -
Google Next'24
1 -
Kafka
1 -
Life at SAP
780 -
Life at SAP
13 -
Migrate your Data App
1 -
MTA
1 -
Network Performance Analysis
1 -
NodeJS
1 -
PDF
1 -
POC
1 -
Product Updates
4,577 -
Product Updates
340 -
Replication Flow
1 -
RisewithSAP
1 -
SAP BTP
1 -
SAP BTP Cloud Foundry
1 -
SAP Cloud ALM
1 -
SAP Cloud Application Programming Model
1 -
SAP Datasphere
2 -
SAP S4HANA Cloud
1 -
SAP S4HANA Migration Cockpit
1 -
Technology Updates
6,873 -
Technology Updates
417 -
Workload Fluctuations
1
Related Content
- How can I use Langsmith with SAP AI Core by selecting LLMs through what SAP provides me? in Technology Q&A
- SAP UX Innovations in Public Cloud Products, Joule, AI, Entry Points, Apple Vision Pro and more in Technology Blogs by SAP
- Personal migration journey BTP: from Workflow Management to Build Process Automation in Technology Blogs by Members
- SAP User Experience Update: What’s New for SAP S/4HANA 2023 (Private Cloud and On-Premise) in Technology Blogs by SAP
- SAP EarlyWatch Alert Dashboard - New statistics about "Used SAPUI5 Applications" in Technology Blogs by SAP
Top kudoed authors
| User | Count |
|---|---|
| 34 | |
| 25 | |
| 12 | |
| 7 | |
| 7 | |
| 6 | |
| 6 | |
| 6 | |
| 5 | |
| 4 |