
- SAP Community
- Products and Technology
- Technology
- Technology Blogs by SAP
- SAP Lumira Visualization Extension - Hello World f...
Technology Blogs by SAP
Learn how to extend and personalize SAP applications. Follow the SAP technology blog for insights into SAP BTP, ABAP, SAP Analytics Cloud, SAP HANA, and more.
Turn on suggestions
Auto-suggest helps you quickly narrow down your search results by suggesting possible matches as you type.
Showing results for
Advisor
Options
- Subscribe to RSS Feed
- Mark as New
- Mark as Read
- Bookmark
- Subscribe
- Printer Friendly Page
- Report Inappropriate Content
12-09-2014
11:22 PM
I am excited to spread the message that you can now create SAP Lumira visualization extensions with SAP Web IDE! Recently we released our long-awaited VizPacker plugin for SAP Web IDE, so Lumira chart developers can use this powerful, cloud-based IDE to create cool chart extensions for Lumira. In the next few blogs, I plan to show you how you can easily create Lumira visualization extensions with this new tool. I will start with the simplest Hello World example in this blog to go through the end-to-end process.
Step 1: Sign up for an SAP HANA Cloud Platform Account to Access SAP Web IDE
If you haven't done so, follow this great blog postSAP Web IDE - Overview by jennifer.cha to gain free access to SAP Web IDE. If you already have access to HANA Cloud Platform (HCP), go directly to the HCP landing page: https://account.hanatrial.ondemand.com/ and click Log On. Note that Chrome browser is recommended for the following steps.

After logging on to HCP, you should see the following home page. Click on Subscriptions in the Content menu on the left hand side:

On the Details pane on the right, click on webide in the list of your subscribed HTML5 Applications:

This will take you to the page with the link to SAP Web IDE:

Click on the link, and it opens up a new browser window for SAP Web IDE. This is our new exciting development environment for creating Lumira visualization extensions:

Step 2: Add VizPacker Plugin to SAP Web IDE
The Lumira VizPacker comes to SAP Web IDE as a plug-in, so in order to use it, we have to add it first. Click on Tools -> External Plugins in the main menu, and you will see a list of available external plugins including VizPacker:
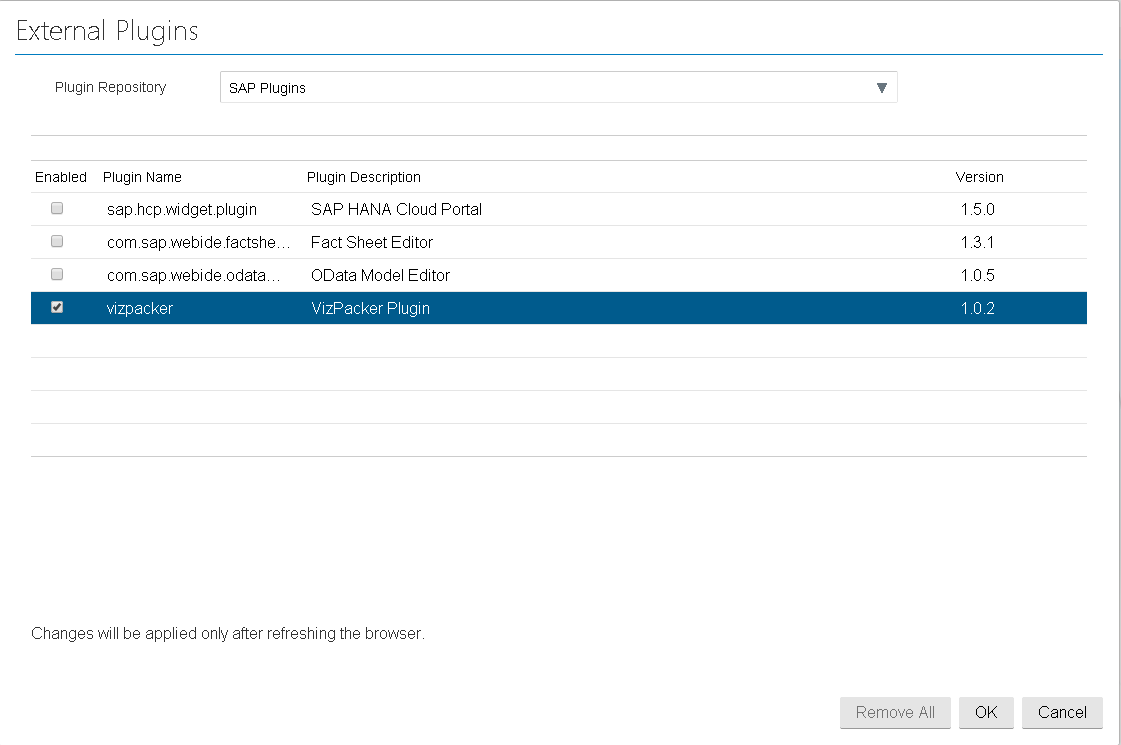
Select the vizpacker plugin, and click OK. Refresh the browser page to apply the changes, and you should now see VizPacker's quick preview button at the top of the right toolbar.

Now you have finished setting up the development environment for VizPacker.
Step 3: Create a Visualization Extension Project
Now we are ready to create our Lumira visualization extension project. Click on File -> New -> Project from Template on the main menu:

You are now prompted with the new project wizard. Choose Visualization Extension from the list of project template, and click Next.

The wizard goes to the next step to set the project name. In our case, let's set it to HelloWorld and click Next.

Now we are at the step to configure the visualization extension's profile, including its name, ID, version and optional informaiton such as company, description, etc. If you are a seasoned Lumira visualization extension developer using VizPacker in the past, at this stage the configuration should ring a bell.

Click Next, and you will be brought to the Layout Configuration step. As we are creating a Hello World extension, we will be using the DIV container rather than the default SVG container. Deselect Title and Legend, as we don't need them in this simple extension.

Click Next, and we are now taken to the Sample Data page. As our Hello World extension will not be based on any data, we are fine with the default sample data.

Click Next, and we can now setup the measure sets and dimension sets based on the sample data. As we are simply going to output a "Hello World" text in this extenion, we will simply click Next and skip this step. I will go into more details on this in my future blogs.

Click Next, and you will hit the confirmation page.

Click Finish. Now it shows the project folder structure, and we can now see the familiar render function open by default:

Step 4: Implement the HelloWorld Extension
Now all we need to do is to add the JavaScript code to output a "Hello World" message. We will do so by appending a <p> element to the container object, which was passed into the render function as an input variable.
Remove the //TODO line in the render function, and add the following lines:
container.selectAll("p").remove(); //First remove any existing <p> element

container.append("p").text("Hello World!"); //Append a new <p> element with the text "Hello World"
By the way, you can use Edit -> Beautify -> Beautify JavaScript ( Ctrl + Alt + B ) to format your JavaScript code. This could come in handy when you would like to indent your code properly, especially helpful for lengthy code.
Save the file by pressing the Save button in the toolbar, and click Refresh in the preview panel. You should now see the "Hello World" message in the preview pane.

Alternatively, you can preview your extension by selecting preview.html in the project folder structure on the left, and click Run in the toolbar. In this way, the preview will show up in a separate window.

Now we have successfully created our first Lumira visualization extension with SAP Web IDE.
Step 5: Pack the Visualization Extension and Deploy to Lumira
The next step is to package the extension and deploy to Lumira Desktop or Server. To do that, click on the Pack button on the toolbar:

You will be prompted by the success message, and the package can be found in the Downloads section of Chrome browser.

If you are going to upload the package to Lumira Server, the package can be used as is. If you would like to try out the package first in Lumira Desktop, follow the instructions below.
Extract the package, and copy the bundles folder to <YourLumiraInstallationDirectory>\Desktop\extensions. Restart Lumria Desktop for the changes to take effect.
Create a Lumira document using any dataset (as our Hello World extension does not really depend on any specific data), and choose the newly-deployed Hello World extension. Add a measure to the measure set, and you should see a "Hello World" message in the Visualize room:.

Now you have created, deployed and consumed your first visualization extension in Lumira Desktop, powered by SAP Web IDE:). Hooray!!
In the next few blogs, I will go through some more complex examples to create Lumira visualization extensions with SAP Web IDE. Stay tuned!
- SAP Managed Tags:
- SAP Lumira
23 Comments
You must be a registered user to add a comment. If you've already registered, sign in. Otherwise, register and sign in.
Labels in this area
-
ABAP CDS Views - CDC (Change Data Capture)
2 -
AI
1 -
Analyze Workload Data
1 -
BTP
1 -
Business and IT Integration
2 -
Business application stu
1 -
Business Technology Platform
1 -
Business Trends
1,658 -
Business Trends
93 -
CAP
1 -
cf
1 -
Cloud Foundry
1 -
Confluent
1 -
Customer COE Basics and Fundamentals
1 -
Customer COE Latest and Greatest
3 -
Customer Data Browser app
1 -
Data Analysis Tool
1 -
data migration
1 -
data transfer
1 -
Datasphere
2 -
Event Information
1,400 -
Event Information
66 -
Expert
1 -
Expert Insights
177 -
Expert Insights
299 -
General
1 -
Google cloud
1 -
Google Next'24
1 -
Kafka
1 -
Life at SAP
780 -
Life at SAP
13 -
Migrate your Data App
1 -
MTA
1 -
Network Performance Analysis
1 -
NodeJS
1 -
PDF
1 -
POC
1 -
Product Updates
4,577 -
Product Updates
344 -
Replication Flow
1 -
RisewithSAP
1 -
SAP BTP
1 -
SAP BTP Cloud Foundry
1 -
SAP Cloud ALM
1 -
SAP Cloud Application Programming Model
1 -
SAP Datasphere
2 -
SAP S4HANA Cloud
1 -
SAP S4HANA Migration Cockpit
1 -
Technology Updates
6,873 -
Technology Updates
422 -
Workload Fluctuations
1
Related Content
- Kyma Integration with SAP Cloud Logging. Part 2: Let's ship some traces in Technology Blogs by SAP
- Experiencing Embeddings with the First Baby Step in Technology Blogs by Members
- Product Updates for SAP Business Application Studio - March 2024 Edition in Technology Blogs by SAP
- Did you know this about Capacity Planning in S/4HANA? in Technology Blogs by SAP
- Unveiling SAP BusinessObjects BI 4.3 SP04 ! in Technology Blogs by SAP
Top kudoed authors
| User | Count |
|---|---|
| 40 | |
| 25 | |
| 17 | |
| 13 | |
| 7 | |
| 7 | |
| 7 | |
| 6 | |
| 6 | |
| 6 |