Objective: Using this document user can create the email distribution list, create dynamic selection variant and Schedule the background Job for which the output will be send to the email ID of distribution list.
· Create Email Distribution list: Log in to SAP and on SAP easy access click on Business workplace.

Click on SAP Business Workplace.

Click on Distribution list.

Select the type of distribution channel list and then click on Create ICON.

Enter the Name, Title and then click ‘F4’ to select the folder.

Here select the existing folder or click on create folder.

Select the existing folder ‘TEST’.

Click on Distribution list content.

Add the email IDs in the list and also select the type To, CC, BCC and then save the list.


· Create dynamic selection variant for Transaction ‘VA05N’ :

Here we will create the dynamic selection variant for document date it should be ‘current date – 3 days’ in from and To field.

Click on Save as Variant.
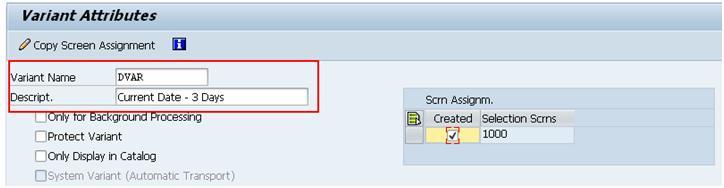

Give the variant name ,description and for the Document Date field Select ‘D’ in the Selection variable and then click on ‘F4’ help in Name of variable column.

Double click on ‘Current date - xxx,current date + yyy’.

Enter ‘3’ in ‘a value for xxx’ and press enter and then ‘SAVE’.

Test the saved variant.

Select the variant ‘DVAR’.

We can see the dates as current date – 3 days.
· Schedule the background Job : SM36

Enter the Job name and click on Step.

Enter the Program Name and Variant and then click on check and save button.

Now click back button.

Click on Spool list recipient to add the email distribution list.

Click on Search help and press ‘F4’.

Select the radio button ‘Distribution list’ and in Find enter the ID of distribution list which we have created the press enter.

Click ‘Copy’.

Now click on ‘Start condition’.
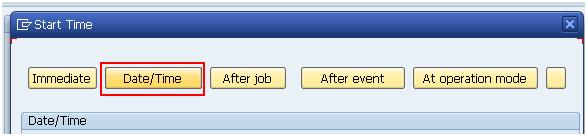
Click ‘’Date/Time’.

Click on ‘Period values’.

Here select ‘Daily’ then check and save.

Enter the start date and time then check and save.

Now click on ‘SAVE’ button.

Now after the job is executed by system we can see the email.

