NOTE: Before beginning, the XLSX Workbench functionality must be available in the your system.
Let's use standard demo report BCALV_GRID_DEMO is available in the every system (the report demonstrates how to use ALV-Grid control). We will export an output table to the Excel based form.
1 PREPARE A PRINTING PROGRAM.
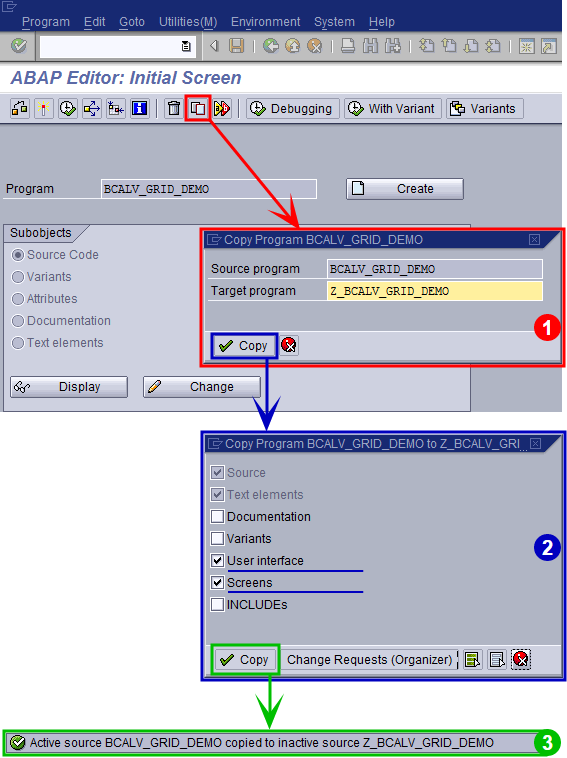
1.1 Copy standard demo report BCALV_GRID_DEMO to the customer namespace, for example Z_BCALV_GRID_DEMO :
1.2 In the copied report, add new button to GUI-status 'MAIN100':

1.3 In the report line number 40, insert next code to processing the new OK-code :

1.4 Activate objects:

2 PREPARE A FORM.
2.1 Launch XLSX Workbench, and in the popup window specify a form name TEST_GRID , and then press the button «Create»:

Empty form will be displayed:

2.2 Push button to save the form.
2.3 Assign context FLIGHTTAB to the form:

Herewith, you will be prompted to create a form's structure automatically (based on context):

We will create form structrure manually,
therefore we should press the button  .
.
2.4 Add a «Grid» component into the Sheet:

2.5 Make markup in the Excel template:

2.6 Select the «Grid» component node and go to the Properties tab:
Select the marked cell range in the Excel-template and press the button  located in the Item «Area in the template»
- Press the button in the Item «Value» and pick the Context Table (FLIGHTTAB) from the popup-list.
Press the button  in the Item «Layout options» and choose columns for output.

2.7 Activate form by pressing button .
.
3 EXECUTION.
Run your report Z_BCALV_GRID_DEMO; ALV-grid will be displayed :

Press button to export Grid to Excel form :

