Message mapping refers to a mapping of messages. When the sender and receiver messages are of different type in an integration flow, then a mapping step is required to transform the sender to receiver message. Hence, Mapping is one of the critical steps in an integration scenario development.
Mapping is supported by a graphical mapping editor. The editor enables you to design a structure mapping between any two XML structures .
Mappings in pre-packaged integration content can be viewed in the SAP Hana Cloud Integration content catalog here. You require SAP SCN user credentials to log in.
In this blog how to create and configure the mapping step in an integration flow is explained.
- To begin with, you have an integration flow configured with the Sender and Receiver
 Figure 1: Integration flow with no Mapping
2. Add Mapping
Figure 1: Integration flow with no Mapping
2. Add Mapping: The Mapping step can be added to the integration flow canvas from the Palette.

 Figure 2: Adding Mapping step to integration flow
You will then be taken into the mapping editor
3. Add Message : Within the editor click on hyper link ‘Add source message’ and ‘Add target message’ to launch the dialog listing existing XSD/WSDL’s available within integration flow or you can upload message you want to use from file system.
 Figure 3: Adding of source and target message in Mapping
4. Model Mapping
Figure 3: Adding of source and target message in Mapping
4. Model Mapping: After adding source and target message within the editor, the next step is to model the mapping
A. Direct Mapping: Drag from source and drop on target field to create direct mapping
 Figure 4: Direct Mapping
On creation of direct mapping, the mapping is show in the mapping expression below.
B. Mapping with Transformation: Transformation can be achieved using the list of inbuilt functions
Let us consider the example of function ‘toUpperCase’. The function can be added by searching for it or by browsing the function palette which categorizes the available inbuilt functions.

Figure 5: Function Palette
Alternatively click on ‘New function’ available source field to add a new function from where we can select the required function by entering a matching text in the filter as shown below.


Then adjust the connection lines to add the function to the mapping.
Figure 6: Adding function from speed button
C. The Meta data of source or target or function can be seen by clicking on ‘i’
 Figure 7: Metadata Information
D. Additional source fields can be added to expression by drag and drop of the source field to target in the mapping editor section above, which adds the field to the mapping expression below
Figure 7: Metadata Information
D. Additional source fields can be added to expression by drag and drop of the source field to target in the mapping editor section above, which adds the field to the mapping expression below
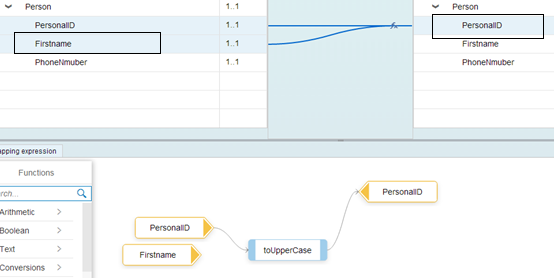 Figure 8: Adding source fields to Mapping Expression
E. Assign constant value to a target field
Figure 8: Adding source fields to Mapping Expression
E. Assign constant value to a target field: If you want to add a constant value to a target field then select ‘Assign Constant’ on target field.
 Figure 9 : Assign Constant to Target
The value can then be entered inline as shown below .

Figure 10: Enter Constant Value
F. The Mapping is saved by clicking ‘Ok’ within editor.
You have now successfully created and configured Mapping step within your integration flow which can be saved and deployed!
Hope you found this blog useful and stay tuned for further updates on Mapping.
In my next blog, i will cover validations and error handling in Mapping.
Try SAP HANA Cloud Integration here.
Useful links:
SAP HANA Cloud Integration – SAP Help Portal Page
http://scn.sap.com/docs/DOC-40396
http://scn.sap.com/blogs/nit/2014/08/17/hana-cloud-integration-hci--an-overvi
SAP HANA Cloud Integration - Test and learn more about SAP’s cloud based integration solution
