
- SAP Community
- Products and Technology
- Technology
- Technology Blogs by SAP
- RaspberryPi on SAP HCP - IoT blog series part 1: S...
Technology Blogs by SAP
Learn how to extend and personalize SAP applications. Follow the SAP technology blog for insights into SAP BTP, ABAP, SAP Analytics Cloud, SAP HANA, and more.
Turn on suggestions
Auto-suggest helps you quickly narrow down your search results by suggesting possible matches as you type.
Showing results for
Advisor
Options
- Subscribe to RSS Feed
- Mark as New
- Mark as Read
- Bookmark
- Subscribe
- Printer Friendly Page
- Report Inappropriate Content
10-15-2014
2:33 PM
As described in the master document for this blog post series, in the first blog post we'll prepare a RaspberryPi so that we can run our next exercises on it.
Table of Contents
Get a Raspberry Pi
So the first thing to do is to get hold of a Raspberry Pi (or Pi as I'll call it from now on). The Pi I'm using is a so called Raspberry Pi revision B with 2 USB ports. The blog post series might also work with the revision A and the revision B+, but I can't test it for now.
I got my Raspberry Pi for Christmas last year so it was an easy experience for me :-).
But you can get Pi's from many vendors.
In addition to the Pi you also need to get
- a power supply with micro USB (5V, minimum of 700mA)
- an SD memory card (8GB, class 4 or higher)
- an ethernet network cable
- an HDMI cable to connect your Pi to a TV
- ideally also a case so your Pi doesn't look too scary for non-techies 🙂
- an USB keyboard, at least for the beginning 🙂
- a digital temperature sensor DS18B20

Get an image
The next thing you need to do is to get an image for your Pi. On the Pi we'll use the Linux OS called Raspian which is in essence a Debian OS which was adapted to run properly fast on a Pi.
I've take the current Raspian image ( Release date 2014-09-09) from the Raspberry Pi download area and downloaded it.
Install the image on your Pi
To install the image just follow the instructions on the corresponding pages from the Raspberry Pi foundation.
Once you have the image on the SD card we go for the next step.
Connecting your Pi
To make it run for the first time go through the following steps
- insert the imaged SD card into your Pi
- connect the ethernet cable with your Pi and your network
- connect the HDMI cable to your Pi and your TV
- connect the USB keyboard to your Pi
- switch on your TV
- as a last step plug in the power supply to your Pi
As a next step you'll watch how the Raspian OS boots-up your Pi and start the configuration tool for Raspian.
The default user is Pi. The default password for that user is raspberry.
Configure your Pi
Follow the instructions provided at the Pi documentation for configuring your Pi.

I've changed my Pi setting for
- Expand filesystem (using the full memory size of my SD card)
- Change password
- Change timezone (adapted to my timezone)
- Change keyboard layout (adapted to the keyboard layout I have on my USB keyboard)
- Hostname (I've set it to rasppirui)
After changing the settings I've clicked on the "Finish" button so that the Pi reboots with the new settings.
You should see also your IP-address (I've masked mine below).

Switching to an SSH connection (optional)
Once you know the IP-address that your Pi fetched from the DHCP server there is no need to use the keyboard and the separate monitor.
Instead you can connect to your Pi via a so called SSH connection. On windows machines you can install tools like putty to get an SSH client.
Linux or Mac systems already have everything in place.
In case you have a Linux or May system (like I do) simply open the terminal application and type-in the following command where aaa.bbb.ccc.ddd is the IP-address that has been assigned to your Pi:
ssh pi@aaa.bbb.ccc.ddd
Confirm the upcoming message by typing the word yes and you are remotely connected to your Pi via an SSH connection.

Setup the proxy (optional)
In case your Pi works behind a proxy you need to configure your Pi accordingly. To setup the proxy for the duration of a session just enter the following commands on your Pi
sudo export http_proxy=http://proxy:8080
sudo export https_proxy=http://proxy:8080
sudo export no_proxy="localhost"
The commands are just an example. In case your proxy is called differently and another port is used you need to adapt the lines above to make it match to your network setup.
Updating the OS
Now we should update the OS to the most current version. To do that you login to your Pi again and enter the following commands:
sudo apt-get update
sudo apt-get upgrade
Depending on the internet bandwith your have this may take a while. Whenever the update asks you if you really want to update just press the y key.
Making your Pi Multi-Location Ready
Once you start working with your Pi and turn it off an on again on various locations you always get into trouble to find out the PIs IP address in the network you are using. To avoid this you can make your Pi send you an email whenever it boots up. With that you can always use an SSH shell to access it remotely without having to connect a keyboard and monitor to it.
There is a nice tutorial at http://elinux.org/RPi_Email_IP_On_Boot_Debian that I've used to accomplish that.
Just follow the steps there and you get an email with the IP address whenever you switch on your Pi and connect it to a network.
Please check if you need to setup the proxy before. Just in case the location you are in is working behind a proxy!
I've created a subfolder called myscripts in the Pi's home folder and stored the file startup_mailer.py in that folder. After that I've adapted the file /etc/rc.local as described in the tutorial and it worked perfectly.

Enable Modules for Sensors
At a later point in time in this blog post series we'll connect an external temperature sensor to our Pi. To be able to use them you need to add 2 modules that are loaded to your Raspberry Pi at boot time. To do that proceed as follows.
Type in
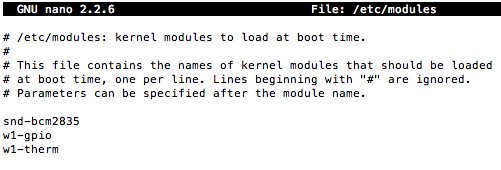
sudo nano /etc/modules
to open the /etc/modules file to edit it.
Now add the following two lines to the file and after that save the file (ctrl + X key and confirm with y)
w1-gpio
w1-therm
You can find out if that worked out fine by rebooting your Pi with
sudo shutdown -r now
and by typing the command
lsmod
to see the list of loaded modules after the reboot. You should see in the output the 2 newly added modules.

Java
We'll also use Java on our Pi in the next blog posts. If you took the Raspian release that I took, Java is already pre-installed on your Pi. You can check it with the following command that should output the installed Java version on your Pi
java -version
In case you are using an older Raspian release just install it with the following command
sudo apt-get update && sudo apt-get install oracle-java7-jdk
Ready to go
Now that we have prepared our Raspberry Pi we can tackle our next challenge to actually send sensor data from our Raspberry Pi to your free developer account on SAP HANA Cloud Platform.
Stay tuned and check out the master document listing all blogs posts of this series around the Raspberry Pi and the SAP HANA Cloud Platform. In the next blog post we'll build an app on your developer account to receive and persist the sensor data.
Best,
Rui
- SAP Managed Tags:
- SAP Business Technology Platform
26 Comments
You must be a registered user to add a comment. If you've already registered, sign in. Otherwise, register and sign in.
Labels in this area
-
ABAP CDS Views - CDC (Change Data Capture)
2 -
AI
1 -
Analyze Workload Data
1 -
BTP
1 -
Business and IT Integration
2 -
Business application stu
1 -
Business Technology Platform
1 -
Business Trends
1,658 -
Business Trends
91 -
CAP
1 -
cf
1 -
Cloud Foundry
1 -
Confluent
1 -
Customer COE Basics and Fundamentals
1 -
Customer COE Latest and Greatest
3 -
Customer Data Browser app
1 -
Data Analysis Tool
1 -
data migration
1 -
data transfer
1 -
Datasphere
2 -
Event Information
1,400 -
Event Information
66 -
Expert
1 -
Expert Insights
177 -
Expert Insights
297 -
General
1 -
Google cloud
1 -
Google Next'24
1 -
Kafka
1 -
Life at SAP
780 -
Life at SAP
13 -
Migrate your Data App
1 -
MTA
1 -
Network Performance Analysis
1 -
NodeJS
1 -
PDF
1 -
POC
1 -
Product Updates
4,577 -
Product Updates
343 -
Replication Flow
1 -
RisewithSAP
1 -
SAP BTP
1 -
SAP BTP Cloud Foundry
1 -
SAP Cloud ALM
1 -
SAP Cloud Application Programming Model
1 -
SAP Datasphere
2 -
SAP S4HANA Cloud
1 -
SAP S4HANA Migration Cockpit
1 -
Technology Updates
6,873 -
Technology Updates
420 -
Workload Fluctuations
1
Related Content
- Astronomy Picture of the Day. With no-code. in Technology Blogs by SAP
- How to troubleshoot SAP BTP OAuth2SAMLBearerAssertion destination with SuccessFactors? in Technology Blogs by SAP
- Set Up the Internet of Things Edge Platform on Raspberry PI in Technology Blogs by SAP
- Raspberry PIへの Internet of Things Edge Platform のセットアップ in Technology Blogs by SAP
- Annotated links: Episode 53 of Hands-on SAP dev with qmacro in Technology Blogs by SAP
Top kudoed authors
| User | Count |
|---|---|
| 37 | |
| 25 | |
| 17 | |
| 13 | |
| 7 | |
| 7 | |
| 7 | |
| 6 | |
| 6 | |
| 6 |