
- SAP Community
- Products and Technology
- Enterprise Resource Planning
- ERP Blogs by Members
- BSI TaxFactory 10 Installation for SQL Server - Pa...
Enterprise Resource Planning Blogs by Members
Gain new perspectives and knowledge about enterprise resource planning in blog posts from community members. Share your own comments and ERP insights today!
Turn on suggestions
Auto-suggest helps you quickly narrow down your search results by suggesting possible matches as you type.
Showing results for
Matt_Fraser
Active Contributor
Options
- Subscribe to RSS Feed
- Mark as New
- Mark as Read
- Bookmark
- Subscribe
- Printer Friendly Page
- Report Inappropriate Content
10-09-2014
11:49 PM
This blog is the continuation from BSI TaxFactory 10 Installation/Upgrade for SQL Server and BSI TaxFactory 10 Installation for SQL Server - Part 2, which collectively covered gathering materials, configuring SQL Server, installing SAP Gateway, creating the TaxFactory database, and installing the TaxFactory server executables. Now we will move on to the TaxFactory web client and loading our dataset, and then in Part 4 we will get it all connected to SAP.
Client Installation
Unlike previous releases, TaxFactory 10 introduces a new web-based client, which requires the installation of a small web server and associated XML files. You will therefore need to install a Java Runtime Environment (JRE), Apache Tomcat web server, Microsoft SQLJDBC driver, and the TaxFactory 10 Client component itself.
Java Runtime Environment
Earlier (in Part 1) you downloaded Oracle Java 7 for Windows 64-bit. You should now have in your Source folder a file named similarly to jre-7u67-windows-x64.exe (the u67 portion may be different if you downloaded a more recent patch). Execute this file. Accept the warning, then on the Welcome screen click on Install. After a moment you should see a success message. Click Close.
To test that the installation was successful, open a command prompt and type java -version. If the JRE is properly installed you should see version information.
Apache Tomcat
Tomcat is a lightweight web server that provides the environment for the TaxFactory web client. Again, you have already downloaded the installation files (in Part 1) to your Source folder, where it will have a name similar to apache-tomcat-7.0.55.exe. Execute this file. Accept the security warning and click Run.
The Apache Tomcat Setup Wizard will start. Click Next. Accept the license agreement by clicking I agree. On the Choose Components page, leave everything at default and click Next.


On the Configuration Options page, leave everything at default (other than optionally checking the box for Create shortcuts for all users) and click Next.


On the Java Virtual Machine page, the wizard should have automatically located the path to your JRE 7 installation. Click Next. On the Choose Install Location page, change the destination folder as appropriate for your software installation standards, or leave it at the default, and click Install. The installation is very quick. When it is done, leave Run Apache Tomcat checked and click Finish. You should briefly see a message about the service starting.
SQLJDBC
Just as the TaxFactory server requires an ODBC driver to connect to the database, so the TaxFactory client, which runs in the Java context of the Tomcat web server, requires a JDBC driver. Earlier (in Part 1) you downloaded the Microsoft JDBC Driver 4.0 for SQL Server and saved it to your Source folder. Extract the contents now.
Create a new folder named sqljdbc_4.0. There are two files you need to copy to this new folder:
- \Source\Microsoft JDBC Driver 4.0 for SQL Server\sqljdbc_4.0\enu\sqljdbc4.jar
- \Source\Microsoft JDBC Driver 4.0 for SQL Server\sqljdbc_4.0\enu\auth\x64\sqljdbc_auth.dll

TF10Client
Earlier (Part 1 again) you downloaded the TF10 Client Package for Windows as a zip file. Extract the contents to create a source folder called TF10ClientInstall. Inside that folder, open TF10ClientInstallation.pdf to find the official installation instructions, and follow along in that document along with this blog to continue.
Execute TF10ClientInstall.exe. Accept the security warning and click Run. Make a note of the functions and prerequisites on the welcome screen and click Next.
Enter the Cyclic password you received from BSI via email and click Next.
Review the license agreement and click I Agree.
On the Configuration Analyzer screen you should note that no prior TF10 Client environments are installed, and that the installer automatically found your Tomcat installation.

If the installer did not find Tomcat, double-check that Tomcat is actually running (it is a Windows service named Apache Tomcat 7.0 Tomcat7). Once your screen looks similar to the above, click Next.
On the XML Server Configuration screen, check the box for 64 bit XML Server and set the appropriate path for installation. I recommend putting this under the same \BSI folder you created earlier for the TaxFactory server executables (in Part 2). Click Next.

As this is the first install on this server, the next screen (BSI TaxFactory 10 Environment Configuration) will read Production Environment Configuration and will have the Install checkbox checked. The screen will be greyed out, because you are required to install one "production" environment on your web server. Don't be alarmed if this is not intended to be "production" but is actually a DEV or QAS system; BSI has set up the client install to allow the installation of multiple environments onto a single web server, but they require PRD to be the first install. My recommendation is to have physically separate DEV, QAS, and PRD servers, which means that BSI will assume a "PRD" environment on each of them. That's ok. Accept the choice here and click Next.

The next screen is probably the most important to get right in this process. This is the "Client Environment" screen. The WEB Server Service Port, WEB Server Service Name, and Database Schema fields will be pre-filled. Do not change these. Under "WEB Server JDBC Configuration / XML Server ODBC Configuration" select the radio button for MS SQL Server.
A pop-up box will ask Does your MSSQL server connection use Windows Authentication? Click Yes.
Now the JDBC JAR file location field will be ready for input (it was greyed out before selecting your DBMS). Click Browse and locate the sqljdbc4.jar file you setup earlier (see "SQLJDBC" in this blog).
Enter the following information into these fields:
- Database Name: TF10
- Database Port: 1433
- Database Host: <your database/taxfactory server hostname>
- DSN: <select the ODBC Data Source you set up earlier (in Part 2), i.e "TFP" or the SID for your Gateway (if you followed my recommendation)>
When you are done, your screen should look similar to this:

Click Next. If all went well, you will see a popup stating Successfully tested ODBC connection and schema for DOMAIN/sidadm. Click OK.
The next screen is TaxFactory XML Server Configuration for MSSQL Windows Authentication. Here you must supply the username and password that the TaxFactory XML server will use to connect to the database. It will default to your currently logged-on user, which at this point is probably sidadm (tfpadm in our example). This is fine to use, as long as the password is set to never expire.
Browse to the path for sqljdbc_auth.dll that you setup earlier (again, in "SQLJDBC" in this blog). When you are done, your screen should look similar to this:

Click Next.
The next five screens are for adding additional environments (DEV, QA, Test1, Test2, and Test3) to the server. You don't need to do that, at least not at this time. Leave the Install button cleared (the default) on each of them and click Next until you come to the confirmation screen:

Check the checkbox for Install PRD Environment(s) and click FINISH. The installation will take a minute or two and will start some services. When it is done you should see Setup was completed successfully and Completed. Click Close.
Load Data Set
Now it's time to launch the client. Switch to your workstation and start your web browser. Navigate to http://hostname.domain.com:8091/eTF10d/PRD, substituting your taxfactory server's hostname. If you are on a newer Cyclic than 10.0.d, use the appropriate cyclic name in place of eTF10d. Logon to the client with:
- User: TF10
- Password: bsi
Create Data Set
After logging on, you will see the following screen:

Click on the DEFAULT Data Set ID to connect to it. This is necessary before you can navigate to any other screen in the client.
In the upper right corner, locate the Jump To drop-down box and select System Tools.

Under Access Tools, select Manage Data Set.

Under Manage Data Sets, above the list of available Data Sets, click the link for Click here to add new Data Set.

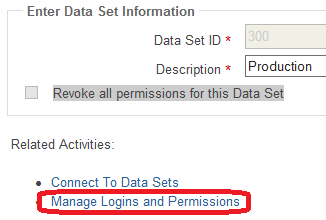
Under Enter Data Set Information, enter your SAP payroll client number as the Data Set ID and a description of your choice. Select the checkbox for Apply default permission to this Data Set and click Save.

Back at the Manage Data Sets screen, click on your new Data Set to configure it.

Under Related Activities, select Manage Logins and Permissions.
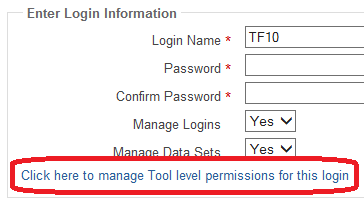
Select the TF10 login (the one in caps).

Select Click here to manage Tool level permissions for this login.
On the Permissions screen, for Permission for Dataset, select your new Data Set and click Refresh.

Scroll to the bottom of the page, select Check All, then Save, then Exit.

Back on the Manage Logins screen, click Manage Data Set, then Connect to Data Sets. Click on your new Data Set to connect to it. Now notice in the lower right (at the right end of the copyright text bar) that your Data Set should be listed as the one that you are connected to.

Install License
Earlier (in Part 1) you created a Machine Key on the BSI website and downloaded it as a file. Now it's time to apply that to your TaxFactory database.
In the Jump To drop-down in the upper right corner, once again select System Tools. Under Database Tools, select Install Machine Key.

Browse to the file you saved (default name is machinekey.lic) and click Upload. After a second or two you should see the message License Key has been installed successfully. If there is an error here, ensure that you correctly entered the hostname on the BSI website when you created the key (including using all caps for a Windows hostname). Also note that the machine key is only valid for installation for a period of five days after creation on the BSI website, so if it has been longer than that, you will need to regenerate the key. Otherwise, click Exit.
Load Tax Master File
Back in Part 1 you downloaded a master file with the latest Cyclic and Regulatory data from BSI. This file will have a name similar to TFU10034.PKG (where 034 indicates the Regulatory, or TUB, level of the file). Using this file enables you to bypass having to separately load the latest Cyclic and every Regulatory bulletin, instead loading it all in one step for initial setup. After this, when BSI releases new Cyclic and Regulatory bulletins, you will apply those normally.
Back on the System Tools page, under Database Tools, select Database Load. Browse to your tax master file and click Upload. On the Database Load screen that pops up, select the checkbox next to tf.xml and click Process.

This load will likely take about five minutes. If it appears to happen quickly, it's best to wait several minutes, as it is probably still loading in background. Normally, however, you will see an IN PROGRESS message while the load is happening. When the load is finished there will be an output file with an audit of the results. Look through the log to see that all records were processed (all zeroes for the second number in each row). When satisfied, click Exit twice.
Back on the System Tools page, under Maintenance Tools, note that the level numbers for Regulatory Bulletin and Cyclic have advanced to the current status (previously they were 0).

Optional: TaxLocator File
Not all states and not all organizations use TaxLocator, but if you do, now is the time to load the TaxLocator file from BSI, using the same procedure as the tax master file.
Load Initial Tax Mapping
The Initial Tax Mapping is a file provided by SAP, not BSI, which provides a mapping between SAP tax codes and BSI tax codes. You downloaded this file in Part 1 from the same location as the SAP TUB files. After extraction, you should have the file BTXTAXC.xml on your workstation.
Note: if you are performing an upgrade and using a Custom Backup and Restore from your TF9 database, you do not need to perform this step, as this data will be contained in the backup/export from TF9. For an initial install, or if you are choosing a 'clean' install of TF10 rather than upgrading, then you will need this file.
On the System Tools page, under Database Tools, select Custom Backup/Restore. On the Custom Backup/Restore page, select Restore. Select your BTXTAXC.xml file and press Upload.
On the Custom Data Restore page that follows, select the radio button for Existing Data Set and choose your new Data Set. Do not select Delete Existing Data nor Restore Permission (Rights). Click Process.
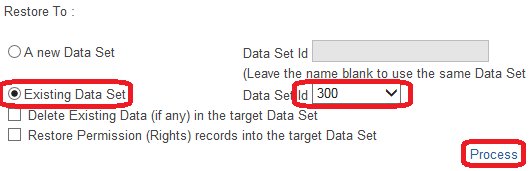
The restore should take less than a minute. Again, when done there will be an output audit file. Verify that there were no unprocessed records, then click Exit four times.
You should now be back at the Welcome screen. Under System Summary you will notice that where previously you had zero mapped tax codes, now you will have several thousand. You may also see a handful of unmapped authorities. This is normal.
<continued at BSI TaxFactory 10 Installation for SQL Server - Part 4>
- SAP Managed Tags:
- HCM Payroll
17 Comments
You must be a registered user to add a comment. If you've already registered, sign in. Otherwise, register and sign in.
Labels in this area
-
"mm02"
1 -
A_PurchaseOrderItem additional fields
1 -
ABAP
1 -
ABAP Extensibility
1 -
ACCOSTRATE
1 -
ACDOCP
1 -
Adding your country in SPRO - Project Administration
1 -
Advance Return Management
1 -
AI and RPA in SAP Upgrades
1 -
Approval Workflows
1 -
ARM
1 -
ASN
1 -
Asset Management
1 -
Associations in CDS Views
1 -
auditlog
1 -
Authorization
1 -
Availability date
1 -
Azure Center for SAP Solutions
1 -
AzureSentinel
2 -
Bank
1 -
BAPI_SALESORDER_CREATEFROMDAT2
1 -
BRF+
1 -
BRFPLUS
1 -
Bundled Cloud Services
1 -
business participation
1 -
Business Processes
1 -
CAPM
1 -
Carbon
1 -
Cental Finance
1 -
CFIN
1 -
CFIN Document Splitting
1 -
Cloud ALM
1 -
Cloud Integration
1 -
condition contract management
1 -
Connection - The default connection string cannot be used.
1 -
Custom Table Creation
1 -
Customer Screen in Production Order
1 -
Data Quality Management
1 -
Date required
1 -
Decisions
1 -
desafios4hana
1 -
Developing with SAP Integration Suite
1 -
Direct Outbound Delivery
1 -
DMOVE2S4
1 -
EAM
1 -
EDI
2 -
EDI 850
1 -
EDI 856
1 -
edocument
1 -
EHS Product Structure
1 -
Emergency Access Management
1 -
Energy
1 -
EPC
1 -
Financial Operations
1 -
Find
1 -
FINSSKF
1 -
Fiori
1 -
Flexible Workflow
1 -
Gas
1 -
Gen AI enabled SAP Upgrades
1 -
General
1 -
generate_xlsx_file
1 -
Getting Started
1 -
HomogeneousDMO
1 -
IDOC
2 -
Integration
1 -
learning content
2 -
LogicApps
2 -
low touchproject
1 -
Maintenance
1 -
management
1 -
Material creation
1 -
Material Management
1 -
MD04
1 -
MD61
1 -
methodology
1 -
Microsoft
2 -
MicrosoftSentinel
2 -
Migration
1 -
MRP
1 -
MS Teams
2 -
MT940
1 -
Newcomer
1 -
Notifications
1 -
Oil
1 -
open connectors
1 -
Order Change Log
1 -
ORDERS
2 -
OSS Note 390635
1 -
outbound delivery
1 -
outsourcing
1 -
PCE
1 -
Permit to Work
1 -
PIR Consumption Mode
1 -
PIR's
1 -
PIRs
1 -
PIRs Consumption
1 -
PIRs Reduction
1 -
Plan Independent Requirement
1 -
Premium Plus
1 -
pricing
1 -
Primavera P6
1 -
Process Excellence
1 -
Process Management
1 -
Process Order Change Log
1 -
Process purchase requisitions
1 -
Product Information
1 -
Production Order Change Log
1 -
Purchase requisition
1 -
Purchasing Lead Time
1 -
Redwood for SAP Job execution Setup
1 -
RISE with SAP
1 -
RisewithSAP
1 -
Rizing
1 -
S4 Cost Center Planning
1 -
S4 HANA
1 -
S4HANA
3 -
Sales and Distribution
1 -
Sales Commission
1 -
sales order
1 -
SAP
2 -
SAP Best Practices
1 -
SAP Build
1 -
SAP Build apps
1 -
SAP Cloud ALM
1 -
SAP Data Quality Management
1 -
SAP Maintenance resource scheduling
2 -
SAP Note 390635
1 -
SAP S4HANA
2 -
SAP S4HANA Cloud private edition
1 -
SAP Upgrade Automation
1 -
SAP WCM
1 -
SAP Work Clearance Management
1 -
Schedule Agreement
1 -
SDM
1 -
security
2 -
Settlement Management
1 -
soar
2 -
SSIS
1 -
SU01
1 -
SUM2.0SP17
1 -
SUMDMO
1 -
Teams
2 -
User Administration
1 -
User Participation
1 -
Utilities
1 -
va01
1 -
vendor
1 -
vl01n
1 -
vl02n
1 -
WCM
1 -
X12 850
1 -
xlsx_file_abap
1 -
YTD|MTD|QTD in CDs views using Date Function
1
- « Previous
- Next »
Related Content
- FP2402 New Installation in Enterprise Resource Planning Q&A
- Quick Start guide for PLM system integration 3.0 Implementation/Installation in Enterprise Resource Planning Blogs by SAP
- SAP ERP Functionality for EDI Processing: UoMs Determination for Inbound Orders in Enterprise Resource Planning Blogs by Members
- SAP Business One 10.0 New Installation in Enterprise Resource Planning Q&A
- Redwood RMJ Architecture, Integration and Interface review with SAP S/4 HANA and ECC Job execution. in Enterprise Resource Planning Blogs by Members
Top kudoed authors
| User | Count |
|---|---|
| 2 | |
| 2 | |
| 2 | |
| 2 | |
| 2 | |
| 2 | |
| 2 | |
| 2 | |
| 1 | |
| 1 |