


- SAP Community
- Products and Technology
- Additional Blogs by Members
- Data Services - Installation and Configuration
Additional Blogs by Members
Turn on suggestions
Auto-suggest helps you quickly narrow down your search results by suggesting possible matches as you type.
Showing results for
Former Member
Options
- Subscribe to RSS Feed
- Mark as New
- Mark as Read
- Bookmark
- Subscribe
- Printer Friendly Page
- Report Inappropriate Content
09-16-2014
10:18 AM
Pre Installation Steps
Take the necessary screen shots for the configuration of below mentioned items after the installation of BODS.
- Job Server Details(Repositories that are associated with job server)
- Access Server Details
- Data Management Console Details
- List of users to be added in the Data Management Console
- List repositories to be added to the Data Management Console
- List of Scheduled batch Jobs
- List of Real-Time jobs
- List of jobs to be added in Web Services
- Other configurations that need to be performed
DI Installation Steps
- Copy the Data Services software from the path to the existing server and then start the installation.
- Start the installation by running the setup.exe. After the "Welcome" screen is displayed, click Next to begin your installation.

- Agree to the license terms by selecting I accept the license Agreement. Click Next to continue.

- Enter the Full name, organization and product key code. Click Next to continue.

- Enter the Product Key for Data Integration Premium
- Enter the Product Key for Data Quality Management Premium - Enter the Product Key for Universal Data Cleanse - Select the path to install the software in destination folder. Click Next to continue.
- Select all features to install. Click on the topmost down arrow next to “Data Services” and select “Entire feature will be installed on local hard drive” so that all the features in the tree will be selected. After selecting click Next to continue.

- Click on “Skip Configuration”, in case you already have a repository database available for your environment. This will automatically skip the “Job server” configuration as well, which we can manually do after installation.

- Click the Next button to continue with the Service Login Information. Check the option Use a service account and click the Next button to continue.
- User Name: <user-name>
- Password: <password>
- Skip the “Access Server” configuration as well, which we can do manually do after installation.

- Click Next to select the web application server.
- Select “Install Tomcat application server” option to install Tomcat on the same server where BODS is installed. The war files will be deployed as part of the installation.

- We shall then copy the war files and deploy them manually in the Weblogic server, after completion of installation.

- Click Next to finalize the installation. The list of programs and services to be installed are displayed. Check all the details and then click Next to Continue.
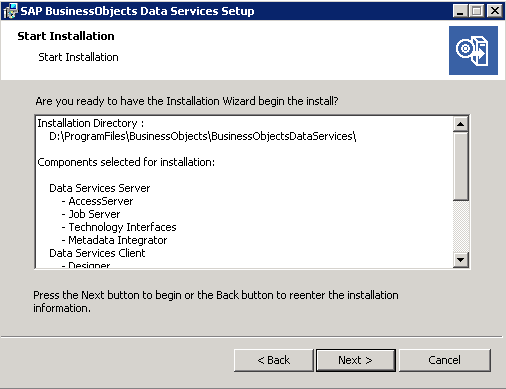
- Click the Next button to start the SAP BODS installation. After successful installation of SAP Business Objects Data Services reboot the server, to reflect configuration changes.

- Click Finish to exit installation. Next Restart the System to configure BODS installation.
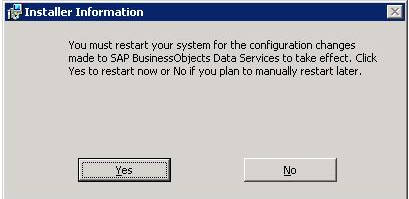
- Click Yes. After machine restart do the initial validation to check the SAP BODS Services and Programs installed. Click Start then All Programs, next check the SAP BODS Installed programs.

- Install DS service pack SP2.

- Then install the DS fix pack version
Note: Once installation has been completed and restarted the server, open the Command Prompt with “Run as Administrator”, go to the DS installation folder and run the below commands one by one to register the OCX files in the “Registry”. Otherwise Data Services Designer will not work.
- REGSVR32.EXE BODataView.ocx
- REGSVR32.EXE BODiffCtrl.ocx
Configuring Job Server & Access Server
- Open Data Services Server Manager -> Click on “Edit Job Server Config” -> Click on Add and provide the Job Server configuration as below. Job Server name: <Name of Job Server> Job Server port: 3500
Enable both the check boxes
Communication Port: 4001
- Click on “Add” button at the bottom and add a repository to the job server. Provide an existing repository details at the right hand side and click on “Apply”.
 Note: The above screen shot is to add the repository associated with the MS SQL Server. Depending on the back end database associated,
we need to provide the corresponding details. - Follow the same procedure to add the repositories to the job server and click on Ok. The added repositories appear on the left side, as shown below.

- Click on Ok twice and click on “Edit Access Server Config” to add a new Access server.
- Click on Add and provide the below details
Directory: D:\ProgramFiles\BusinessObjects\BusinessObjectDataServices\bin\DS_AS_<ENV>_<Name>
Note:The folder structure might differ depending on the acceptance of the server installing. The spaces present in the path might need to be removed if the system does not accept the path while installing the DI software.

- Click on Ok twice and configure SMTP by providing the details, and click on Apply.
- The screen looks like this:
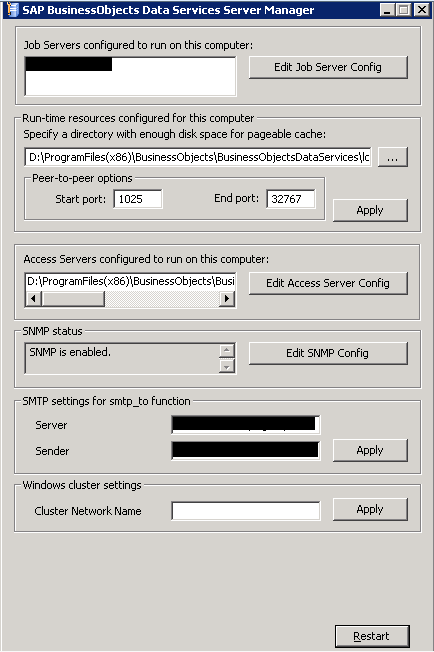
- Click on Restart to submit the Job server and Access server configurations. This will take few minutes and the window closes automatically.
Test Case:
- Open the Data services Designer for successful login to repository (Database Server Name).
- Check whether Data services Server Manager is working.
- Check whether Data services repository Manager is working.
Data management Console configuration on Weblogic Server Deploy DS on Weblogic
- Browse to: “D:\ProgramFiles\BusinessObjects\BusinessObjects Enterprise 12.0\java\applications” in the BODS installation server.
- Copy DataServices.war, Doc.war & webservice.war from above location and paste them to D:\BOEAPPS on the Weblogic Server.
- Create a new domain in the Weblogic Server.
- Create the DI Installation folder structure in the 😧 drive of WebLogic server. D:\ProgramFiles\BusinessObjects\BusinessObjectDataServices
- Create 2 folders under the above mentioned directory.
- conf
- ext
Note: Once we deploy the war files using Weblogic admin Console, "admin.xml" file gets created under this directory in conf folder once we launch the Data Management Console. The repository and user details of Management Console gets stored in this file.
- Log in to admin server console in Weblogic server and go to “Deployment” tab and click on Install.
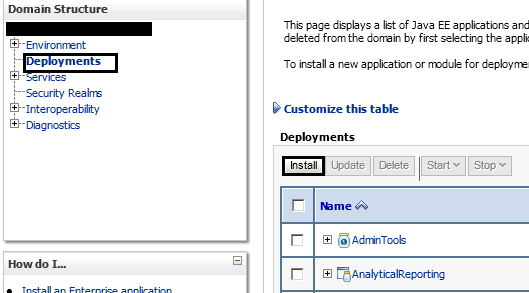
- Now you have to enter the path in which the .war files are present. Now click next so that it will display the files present in the path. Now select the radio button DataServices.war. Click Next to continue.

- Select the Radio Button “Install this deployment as an application” and click next to continue.

- Now select the deployment target by checking the box <Domain Server>. Click next to continue.

- Keep the default settings & click Finish.

- Now the confirmation screen appears, select the radio button “No, I will review the configuration later” cross verify the details and click on finish.

- Now go to “Deployment” section and check the status of the application you have installed. It has to be in “Active” state. Some war files take longer than the others to install, so please be patient.

- Now double click on the application that has been installed to open the settings of the application. Now go to “Testing” tab and take the url to access the application.
Note: To access the Data Services Management Console, use admin as user name and password to generate the admin.xml file for the first time.
Test Case:
Make sure that the Data Management Console is running with the link provided in the testing tab.
Add a repository to the console, then restart the Weblogic server and check if the configuration still remains in the console.
| Sl. No. | Test Cases |
|---|---|
| 1 | Create a sample workflow/Dataflow and validate them |
| 2 | Create a datastore and import tables |
| 3 | Create a new job in Designer using job server |
| 4 | Validate and Execute the new job in the Designer using job server |
| 5 | Execute the Job using Data Management Console using job server |
| 6 | Add DEV & QA Central repository in the Designer |
| 7 | Export the objects to Central repository(Check out/check in) |
| 8 | Import the objects from Central reposity(get latest version) |
| 9 | Export the objects to ATL files(Backup) |
| 10 | Schedule the jobs in Data Management Console |
| 11 | Add the users to data management console and check the login access |
| 12 | Enable and start the real-time services in data management console |
| 13 | Check the configuration of data management console which should replicate the old DM Console |
| 14 | Restart Job/Access Servers through Data Service Server manager |
| 15 | Creation of local repository using Data Services Repository Manager |
5 Comments
Related Content
- How to configure odata Service to be readonly for technical user in Technology Q&A
- How to configure Custom SAPUI5 app to Fiori launchpad in S/4 HANA 2022 on premise? in Technology Q&A
- Kerberos Error when task "deploy" from db-deployer in Technology Q&A
- Quick Start guide for PLM system integration 3.0 Implementation in Product Lifecycle Management Blogs by SAP
- SAP Document and Reporting Compliance - 'Colombia' - Contingency Process in Technology Blogs by SAP