The Cloud Data Source is a great new feature in Cloud for Customer since 1405 version.
It allows the SAP customer to create a custom data source (aka table or persistent storage) to hold custom data for reporting, that is outside of the normal SAP data source. You no longer need the Cloud Studio to do this.
I will describe a step-by-step approach to create a custom data source, and upload manually. In our example, we want a database table to hold the forecasted sales for an account. So we want fields Account ID, Forecasted Sales Quantity. The system then add
1. In the C4C system, select the work center Business Analystics->Design Data Source.
2. Select New->Cloud Data Source.

3. It will show a screen to define the Custom Data Source. We will start simple.
- For the DataSource ID, the name has to start with a "Z"
- For Manual Data Upload, we will check this box to allow manual upload by CSV files
- In the Data Source Fields, you can add the fields you want.
- For fields of type Quantity, it will automatically add a related field (re=uses our field name, but adds "_UNIT" to specify the Unit of Measure

Then click Save.
Congratulations - You have a custom Cloud Data Source (CDS) !
So now, how do we get data in this CDS ? There are 2 ways. This blog will cover the first method - doing manual data upload from a CSV file. The 2nd method is using web services which I will save for another time.
Most likely you will have an Excel file of data ready.
1. Make sure the Excel is edited to match the columns, and change the column name to match the CDS field names
2. In Excel, save the file as .CSV file. If you can save the file using the SAP standard delimiter of semi-colon ";", that would be best. IMPORTANT.
You CAN still use comma as a delimiter - that can be specified during import.
3. This is an example of what the input file would look like:

All text values should have quotes.
Units of measure and currency should be specified using the ISO standards as defined in C4C.
4. To load the data file, click on Data->Upload

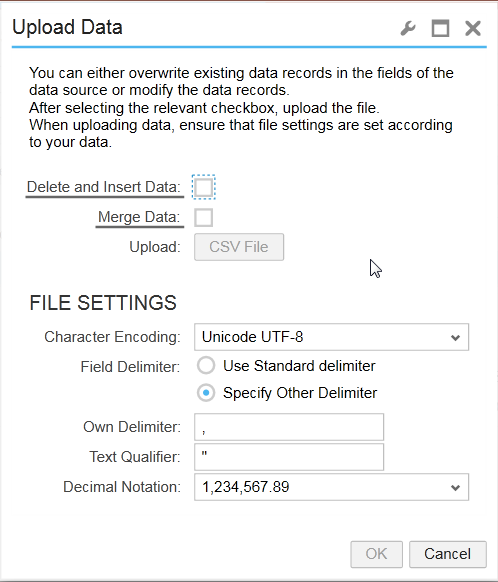
5. It will prompt you for import settings.
Notes:
a. Delete and Insert Data is a destructive import. It will clean out your BO before inserting. BE CAREFUL.
b. The CSV button is activated when you select Delete and Insert Data or Merge Data option. Select your input file to import.
c. When you pick standard delimiter, C4C expects a semi-colon (;) as the delimiter. You can specify a comma as an alternative.
Be careful when you use comma and fields with amounts formatted with commas. That's why SAP used the default of semi-colon.
Click OK when settings are selected and you want to start Import.
6. Once imported, you can click on Preview to see the data import.

If it's the first time doing Preview, all the columns will be in "Not Currenly Shown". Simply take some of those columns, and move to Rows.
Once you are finished designing that report to validate your import, I recommend you save it as a permanent report to be used for future.

Well, there it is. You have imported data into your custom data source now. Enjoy!
If you found this blog to be helpful, please be sure to click 5 stars, share or leave comments below.
