
- SAP Community
- Products and Technology
- Enterprise Resource Planning
- ERP Blogs by Members
- Creation of CO Reports in Report Painter by Modify...
Enterprise Resource Planning Blogs by Members
Gain new perspectives and knowledge about enterprise resource planning in blog posts from community members. Share your own comments and ERP insights today!
Turn on suggestions
Auto-suggest helps you quickly narrow down your search results by suggesting possible matches as you type.
Showing results for
Aniket_D
Active Participant
Options
- Subscribe to RSS Feed
- Mark as New
- Mark as Read
- Bookmark
- Subscribe
- Printer Friendly Page
- Report Inappropriate Content
08-23-2014
12:27 PM
Many a times due to business requirements user requests for an enhancement in available standard SAP reports. The information about standard reports and process to create a new report using standard report is available at various places on forum in bits and pieces. However one might end up spending a good amount of time in understanding the process, especially inexperienced consultants in CO domain. This document details out the process to enhance the standard CO reports in report painter to meet various business requirements.
The process is explained by considering the standard report 1SIP-001 (Transaction S_ALR_87013611). The standard report displays the actual and plan figures for a cost center area or a cost center along with variance. The limitation of the standard report is that it could display values of only one plan version at a time. As indicated in below screen multiple selections for Plan Version is not available.

A business requirement is to generate a report with values for different Plan Versions. One can always execute standard report multiple times by providing different Plan Version values in selection. This process is not user friendly. It is easier to enhance the standard report to meet the requirement to display values for different plan versions in single execution.
Step 1 – To identify Standard Report for enhancement
Information about Library and Report Group of standard report is available under main menu of report selection (Transaction S_ALR_87013611) > Environment > Technical Information. The library for standard report (Transaction S_ALR_87013611) is 1VK and report group 1SIP

In transaction GR53 identify the reports assigned to report group 1SIP. The report assigned is 1SIP-001.
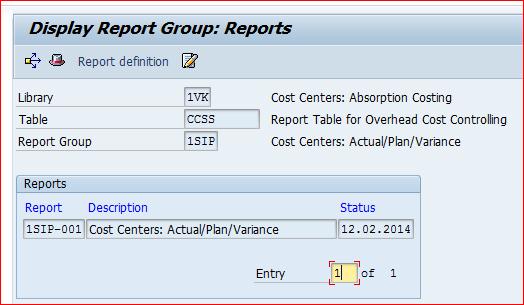
In transaction GRR3 under Library 1VK identify how standard report is defined. Row model and column values can be identified with double click on respective fields.

Step 2 – To create a custom report based on standard report
To create a custom report based on standard report, in transaction GRR1, provide custom report name and Library and select "Create" button

In next screen, report description can be added.

Click on the row 1 and go to Edit > Rows > Inset row model and Select 1-LM-BEL-ENT Cost element: Deb/Cred as indicated below

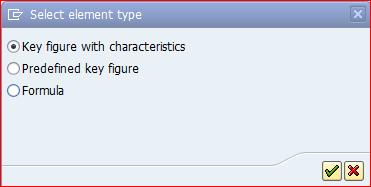
Click on first column to add column for actuals, select Key figure with characteristics option

Select basic key figure as “Cost” and Value Type – 4 for Actuals

Select Version 0, check and confirm

Provide short, long and medium text for column (Shift+F1)

Click on second column to add column for plan values. Select Key figure with characteristics option
Select Characteristics “Cost” as follows, Value type as “1” and Version “0” check and confirm and provide short, long and medium text for column (Shift+F1)

Click on third column to add column for Absolute variance. Select formula option and provide formula as below. Provide short, long and medium text for column (Shift+F1)


Click on fourth column to add column for Relative variance. Enter formula as follows.

Similarly insert new elements for Plan Version 1 as below

Absolute Variance for version 1

Relative variance for version 1

Insert element for Plan Version 2 similar to Plan Version 1 with version as 2 in Element definition

Insert element for Absolute Variance2 and Relative Variance2, provide appropriate values in formula similar to Absolute Variance 1 and Relative Variance 1.
For Actal value, Plan value, Absoulte Variance, Relatvie Variance of version 0,1,and 2 report layout will be as follows. Report layout can be modified as per requirement.

Report selection can be designed as below by selecting Edit > Gen. Data Selection. Save the report once report selection and report columns are designed.

Step 3 – To assign form report to report group
In transaction GR51, create a new report group in Library 1VK

Provide appropriate description

Select report tab to assign newly created report to the report group. Under reports newly created report (CCPLAN1) will be available for selection in F4. Save created group.

Step 4 – Report execution
Report group can be executed using transaction GR55. A transaction code can also be created and assigned to report.

Report can be executed, by providing cost center group or values also cost element group or values

Data for all plan versions 0, 1 and 2 is available with single execution. One can add more versions to the report as per requirement.

Step 5 – Transport Report and Report Group
If report is to be created in development environment and then moved to production environment then same can be achieved by standard transaction.
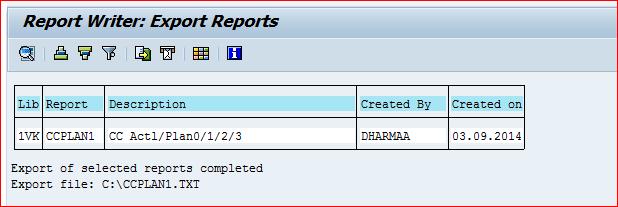
Export report from development system using transaction GR37, Enter Library and report name, Provide path to presentation server and execute

On next screen select the report and execute

File for report is exported to presentation server.
Export report group from development system using transaction GR57. Enter Library and Report Group and provide path to presentation server and execute

On next screen select the report and execute

File for report group is exported to presentation server.

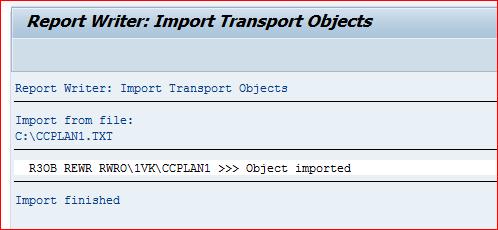
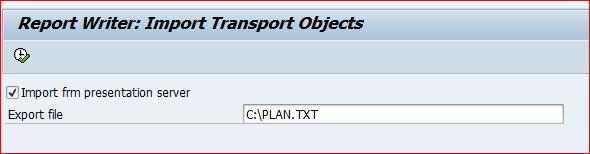
In Production or higher systems, report can be imported using transaction GR38. Provide a path to file on presentation server in selection and execute

Report is imported
Report Group can be imported using transaction GR58. Provide a path to file on presentation server in selection and execute
Report Group is imported

Report and report groups can also be moved to higher systems by creating a transport using transaction GCTR

Limitations –
1) Plan version field is not available as a selection parameter
2) The drilldown option to get actual line items and other details in standard reports is not available in custom report
- SAP Managed Tags:
- FIN Controlling
7 Comments
You must be a registered user to add a comment. If you've already registered, sign in. Otherwise, register and sign in.
Labels in this area
-
"mm02"
1 -
A_PurchaseOrderItem additional fields
1 -
ABAP
1 -
ABAP Extensibility
1 -
ACCOSTRATE
1 -
ACDOCP
1 -
Adding your country in SPRO - Project Administration
1 -
Advance Return Management
1 -
AI and RPA in SAP Upgrades
1 -
Approval Workflows
1 -
ARM
1 -
ASN
1 -
Asset Management
1 -
Associations in CDS Views
1 -
auditlog
1 -
Authorization
1 -
Availability date
1 -
Azure Center for SAP Solutions
1 -
AzureSentinel
2 -
Bank
1 -
BAPI_SALESORDER_CREATEFROMDAT2
1 -
BRF+
1 -
BRFPLUS
1 -
Bundled Cloud Services
1 -
business participation
1 -
Business Processes
1 -
CAPM
1 -
Carbon
1 -
Cental Finance
1 -
CFIN
1 -
CFIN Document Splitting
1 -
Cloud ALM
1 -
Cloud Integration
1 -
condition contract management
1 -
Connection - The default connection string cannot be used.
1 -
Custom Table Creation
1 -
Customer Screen in Production Order
1 -
Data Quality Management
1 -
Date required
1 -
Decisions
1 -
desafios4hana
1 -
Developing with SAP Integration Suite
1 -
Direct Outbound Delivery
1 -
DMOVE2S4
1 -
EAM
1 -
EDI
2 -
EDI 850
1 -
EDI 856
1 -
edocument
1 -
EHS Product Structure
1 -
Emergency Access Management
1 -
Energy
1 -
EPC
1 -
Financial Operations
1 -
Find
1 -
FINSSKF
1 -
Fiori
1 -
Flexible Workflow
1 -
Gas
1 -
Gen AI enabled SAP Upgrades
1 -
General
1 -
generate_xlsx_file
1 -
Getting Started
1 -
HomogeneousDMO
1 -
IDOC
2 -
Integration
1 -
learning content
2 -
LogicApps
2 -
low touchproject
1 -
Maintenance
1 -
management
1 -
Material creation
1 -
Material Management
1 -
MD04
1 -
MD61
1 -
methodology
1 -
Microsoft
2 -
MicrosoftSentinel
2 -
Migration
1 -
MRP
1 -
MS Teams
2 -
MT940
1 -
Newcomer
1 -
Notifications
1 -
Oil
1 -
open connectors
1 -
Order Change Log
1 -
ORDERS
2 -
OSS Note 390635
1 -
outbound delivery
1 -
outsourcing
1 -
PCE
1 -
Permit to Work
1 -
PIR Consumption Mode
1 -
PIR's
1 -
PIRs
1 -
PIRs Consumption
1 -
PIRs Reduction
1 -
Plan Independent Requirement
1 -
Premium Plus
1 -
pricing
1 -
Primavera P6
1 -
Process Excellence
1 -
Process Management
1 -
Process Order Change Log
1 -
Process purchase requisitions
1 -
Product Information
1 -
Production Order Change Log
1 -
Purchase requisition
1 -
Purchasing Lead Time
1 -
Redwood for SAP Job execution Setup
1 -
RISE with SAP
1 -
RisewithSAP
1 -
Rizing
1 -
S4 Cost Center Planning
1 -
S4 HANA
1 -
S4HANA
3 -
Sales and Distribution
1 -
Sales Commission
1 -
sales order
1 -
SAP
2 -
SAP Best Practices
1 -
SAP Build
1 -
SAP Build apps
1 -
SAP Cloud ALM
1 -
SAP Data Quality Management
1 -
SAP Maintenance resource scheduling
2 -
SAP Note 390635
1 -
SAP S4HANA
2 -
SAP S4HANA Cloud private edition
1 -
SAP Upgrade Automation
1 -
SAP WCM
1 -
SAP Work Clearance Management
1 -
Schedule Agreement
1 -
SDM
1 -
security
2 -
Settlement Management
1 -
soar
2 -
SSIS
1 -
SU01
1 -
SUM2.0SP17
1 -
SUMDMO
1 -
Teams
2 -
User Administration
1 -
User Participation
1 -
Utilities
1 -
va01
1 -
vendor
1 -
vl01n
1 -
vl02n
1 -
WCM
1 -
X12 850
1 -
xlsx_file_abap
1 -
YTD|MTD|QTD in CDs views using Date Function
1
- « Previous
- Next »
Related Content
- Building Low Code Extensions with Key User Extensibility in SAP S/4HANA and SAP Build in Enterprise Resource Planning Blogs by SAP
- Sales order line item rejected even though MTO Production order has CNF and DLV status (Strategy 82) in Enterprise Resource Planning Q&A
- Quick Start guide for PLM system integration 3.0 Implementation/Installation in Enterprise Resource Planning Blogs by SAP
- Print customer specific inspection plan results on Outbound Certificate of Analysis in SAP QM in Enterprise Resource Planning Q&A
- FAQ on Upgrading SAP S/4HANA Cloud Public Edition in Enterprise Resource Planning Blogs by SAP
Top kudoed authors
| User | Count |
|---|---|
| 2 | |
| 2 | |
| 2 | |
| 2 | |
| 2 | |
| 2 | |
| 2 | |
| 2 | |
| 1 | |
| 1 |