
- SAP Community
- Products and Technology
- Technology
- Technology Blogs by SAP
- SAP Lumira Cloud with Data Service Enabled - Part ...
Technology Blogs by SAP
Learn how to extend and personalize SAP applications. Follow the SAP technology blog for insights into SAP BTP, ABAP, SAP Analytics Cloud, SAP HANA, and more.
Turn on suggestions
Auto-suggest helps you quickly narrow down your search results by suggesting possible matches as you type.
Showing results for
Former Member
Options
- Subscribe to RSS Feed
- Mark as New
- Mark as Read
- Bookmark
- Subscribe
- Printer Friendly Page
- Report Inappropriate Content
07-31-2014
1:31 AM
In this article you will find the discussion about:
- The business needs of data service for cloud BI application
- The Basic data upload workflow of SAP Lumira Cloud using HCI
- Advanced workflow using enhanced HCI upload settings
The business needs of data service for cloud BI application
As of today, there are two major ways of getting data into SAP Lumira Cloud.
- User can log on SAP Lumira Cloud, click the Create Dataset button and then choose a local CSV file or Excel spreadsheet to create a dataset
- User creates a dataset on Lumira desktop, and then publishes the dataset to cloud
Now the data is on the cloud, you can create story boards and share with others. However, is there a scalable way for you to refresh the data so you and the people who you shared the dataset with can always access the up to date data?
Let’s look at a typical scenario here. As a business user, you created a story board on SAP Lumira Cloud based on your company’s sales data and share the story board to your team. Meanwhile, your company maintains all business data (e.g. sales transaction data, employee data) in the company database, which could be an ERP system, a Hana DB or a cloud system. With new data coming in regularly, how to you send the data from the company database to SAP Lumira Cloud so the content of your story board is always kept up to date?
As a business user, you have lots of datasets to maintain for updating your story boards. Do you want to delegate the task to some more IT oriented users go gain more efficiency?
SAP Lumira Cloud is now introducing a data service integration feature for enterprise license users to fulfill the business needs. The integration is with a SAP Hana application called Hana Cloud Integration (HCI).
The SAP Lumira Cloud and HCI integration provides basic INSERT type of data upload workflow. It also provides advanced workflow with enhanced HCI upload settings, which supports advanced features such as UPSERT (insert and update), filtering desired data, etc. The target key user is an IT Admin type of user who is trained to use both SAP Lumira Cloud’s admin feature and HCI. The feature is for enterprise license user of SAP Lumira Cloud only, and we assign the data upload responsibility to team admins.
The basic data upload workflow of SAP Lumira Cloud using HCI
In the basic workflow, we will use the SuccessFactors database as the source data.
Pre-requisite: End user has created a story based on an initial dataset on SAP Lumira desktop application. The user published the story and its associated dataset to SAP Lumira Cloud. Note that alternatively the user can create a dataset on SAP Lumira Cloud directly. To run the integration workflow, there are also some initial setup steps (such as agent and datastore) to be done in the HCI application, please refer to the video here for details.
In this particular example, the story is called Employee Analysis. Its original dataset has around 10 rows of records only.

Here is the end to end workflow,
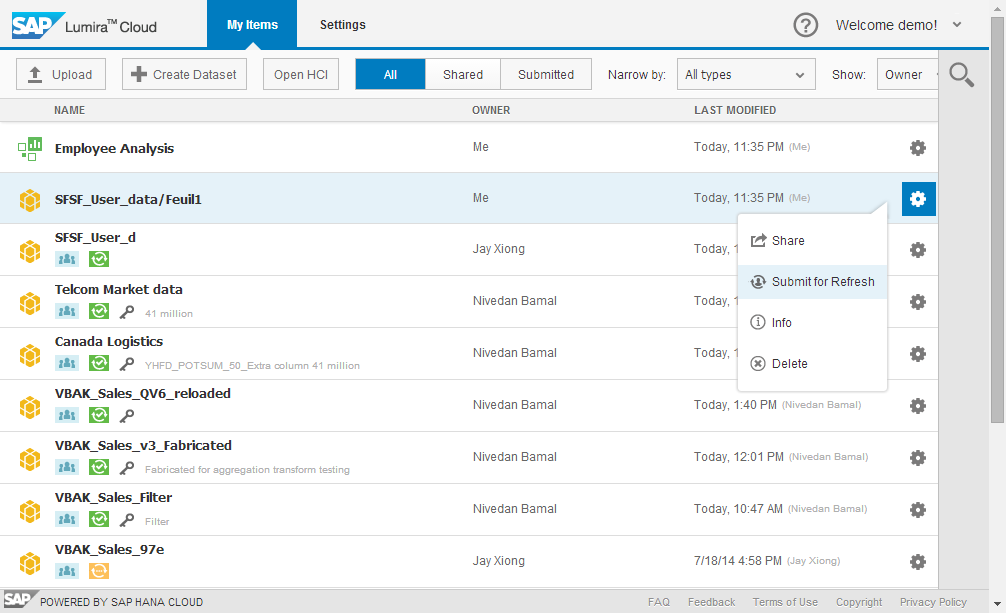
- As the end user, log on SAP Lumira Cloud; find the dataset (called “SFSF_User_data”) from My Items list. Select “Submit for Refresh” from the dataset’s action menu.
2. In the submission dialog, enter the data refresh requirements

3. As team admin, log on SAP Lumira Cloud to start working on the data refresh workflow.
Note, when the end user submitted his/her dataset for refresh, the team admin will receive an email containing end user’s detailed requirements.
The submitted dataset will appear under the Submitted tab of both end user and team admin. The orange icon of this submitted dataset indicates a data refresh request has been submitted, and the job is pending on the team admin for following up.

4. As team admin, log on to the HCI application. (Clicking on the Open HCI button will open the HCI logon screen and will navigate user to there)
As team admin, create a task to upload the data from the source to the target.
Note: Before the team admin can create and run a task, some essential setup in HCI needs to be done. For example, user needs to create HCI agent that runs the task, create source datastore that connects to the source database, and create target datastore that connects to SAP Lumira Cloud. For details, please refer to HCI’s user guide at SAP’s help portal.

5. Follow the wizard to go through the task creation workflow.
First, define a name for the task.

In the next step, select a source datastore. In our example, the user chooses SuccessFactors.

Then select a target datastore. In our example, it is an instance of SAP Lumira Cloud.

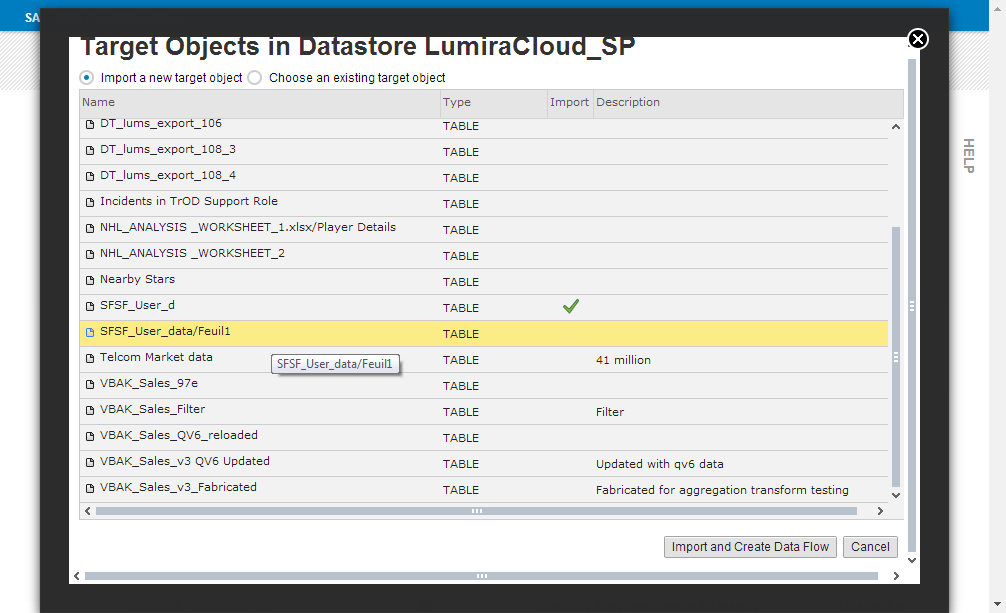
After the datastores are selected, user needs to select the target dataset to be refreshed.

The application will prompt to ask user to choose the dataset to be imported. If you have imported datasets before, you can choose an existing one, or you can import a new dataset if it has not been imported.
The next step is to define the data flow from the source to the target. Again, you need to define a name for this data flow. At this step, you will be offered an option to delete old data that are in the target dataset. Don’t select this option if you just want to append your data from the source to the end of your existing target dataset.

When you hit the OK button, you will be led to the Edit Data Flow screen. It presents you a chart like data flow where you need to drag and drop the source table, and connect the flow visually.


Double click on the Target_Query icon to open the column mapping screen.

Note: As the company’s IT admin user, you are supposed to know both your source and target data well so that you can do the correct mapping.
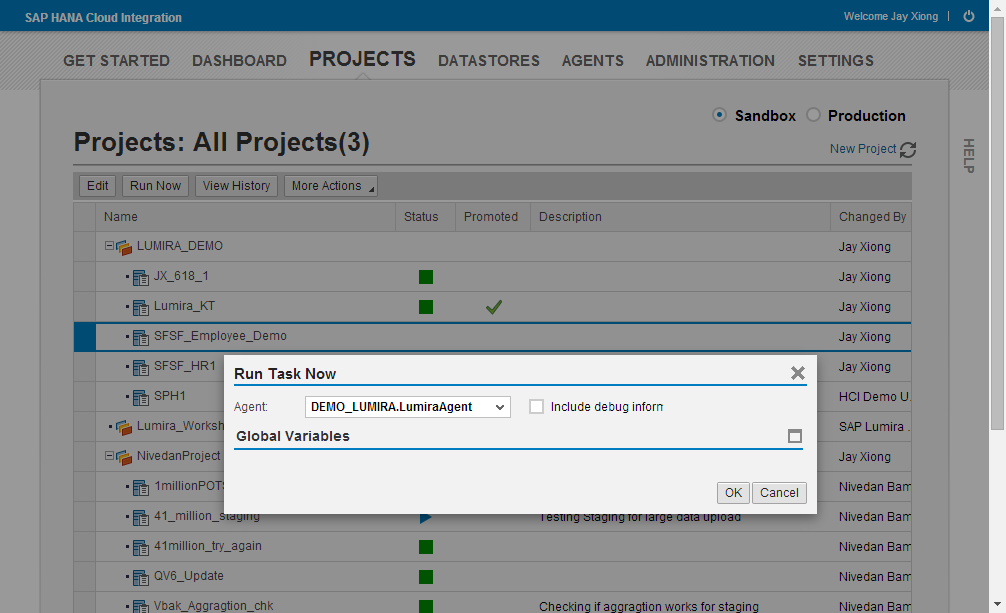
6. Close the above screen, as team admin now you can run the task.
Go back to the PROJECTS screen, find the task you just created, and click the Run Now button from the button row. You will be asked to select an Agent to run the task, or you can click OK directly to let HCI pick a default agent for you.
When the task is running, you can monitor its status. To see details, select the task, click the View History button. If a task runs successfully, it will show a green icon as blow.

The task status is returned to Lumira Cloud. As the team admin, you go back to SAP Lumira Cloud, and then you can find the orange icon under the previously submitted dataset has turned green. The last refreshed time stamp has also been updated.

Meanwhile, as the end user, you can also find the status of your submitted dataset has been updated. (Note: please refresh your screen to see the update)

Now as the end user, if you open the story that was created based on this dataset, you can find the story is showing updated data (...a lot more data points and new values).

Now we have completed the introduction to the basic data uploading workflow. To continue with the advanced work flow, please check out the second blog - SAP Lumira Cloud with Data Service Enabled - Part 2.
- SAP Managed Tags:
- SAP Lumira
8 Comments
You must be a registered user to add a comment. If you've already registered, sign in. Otherwise, register and sign in.
Labels in this area
-
ABAP CDS Views - CDC (Change Data Capture)
2 -
AI
1 -
Analyze Workload Data
1 -
BTP
1 -
Business and IT Integration
2 -
Business application stu
1 -
Business Technology Platform
1 -
Business Trends
1,661 -
Business Trends
87 -
CAP
1 -
cf
1 -
Cloud Foundry
1 -
Confluent
1 -
Customer COE Basics and Fundamentals
1 -
Customer COE Latest and Greatest
3 -
Customer Data Browser app
1 -
Data Analysis Tool
1 -
data migration
1 -
data transfer
1 -
Datasphere
2 -
Event Information
1,400 -
Event Information
64 -
Expert
1 -
Expert Insights
178 -
Expert Insights
273 -
General
1 -
Google cloud
1 -
Google Next'24
1 -
Kafka
1 -
Life at SAP
784 -
Life at SAP
11 -
Migrate your Data App
1 -
MTA
1 -
Network Performance Analysis
1 -
NodeJS
1 -
PDF
1 -
POC
1 -
Product Updates
4,577 -
Product Updates
326 -
Replication Flow
1 -
RisewithSAP
1 -
SAP BTP
1 -
SAP BTP Cloud Foundry
1 -
SAP Cloud ALM
1 -
SAP Cloud Application Programming Model
1 -
SAP Datasphere
2 -
SAP S4HANA Cloud
1 -
SAP S4HANA Migration Cockpit
1 -
Technology Updates
6,886 -
Technology Updates
403 -
Workload Fluctuations
1
Related Content
- Annotation in SEGW in Technology Q&A
- It has never been easier to print from SAP with Microsoft Universal Print in Technology Blogs by Members
- Can a user log on to the BTP Build Workzone (standard edition) with UN + PW instead of SSO? in Technology Q&A
- odata url accessibility in Technology Q&A
- Unable to log in to SAP BusinessObjects CMC in Technology Blogs by Members
Top kudoed authors
| User | Count |
|---|---|
| 13 | |
| 10 | |
| 10 | |
| 7 | |
| 7 | |
| 6 | |
| 6 | |
| 5 | |
| 5 | |
| 4 |