
- SAP Community
- Products and Technology
- CRM and Customer Experience
- CRM and CX Blogs by Members
- How to customize Excel import template (example fo...
CRM and CX Blogs by Members
Find insights on SAP customer relationship management and customer experience products in blog posts from community members. Post your own perspective today!
Turn on suggestions
Auto-suggest helps you quickly narrow down your search results by suggesting possible matches as you type.
Showing results for
Former Member
Options
- Subscribe to RSS Feed
- Mark as New
- Mark as Read
- Bookmark
- Subscribe
- Printer Friendly Page
- Report Inappropriate Content
07-28-2014
2:09 PM
The goal of this blog post is to detail how you can customize a standard Import Excel file from Cloud for Customer using the example of Marketing Leads.
A lot of the explanations are inspired from an old document Support referred to when I asked for some information. It was slightly different as it was meant for ByDesign but still relevant.
Also I did not see anything in the Help Guide. There are some steps detailed to replace the Templates themselves but not to adapt them with your own fields.
Before we start, you will need to have the C4C add-in installed and enabled of course as import templates need it. You can get it by heading to the Download section of your solution.
Since the Excel file is using an XML structure for the import templates generated by C4C, you will need to add the “Developer” tab in your ribbon. To do so just follow these quick steps: http://office.microsoft.com/en-001/excel-help/show-the-developer-tab-HA101819080.aspx
You will also need to have a Zip Tool like 7-zip, WinRar, WinZip… your preferred one. We will “unpack” the XLSX file retrieved from C4C and then we will need to repack it. It works exactly like a ZIP file, no surprises.
Finally, you will need to be able to edit an XML file. I personally am using Notepad++, but any editor will do of course even the classic Notepad.
Summary of steps to perform
- Download the Import Template from the relevant Work Center directly and unzip it;
- Find out which A2X Web Service is the Import Template using;
- Add the required extension fields in the A2X Web Service;
- Retrieve the Technical Field Name and the Namespace for these fields (you can get these in the A2X WSDL file);
- Edit the /xl/xmlMaps.xml file to add the fields in the XML structure;
- Repack the XLSX and open the file in Excel;
- Edit your import template using the new fields available in the XML structure;
- (Optional) Update the import template in C4C (Application and User Management > Business Flexibility > Microsoft Office Template Maintenance) – This is not covered in this blog as there already is a good guide in the Help Center.
Download the original Import Template
It is quite straightforward, just make sure that in your Scoping you have activated the feature, and then head to the Work Center for which you want to retrieve the import template and check the cogwheel menu for “Import from Microsoft Excel”.

Once you have downloaded your file, just right click on it and try unzipping it with your favorite tool:

Once it is unzipped, check the folder “xl” for the file “xmlMaps.xml”. This file will be very import for the next steps, you can open it using Notepad++ for instance or your favorite XML/Text Editor.

This file contains the XML structure used by Excel and the SAP C4C AddIn to build your request to the server and perform the import task. It is calling the A2X Web Service to do that and you will find traces of it in “xmlMaps.xml”.
For instance, look for “OfficeIntegrationConfiguration” without quotes. It will show you the few steps in the XML used to determine the web service, like “ManageMarketingLeadIn” in this case. You can get yours by checking what is in the <Name> tag.

So no we already have 2 important pieces: the “xmlMaps.xml” file and the A2X Web Service.
Add the required extension fields in the A2X Web Service
You would perform this step as you would usually do for any A2X Web Service if you are familiar with this.
You just have to head to the Work Center (Marketing Leads for me here), switch to “Adaptation Mode” and then “Edit Screen”. This step can also be performed in the HTML5 client.
Open your “Extension Fields” details as shown below and highlight the field you want to add in your Import Template and click on “Further Usage”.

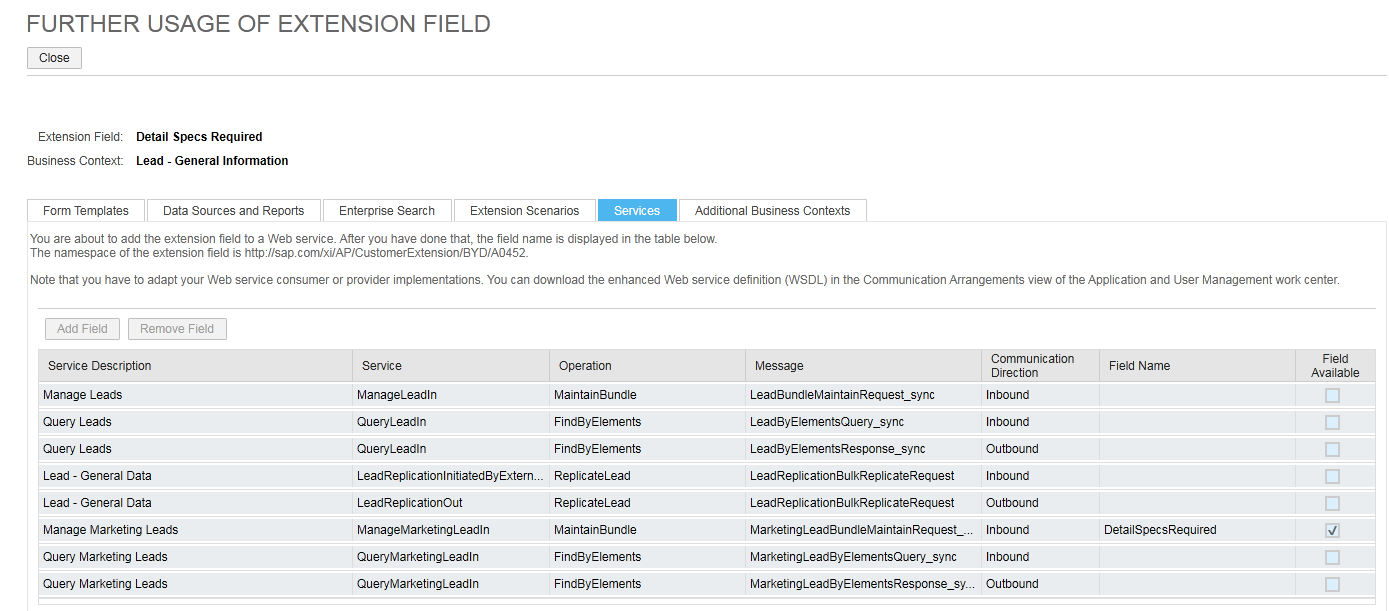
In there, you will head to the tab “Services” to add the field to the A2X Web Service. Select the proper one in the list and click on “Add Field”, it is saved automatically. You will want to save 2 other information: the namespace as shown in the small header above the table “http://sap.com/xi/AP/CustomerExtension/BYD/A0452” and the Field Name generated for the Web Service as shown in the table “DetailSpecsRequired” for instance here. These will be important when updating the XML structure. Please note that the namespace will most probably be the same for all your extension fields.
If you are looking for adding standard fields, you will need to download the A2X Web Service WSDL first and check in it if the fields are available. If they are you can simply go ahead and check their technical names in the WSDL file. If you need some guidance for this, don’t hesitate to post in the comments and I can share more details.

Edit the xmlMaps.xml structure file
This part can be tedious depending on how familiar you are with XML structure. If this is one of the first times for your using XML files, try not to be intimidated by the size of the file and we are just going to perform minimal changes. Again my steps here will describe what I did for the Marketing Leads, if you are customizing another file and need some help do not hesitate to post in the comments section.
The first thing that we will want to do is to add the field in the structure itself. Search for the name of the A2X Web Service and the first result should give you a similar view. You should see the list of available fields in the XML structure just below. You can read different <xs:element> tags with names like UUID, ID, Name, QualificationLevelCode etc.
There are different levels as you can see below. The metadata level will be used by the AddIn to put in the Update Date and Time and the Status received when performing the action. You will generally focus on the level just below named “MarketingLead” here which will next the other header elements like Name, Firstname, Lastname, Company etc. In my example we are adding a field at this level.
As a side note, the property minOccurs will define if this is a mandatory field or not for the structure. If you put it to 1, you will have to have an entry in it in your Excel file when running the import. The other property maxOccurs should be set to 1 as well as shown below, only in very rare and complex occasions you would want multiple entries which I will not describe here.

We are now going to add one line to reflect the Extension Field we added in the A2X Web Service and want to use in the import process.
Copy one of the <xs:element> lines, for instance the one with the name “CompanyName”. You will want to perform 3 changes on this one: “minOccurs” should be set to 0 as the extension field is not mandatory, “name” should be set to “DetailSpecsRequired” to reflect the name of the extension field and the type should be set to “tns:Indicator”.

Why Indicator? This field was created as a Checkbox which is also known as Indicator. It means that in the Excel file it will have to be filled with “TRUE” or “FALSE” (without quotes).
Another type could be “xs:String” which will actually work for most of your fields, like dropdowns or even indicators. The only problem here is that you have to make sure that you are filling the cell in Excel during the import with a data that C4C can read for your extension field. For instance, in our case here, the extension field is an indicator. If I set it to a String type, and put “TRUE” as the value it would fail. I would need to use 0 or 1 as a value instead.
Bottom line, your mileage may vary and you are more than encouraged to test things out here. I haven’t found any official documentation but maybe someone found one to complete the part about element types here.
We have now to update a second part of the XML structure in order to make the field fully work. Look for “MaintainBundle” and you should fall in the same area as you did when you were looking for the A2X Web Service name earlier. Below that, you will find a tag called “Transformations” which will process the information from Excel to format the Web Service Query and send the data to your C4C tenant. We will want to add a simple piece of code for each field that we created. There can be some logic implied in here but I will not cover that simply because I don’t know anything about that, again I haven’t found any documentation so I’m happy to point to any links you might have found and that would be relevant here or include your comments.

Just above:

We will add a simple piece:

Copy/Paste friendly:
<xsl:template match="DetailSpecsRequired">
<xsl:element namespace="http://sap.com/xi/AP/CustomerExtension/BYD/A0452" name="DetailSpecsRequired">
<xsl:value-of select="."/>
</xsl:element>
</xsl:template>
This code will basically just tell the file to look for the field “DetailSpecsRequired” in the namespace stated. You will have to edit this code with your field name and your namespace.
Save your XML and done.
Repack the XLSX
Easy step so you can go grab a coffee or a tea real quick. Just head back to the root of your initial extract, select all your files and zip them all.

You will have a new ZIP file created, just change the extension to XLSX and open it in Excel!
Edit the Excel template with your new fields
Now that your file is in Excel, open it and head to the “Developer” tab in the Ribbon. Click on “Source”, a right panel will appear with the XML Structure, you can check that your field has been added properly by checking the SAP_BYD_MAIN mapping from the dropdown.

If you have an error when trying to display the SAP_BYD_MAIN mapping you might want to recheck your XML structure file and make sure all the field names are properly etc. If nothing worked maybe share your issues to find out what could be the problem.
If everything is good we will now want to add the Field to the Table in Excel so you can add data to it. For this you will first create a new column in the worksheet wherever you want in the table (not at the end as there are some hidden columns used for technical stuff), in the example above I’ve created it as the column F.
Name it the way you want so your users know what this is about, and then simply take the field from the right and drag and drop it on the column header. If everything is fine whenever you select a field name that is in bold on the right it means that it has been mapped in the Excel and will highlight where the mapped data is. Check that it is the case with your new field.

And you are done! After that, just save your new XLSX, give it a test of course by using the AddIn as usual (Log On then Save Data after adding information in the table) and check that your fields are correctly populated.
As mentioned at the beginning, I will not explain how to update the template so that this is this file that is being downloaded when your users are getting it from C4C. There already is a full documentation on this, simply search for “Maintain Microsoft Excel Templates” in the Help Center and you will find it.
- SAP Managed Tags:
- SAP Cloud for Customer add-ins
22 Comments
You must be a registered user to add a comment. If you've already registered, sign in. Otherwise, register and sign in.
Labels in this area
-
ABAP
1 -
API Rules
1 -
CRM
1 -
Custom Key Metrics
1 -
Customer Data
1 -
Determination
1 -
Determinations
1 -
Introduction
1 -
KYMA
1 -
Kyma Functions
1 -
open SAP
1 -
Sales and Service Cloud Version 2
1 -
Sales Cloud v2
1 -
SAP
1 -
SAP Community
1 -
SAP CPQ
1 -
SAP CRM Web UI
1 -
SAP Customer Data Cloud
1 -
SAP Customer Experience
1 -
SAP Integration Suite
1 -
SAP Sales Cloud v2
1 -
SAP Service Cloud v2
1 -
SAP Service Cloud Version 2
1 -
Service Cloud v2
1 -
Validation
1 -
Validations
1
Related Content
- SAP Hybris Marketing: Customer Data Upload in CRM and CX Questions
- SAP Commerce Cloud Q1 ‘24 Release Highlights in CRM and CX Blogs by SAP
- SAP CPQ - User Interface Design in CRM and CX Blogs by Members
- SAP CPQ with DocuSign - Standard vs Custom Integration in CRM and CX Blogs by SAP
- Campaign Build - Segmentation Best Practice in CRM and CX Blogs by SAP