
- SAP Community
- Products and Technology
- CRM and Customer Experience
- CRM and CX Blogs by Members
- ABAP Reports on Web UI
CRM and CX Blogs by Members
Find insights on SAP customer relationship management and customer experience products in blog posts from community members. Post your own perspective today!
Turn on suggestions
Auto-suggest helps you quickly narrow down your search results by suggesting possible matches as you type.
Showing results for
Former Member
Options
- Subscribe to RSS Feed
- Mark as New
- Mark as Read
- Bookmark
- Subscribe
- Printer Friendly Page
- Report Inappropriate Content
07-17-2014
9:30 AM
ABAP Reports Links on Web UI
Introduction
One of the most common requirements especially when the client is using SAP CRM is the ability to execute ABAP Reports on the Web UI screen.
The purpose of the document is to brief on the step-by-step approach to achieve the above requirement.
The Custom Reports can be made available on the Web UI screen:
- Through a Direct Link
- Creating a new Work center
1.0 Logical System Mapping:
This the first step in achieving our requirement.
Before using the Transaction Launcher, SAP ITS (Internet Transaction Server) has to be configured with or without local ITS. The scope of the current document is only setting up SAP ITS using Local ITS.
- Go to TCode: CRMS_IC_CROSS_SYS
- Enter Mapping & Logical System Name
- Logical System Name - System in which the GUI transactions have to be executed on Web UI
- Please check if the authorization to change the entries in Production is existing. Else,
- the entries has to be made for Production System and transported
- Configure Transaction Launcher in Quality & Production environment (not recommended)
- Set 'Local ITS' checkbox

Create BOR Object (SE80)
- Copy Standard BOR Object TSTC

2. For the newly created BOR
- Under Method EXECUTE: Set 'Synchronous'

3. Change to status of the object to 'Implemented' (EDIT)
4. Generate the object

Transaction Launcher
1. Start the Transaction Launcher wizard using the below path
SAP IMG > Customer Relationship Management>UI Framework>Technical Role definition>Transaction Launcher>Configure Transaction Launcher
2. Give a name to the Transaction Launcher ID

3. Give a Description & CLASS Name
- The new Class will be created

4. Select the values
- Transaction type : BOR
- Logical System
- BOR Object Type: BOR object copied from TSTC
- Method Name: EXECUTE

Direct Link on the Screen
1. Go to Navigation Bar:
SAP IMG>Customer Relationship Management>UI Framework>Technical Role definition>Define Navigation Bar Profile
OR
Go Tcode: CRMC_UI_NBLINKS
2. Define Logical Links:
- Type: Launch Transaction
- Target ID: EXECLTX
- Parameter: Transaction Launcher ID
- Parameter Class: CL_CRM_UI_LTX_NAVBAR_PARAM
- Title: Title of the Link
- Description

3. Create Direct Link Group
- Group Type: Reports
- Title
- Description

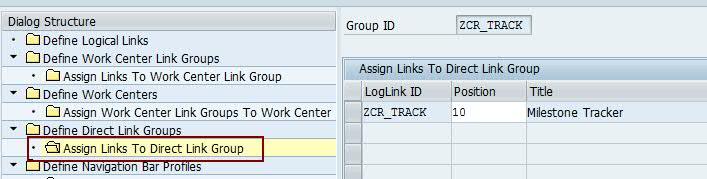
4. Assign the new Logical Link to the Direct Link Group created
5. Assign the new Direct Link Group to the Navigation Bar Profile


6. Use the below path to go to 'Define Business Role'
SAP IMG>Customer Reslationship Management>UI Framework>Business Roles>Define Business Role
7. Select the Business Role and double click on 'Adjust Direct Link Group'

8. Select the Direct Link Group created in the previous step and double click on 'Adjust Direct Links'
- Set the 'Visible' checkbox and Save.


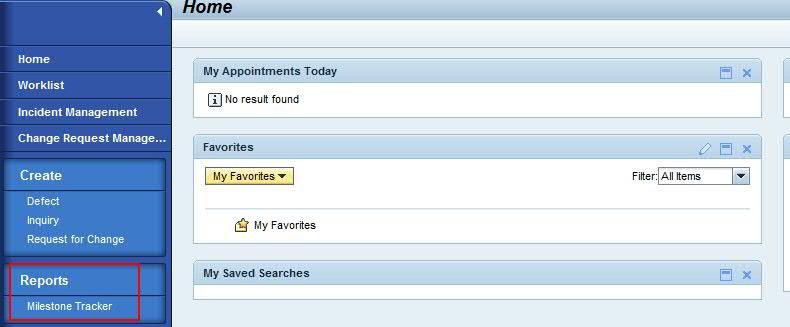
9. The link will be visible on the Navigation Part in the Web UI Screen.
Report Links in New Work Center
To create a new custom work center, a new Z* Component has to be created and modified.
1. Create a new BSP Component
- Create a new Z* Component (TCODE: BSP_WD_CMPWB) or copy from a standard component.
2. Create an Overview Page
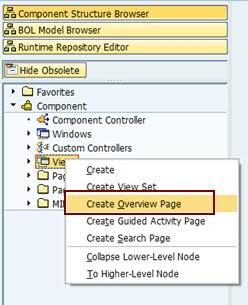
3. Go to Runtime repository Editor
- Add View under the Window
- Select the Overview Page created in the previous step

- Create an Inbound Plug 'DEFAULT'


4. Right click on Component Interface & Add Interface View

- Select the MainWindow (Inbound plug created & View added in the previous step) as the Interface View

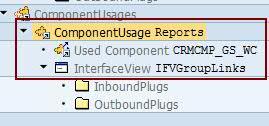
5. Add Component Usage and give a name (e.g. Reports)

6. Add Interface View to the Component usage created
- Used Component: CRMCMP_GS_WC
- Interface View: IFVGroupLinks
7. Right-Click on ViewSets and add View Set
- Select the Overview Page created

7. Right-click on the viewset and add the View Area

8. Right-click on the View Area and select the Component Usage added in the previous step (Reports.IFVGroupLInks).

9. Component Controller Method: WD_USAGE_INITIALIZE
- Enhance / Modify the code in the Component Controller method WD_USAGE_INITIALIZE as follows:


10. Go to the Configuration tab of the Overview Page created
- Select the Component & move it to the required columns & give a appropriate name:


11. To get the Header on the Web UI screen after navigating to the Work Center created
- Enhance the following method
- Populate the value into the variable 'DESCRIPTION':


Now we have a new component which will hold our custom Work Center. All we need now is to create the Work Center and assign the Logical links.
12. Go to the following path & add the new Component created
SAP IMG>Customer Relationship Management>UI Framework>Technical Role Definition>Define Work Area Component Repository
- Go to 'New Entries' & Add the new Component and the Window Name
- Select the new entry & click on 'Inbound Plug Definition'
- Enter a name for Target ID & the Inbound Plug 'DEFAULT' created under the Interface view in the Component

13. Go to the Navigation Bar Profile (TCODE: CRMC_UI_NBLINKS)
14. Create a new Logical Link:
- LogLink ID
- Type: Work center
- Target ID: Created in the previous steps
15. Define Work center Link Groups
16. Select the Work Center link group & click on 'Assign Links to Work Center Link Group'
- The Links created (using Transaction Launcher) for each Reports will be available under this Work Center Group
- Assign the Logical Links (of type Launch Transaction) defined in the previous steps
17. Define Work Center
18. Assign the Work Center Link Groups to the Work Center:
19. Assign the Work Center to the Navigation Bar Profile as required:
20. Go to 'Define Business Role
21. Adjust the Links for the Business Role:
- Select the Business Role and Click on 'Adjust Work Centers'
- Ensure that the work center created is not 'Inactive'
22. Go to 'Adjust Work Center group Links' and ensure that the 'Visible' is checked
- If the requirement includes to provide a menu list on the Work center, check 'Menu':
23. CRM Home Page
- Go to the CRM Home Page & select the Business Role to which the links have been assigned
- New Work Center 'Reports' will be available with the 'Menu' option
- Go to 'Reports' work center
- The links to the ABAP Reports will be available
Picture: Pic_final (Attachment)
Thanks & Regards,
Prasanna
- SAP Managed Tags:
- SAP Customer Relationship Management
13 Comments
You must be a registered user to add a comment. If you've already registered, sign in. Otherwise, register and sign in.
Labels in this area
-
ABAP
1 -
API Rules
1 -
c4c
1 -
CRM
1 -
Custom Key Metrics
1 -
Customer Data
1 -
Determination
1 -
Determinations
1 -
Introduction
1 -
KYMA
1 -
Kyma Functions
1 -
open SAP
1 -
Sales and Service Cloud Version 2
1 -
Sales Cloud
1 -
Sales Cloud v2
1 -
SAP
1 -
SAP Community
1 -
SAP CPQ
1 -
SAP CRM Web UI
1 -
SAP Customer Data Cloud
1 -
SAP Customer Experience
1 -
SAP Integration Suite
1 -
SAP Sales Cloud v2
1 -
SAP Service Cloud v2
1 -
SAP Service Cloud Version 2
1 -
Service Cloud v2
1 -
Validation
1 -
Validations
1
Related Content
- crystal report for special term on customers & vendors in CRM and CX Questions
- Error by Logon eclipse in CRM and CX Questions
- Media collection not editable in SmartEdit in CRM and CX Questions
- SAP Hybris Marketing: Customer Data Upload in CRM and CX Questions
- scheduler crystal report - parameter in CRM and CX Questions
Top kudoed authors
| User | Count |
|---|---|
| 1 | |
| 1 | |
| 1 | |
| 1 | |
| 1 |