
- SAP Community
- Products and Technology
- Additional Blogs by SAP
- How to enhance the Status in the workflow of Norma...
Additional Blogs by SAP
Turn on suggestions
Auto-suggest helps you quickly narrow down your search results by suggesting possible matches as you type.
Showing results for
SAP_GPS
Explorer
Options
- Subscribe to RSS Feed
- Mark as New
- Mark as Read
- Bookmark
- Subscribe
- Printer Friendly Page
- Report Inappropriate Content
07-10-2014
7:28 PM
Use Case: When there is a requirement around a need to enhance the existing workflow/standard process of a standard transaction type (e.g. SMMJ or SMHF: Normal or Urgent Change) and add a new status value to the status profile, action profile.
Prerequisite: The transaction types you want to adapt should first be copied to the customer specific namespace (e.g. ZMMJ or ZMHF) first. This applies to the transaction type, and all the profiles that are included (status, action, text, date, partner, etc.). Once you have copied the
transaction type into the customer namespace, the changes that are made will be safe from errors, updates etc… This means they will not be overwritten when implementing a service pack or update, where SAP delivers updated or changed standard customizing. It also protects
the standard transaction types to be in a pristine state as delivered.
The steps include the following –
- Status Profile Customization
- Action Profile Customization
- Creating new conditions
- Specifying Status Attributes
- Assign Actions
- Assign Consistency Checks (Optional)
- Specify Partner Function Assignment Check (Optional)
- Status Driven Import at “Verify Checklist”
status (Optional)
The screenshots are from SAP Solution Manager 7.1 SP 08 system. Initial Review shows no major differences in this customization between SAP Solution Manager 7.1 SP08 and SP10 versions.
In this blog we will be using an example of Urgent Correction.
Step 1: Status ProfileCustomization
The first customizing step is to create an own status for a specific transaction type. To insert the new status, we recommend copying an existing status rather than creating a new status from the scratch. This has the advantage that the corresponding, underlying business transactions, that are included in each status, will also be copied and that helps to tweak only what is necessary.
Go to SPRO – IMG – Define the status profile for user status.

Scroll down to find the Status Profile of the transaction type that is to be changed. Double click on the Status Profile. To create a new status, highlight an existing status and select the copy icon. Copy and change the description or text to “Verify Checklist Completion”

Change the status Number, Status, Status Description, Lowest Status No., Highest Status No. Press enter to return to the Status Profile screen after making changes as above for “Verify checklist completion."
The values “Lowest” and “Highest” define where you can go to, once you have reached a specific status. In our example, we cannot go back to 20 (In Development) but we can go forward until 80 (Completed), but not to 90 (Withdrawn).
Authorization Codes are used in ChaRM security to determine if a user has access to a document when it is in a particular status. Custom Authorization Codes can be defined by selecting the Authorization Key option under the Environment pull-down.
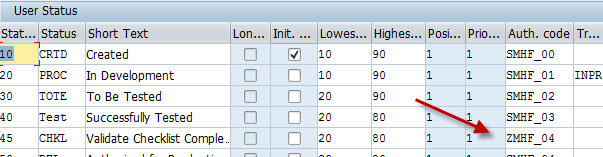

You can see the example above on the use of authorization code for the new status “Validate Checklist Completion”. You can check the user status in table TJ30 (transaction SE16)

Step 2: Action Profile Customization
The second step is to create the ChaRM Actions Conditions for the corresponding status. The Post Processing Framework (PPF) provides SAP applications with uniform interface for the condition-dependent generation of actions. The actions are generated as per the conditions specified for that action. They can be defined to be processed either directly or later.
Go to SPRO -- IMG path – “Define Action Profiles and Actions”
Either create a new action or copy an existing action to adjust to the custom status. Recommendation is to copy an existing action.

The action determination can remain the same. The Partner responsible for this action would be the change manager and so select accordingly for the field Partner-Dependent. The determination technology works exactly like a price procedure: you can use fields from the field catalog to
set up condition tables and you set up a number of access sequences to find the correct action profile(s).
Double click on the “Processing types” and click on the pencil icon.

You can use Actions to schedule and start follow-on processing steps, depending on the transaction type and different schedule and start conditions.

The user status should be reflective of the status that your have created in the status profile.
See below for the process to clarify on how CRM infrastructure works.

Step 3: Creating new conditions
The third step would be to create new conditions.
Go to the IMG path “Define Conditions”
Add the newly created action.

PS: You can also use the transaction “sppfcadm” and select the application CRM_ORDER. Click on the button “condition configuration” and you will see thesame screen as the above.


The condition will be given as below. This is to indicate that after “successfully tested”, the next action would be “verify checklist completion” in the Urgent Change document workflow of charm.

Adapt the condition of action profile ZMHF_GO_LIVE to indicate that after “verify checklist completion” the given user would then be able to authorize the release of Urgent change to PROD in the Urgent Change document workflow.

Step 4: Specifying Status Attributes
Now that we have our new status, and the corresponding actions and conditions we also need to make sure the new status is recognized by the Change Request Management/CRM framework. This is particularly required for the autdit train in the text log, which is written when processing the transaction.
Go to IMG → search for "Make settings for change transaction types"

Scroll down and copy status E005 Test System. This is to copy a status entry to accommodate a new entry E0011. Use the pull down list on the UsrSt column to replace the User Status with the User Status being added to the list as below. Change the value in column Seq. to reflect the sequence of the User Status values in the work flow of the document.

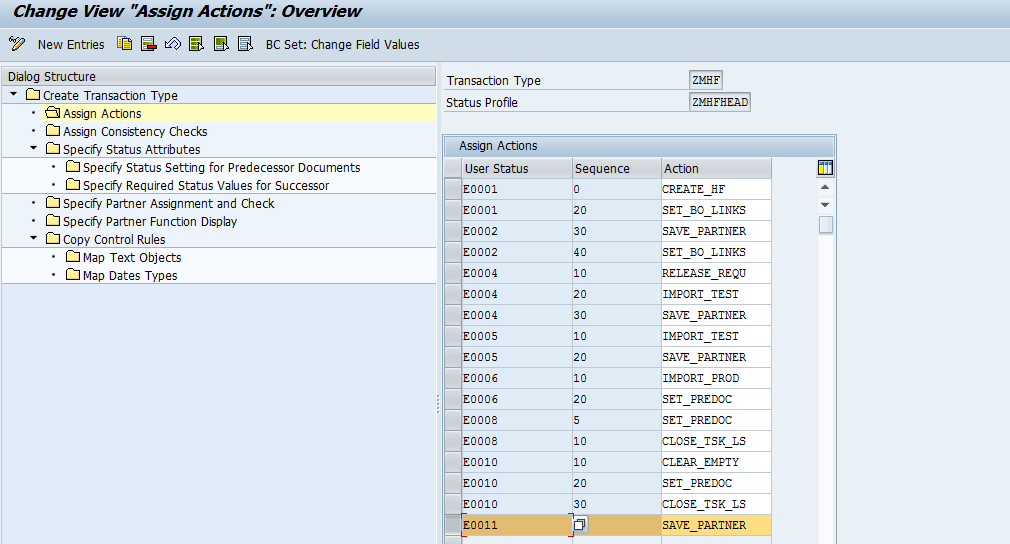
Step 5: Assign Actions
Go to the SPRO Step “ Make Settings for change Transaction Types”. Select ZMHF and double click on “Assign Actions” and do the following
Step 6: Assign Consisteny Check
Go to the SPRO Step “ Make Settings for change Transaction Types”. Select ZMHF and double click on “Assign Consistency Checks” and do the following

This table contains conditions that are checked when the status changes from one phase to the next. In addition, the UsrSt column to the far right indicates the status that will be used if the system has to automatically reset the status during a phase transition due to an error situation. Notice the new entry for E0011. Also, check the UsrSt entries in the far right column, these entries need to be changed to E0005 and E0011 respectively since “Verify Checklist Completion” status is after the status “Successfully Tested (E0005)” and previous to the status “Authorized for Production (E0009)”. Change these entries to E0005 and E0011 accordingly and save the changes to the transport.

Step 7: Specify Partner Function Assignment Check
Go to IMG step as specified in Step 6.
This helps to display partner functions in the Details assignment block, per transaction type. The system also displays these partner functions as transaction type search criteria.

Step 8: Status Driven Import at “Verify Checklist” status
IMPORT from Tasklistonly imports transports of Normal or Urgent Corrections which are in certain state (not all TRs) E.g. all Transports are imported to Production which belong to Normal or Urgent Corrections in Status "Checklist Verified" in our example.
Go to table /TMWFLOW/VC_IMPS with transaction /nsm34

The above blog is a continuation of Part 1 How to Configure Checklists in SAP Solution Manager 7.1 -- Part 1. The blog was about how checklist can be set-up.
3 Comments
Related Content
- Deliver Real-World Results with SAP Business AI: Q4 2023 & Q1 2024 Release Highlights in Technology Blogs by SAP
- How to Enable Stories in People Analytics for SF systems provisioned before 2022 in Human Capital Management Blogs by Members
- New Installation of SAP S/4HANA 2023 FPS1 – Part 4 – Rapid Activation for Fiori in Enterprise Resource Planning Blogs by SAP
- SAP S/4HANA Cloud Private Edition | 2023 FPS01 Release – Part 1 in Enterprise Resource Planning Blogs by SAP
- Ensuring Quality of Journal Entry APIs Through Comprehensive Automated Testing in Enterprise Resource Planning Blogs by SAP