
- SAP Community
- Products and Technology
- Technology
- Technology Blogs by SAP
- SAP Identity Management HTML Reporting: How to cre...
Technology Blogs by SAP
Learn how to extend and personalize SAP applications. Follow the SAP technology blog for insights into SAP BTP, ABAP, SAP Analytics Cloud, SAP HANA, and more.
Turn on suggestions
Auto-suggest helps you quickly narrow down your search results by suggesting possible matches as you type.
Showing results for
emanuil_ivanov
Explorer
Options
- Subscribe to RSS Feed
- Mark as New
- Mark as Read
- Bookmark
- Subscribe
- Printer Friendly Page
- Report Inappropriate Content
06-10-2014
1:20 PM
HTML Reporting
This is an article focused on the reporting functionality of Identity Management with the main focus on HTML Reporting. The article is applicable to both Identity Management 7.2 and 8.0 versions.
Identity Management needs to satisfy certain reporting requirements, such as:
- What are the attributes of a given user?
- What are the business roles assigned to a given user?
- What systems does a given user has access to?
- Which business roles are available in the system?
- How many users/business roles, etc. are available in
the system?
In this article, I will show you how to use Identity Management’s functionality in order to create pretty, complete and useful HTML Reports. With Identity Management, you can create reports using the information which is available in the Identity Center. The core of HTML Reporting is very simple – SQL Queries, which get values for a given entry type from the database. Wrapping up those queries with some HTML and CSS code makes a fully customizable appearance for the generated reports, which gives flexibility and better user experience to the end users. Let us start this magical tour into the wonderful world of HTML reporting with the entry type itself:
MX_REPORT
The MX_REPORT entry type is the entry type for report requests and exists in Identity Management as of 7.1 SP2. The report is executed as an action task on the MX_REPORT entry type. As the report is a task, the task status indicates the progress of the report, i.e. pending, ok or error. By default, the MX_REPORT is not listed as a searchable entry type. Note that the report task will always create an entry of type MX_REPORT, regardless of the provided entry type in the task definition.
Let’s take a look at the most important attributes of the MX_REPORT entry type:
- MSKEYVALUE
- DISPLAYNAME- display name of the report.
- MX_OWNER
- MX_REPORT_ENTRY
- MX_REPORT_DATE– date on which the report was requested.
- MX_REPORT_FORMAT– format of the report (this could be PDF, HTML, DOC, etc.)
- MX_REPORT_RESULT– this attribute holds the full report result. It is saved as a binary in the database.
- MX_REPORT_RESULT_REF– this attribute holds a reference to the report result, in case it is stored in a separate file server.
Reports are shown in the View Reports tab of the Identity Management User Interface. In this tab, we have a table with 5 columns:
- Entry – This corresponds to the value of the MX_REPORT_ENTRY attribute.
- Status - Status of the report task (pending, OK or Error). This status is calculated based on the status of the task execution, taken from the MCMV_AUDIT view.
- Report Date - This corresponds to the value of the MX_REPORT_DATE attribute.
- Report Name - The name of the report. If DISPLAYNAME has a value, this value is stored, otherwise the value of MSKEYVALUE is stored here.
- Report Result - This corresponds either to the MX_REPORT_RESULT or to the MX_REPORT_RESULT_REF attribute.
In order for a report to be shown in the View Reports tab, it must have a value for either MX_REPORT_RESULT or MX_REPORT_RESULT_REF. Otherwise, the report will be stored in the database, but it won’t be visible in the User Interface, as it has no result file attached to it.
We’ve seen the entry type for reporting, now let’s get into some real action. Let’s create a report task, which returns all the assigned privileges and roles for a given user. To make things more beautiful, we will wrap it with some CSS and HTML, to create a good-looking report. Let’s begin…
HTML Reporting Task
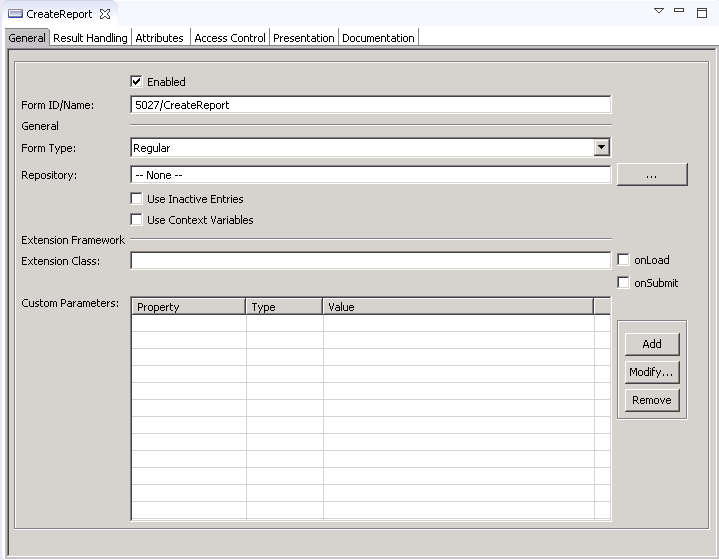
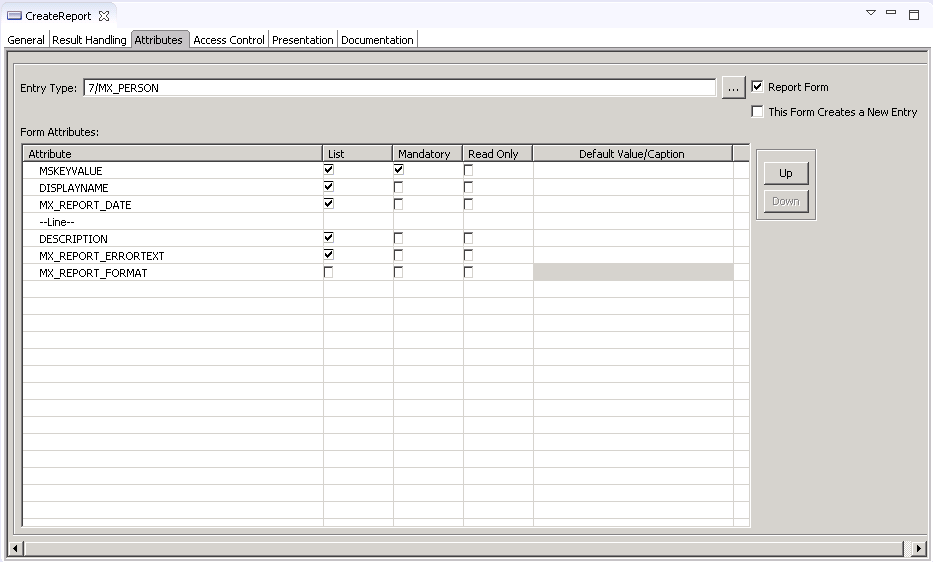
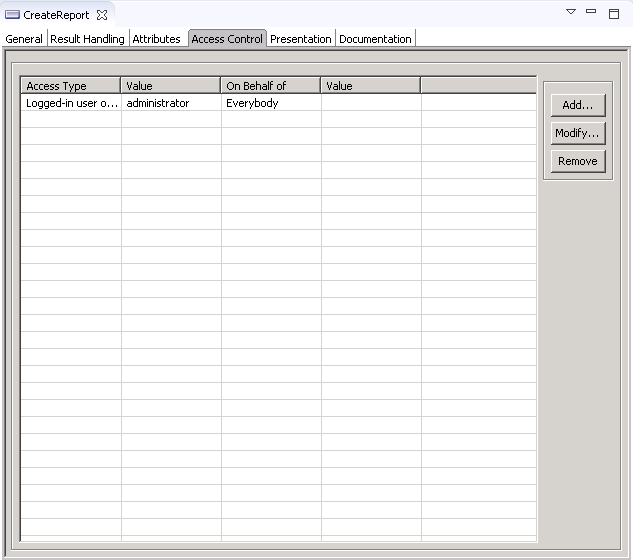
We start by creating the task – let’s name it “Create Report”. We make it a UI task(in version 8.0, Regular Form), and on the attributes tab we mark “Report task” (in version 8.0, Report Form). This will automatically display all the attributes for the MX_REPORT entry type and create a new MX_REPORT entry type, regardless of what we have selected as the entry type of the task itself. We select the task entry type to be MX_PERSON (which means what it will be executed on a person, but will create a report) and select some attributes to be displayed. (check the screenshot below.) The last step is to add access control to the task – let’s say we want only the administrator user to be able to create reports for entries. So, we give access type – logged-in-user, with value- “Administrator” and on behalf of everybody relation. Here is how the task definition should look like:
SAP Identity Management 7.2


SAP Identity Management 8.0
So far we have only a UI task, that can be executed by an Administrator and creates a new entry of type – MX_REPORT. As there is no report_result, we don’t have an actual report ready. In order to create the report, we would attach a new empty job, with one To Identity Store pass.
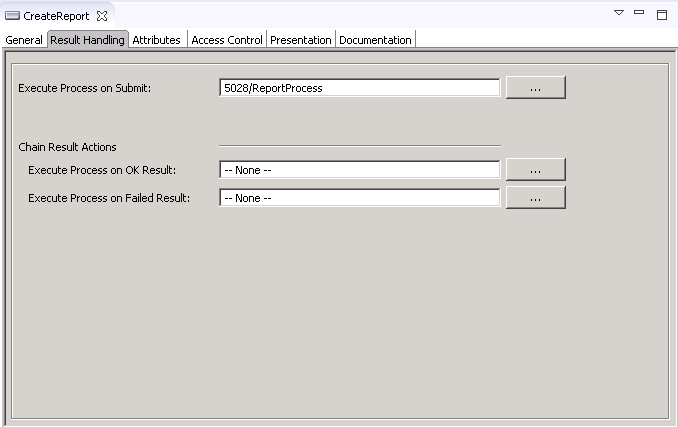
In version 8.0, you cannot directly attach an action task to a form. That is why you need to create a process of type Form Action Process and add an action task to it. Then, open your Create Report form in the Identity Management Developer Studio, and on the Result Handling tab, select this process in the Execute Process on Submit field.
SAP Identity Management 8.0
You can continue with adding a To Identity Store pass an HTML Reporting Script(described below) in the action task.
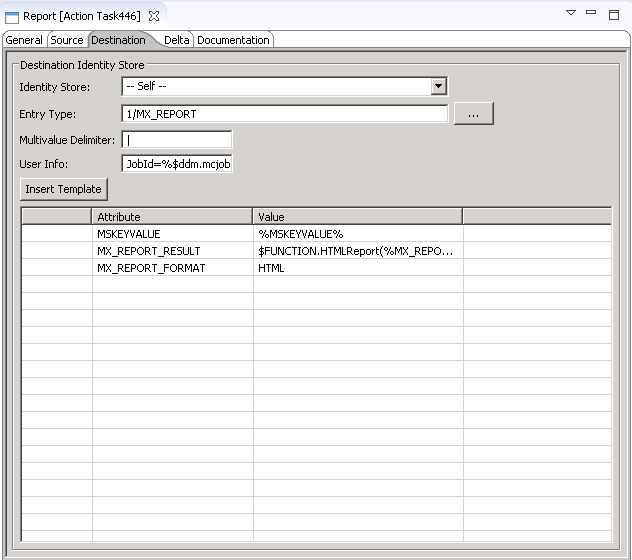
In the pass Destination tab, we will add MX_REPORT as an entry type, because the pass will make modifications to the newly created MX_REPORT entry. The idea here is, that after we create the report in the UI, we would receive the value of the MX_REPORT_ENTRY attribute, which is actually the mskey of the user, we are running the Create Report task on, and use this value as MSKEY in our queries, which will return the assigned privileges and roles. We will need MSKEYVALUE, to point to the created report, MX_REPORT_FORMAT, which will be with value – “HTML”, because if it’s in another format, when opened in the UI, it will not be opened in the browser as needed; and MX_REPORT_RESULT, which will get its value from a custom script. In the script, we will use the magic of HTML5 + SQL Queries in order to create the report itself. Let’s create the script.
HTML Reporting Script
We create a new local script for the action task. Let’s name it HTMLReport. The script will take as input parameter the value of MX_REPORT_ENTRY (the mskey of the user, we are reporting on) and will return a binary representation of the report, which will be stored in the Identity Center. I will explain the process of creating the script:
- We create a Header and Footer, which will be just static CSS and HTML code in the beginning and in the end of the HTML file. We do this to delimitate the static parts of the HTML code, so that they won’t interfere with our main logic. The header contains the opening HTML tags and the CSS used, and the footer just contains the closing HTML tags. For the sake of simplicity in this article, I won’t add the real CSS code I used in this example. Your header should look like this:
<html>
<head>
<style type="text/css">
<….........CSS here……………..>
</style>
</head>
<body>
And your footer should be like this:
</table>
</div>
</body>
</html>
2. Now, let’s create the script itself. For now, we have the HTML opening tags and the CSS, and the HTML closing tags, along with the table closing tag. Now, let’s populate the table itself. We will create 2 rows and 3 columns. The 1st row will contain the table headings: User Name, Assigned Privileges and Assigned Roles. The second row will contain the username, privileges and roles, all extracted from the Identity Center.
Privileges are extracted with the following query:
select mcothermskeyvalue from idmv_link_ext2 where mcAttrName='MXREF_MX_PRIVILEGE' and
mcthismskey='"+Par+"'
For roles, the query is:
select mcothermskeyvalue from idmv_link_ext2 where mcAttrName='MXREF_MX_ROLE'

and mcthismskey="+Par+"
Since Par(which is the value of MX_REPORT_ENTRY) , contains the mskey of the entry, we have to extract the mskeyvalue of that user to be shown under User Name. This is done via the following query:
select mcmskeyvalue from idmv_entry_simple where mcmskey="+Par+"
Getting the results from those queries as values is done via the uSelect() function.
We store the results of those queries in variables and add them to the table elements and store this into a variable (oHTML), which represents the table body.
The last thing left to do is to return the binary representation (hex code). This is done via the uToHex() function. We also need to add “{HEX}” as prefix.
This is how our example script looks like in the end:
//

Main function: HTMLReport

function HTMLReport(Par){

var oHeader = uFromFile("C:\\Reporting\\Template\\header.html","-1","false");

var oFooter =uFromFile("C:\\Reporting\\Template\\footer.html","-1","false");

var AssignedPrivileges=uSelect("select mcothermskeyvalue from idmv_link_ext2 where mcAttrName='MXREF_MX_PRIVILEGE' and

mcthismskey='"+Par+"'");

var oList="";

var oArray=AssignedPrivileges.split("!!");

for(var i=0; i<oArray.length; i++){

oList=oList+oArray[i]+'<br>';

}

var AssignedRoles = uSelect("select mcothermskeyvalue from idmv_link_ext2 where mcAttrName='MXREF_MX_ROLE' and

mcthismskey='"+Par+"' ");

var oList2="";

var oArray2 = AssignedRoles.split("!!");

for(var i=0; i<oArray2.length; i++){

oList2 = oList2 + oArray2[i] + '<br>';

}

var userName = uSelect("select mcmskeyvalue from idmv_entry_simple where mcmskey="+Par+" ");

var oHTML='<div class="HTMLReport"><table><tr><td>UserName:</td><td>Assigned Privileges</td><td>Assigned Roles</td></tr>';

oHTML+='<tr><td>'+userName+'</td><td>'+oList+'</td><td>'+oList2+'</td></tr>';

var oHex="{HEX}"+uToHex(oHeader+oHTML+oFooter);

return oHex;

}
We save and go back to the To Identity Store pass definition.
3. As a final step, we add the value of MX_REPORT_RESULT to be calculated via the HTMLReport script, with MX_REPORT_ENTRY as input parameter. The Pass definition should look like this:
SAP Identity Management 7.2

SAP Identity Management 8.0
4. Save the task and log on to the User Interface with the “Administrator” user.
Starting the task via the User Interface
Let’s execute the task on an entry. We go to Manage tab and search for a person. We select the person, go to “Choose task” and select the “Create Report” task(in version 8.0, Create Report form).

The “Create Report” task is opened and we fill the attributes needed, then click “Save”.

This will save a new entry of type MX_REPORT, with MSKEYVALUE and Display Name – Superman Report, MX_REPORT_DATE – 25.04.2014, and values for DESCRIPTION and MX_REPORT_ERROR. Saving this will execute the action task and the To Identity Store pass, which will set HTML as value to the MX_REPORT_FORMAT attribute, and will calculate the value of MX_REPORT_RESULT, using the Script we created. To see our result, we will go to the View Reports tab:

We can see our newly generated report. We can see that it is for the Entry Clark Kent, the report task is successfully executed (Status – “OK”), the report name and the report result. If we click on the Result, we will see our report in the browser:

Pretty, isn’t it? It contains the UserName of the user and all the assigned privileges and business roles.
You can find the header and footer files, which I used with the abovementioned script to create this example report, attached to the article. If you like them, they are available for free usage :smile:
Yours truly,
Emanuil
- SAP Managed Tags:
- SAP Identity Management
25 Comments
You must be a registered user to add a comment. If you've already registered, sign in. Otherwise, register and sign in.
Labels in this area
-
ABAP CDS Views - CDC (Change Data Capture)
2 -
AI
1 -
Analyze Workload Data
1 -
BTP
1 -
Business and IT Integration
2 -
Business application stu
1 -
Business Technology Platform
1 -
Business Trends
1,661 -
Business Trends
86 -
CAP
1 -
cf
1 -
Cloud Foundry
1 -
Confluent
1 -
Customer COE Basics and Fundamentals
1 -
Customer COE Latest and Greatest
3 -
Customer Data Browser app
1 -
Data Analysis Tool
1 -
data migration
1 -
data transfer
1 -
Datasphere
2 -
Event Information
1,400 -
Event Information
64 -
Expert
1 -
Expert Insights
178 -
Expert Insights
270 -
General
1 -
Google cloud
1 -
Google Next'24
1 -
Kafka
1 -
Life at SAP
784 -
Life at SAP
11 -
Migrate your Data App
1 -
MTA
1 -
Network Performance Analysis
1 -
NodeJS
1 -
PDF
1 -
POC
1 -
Product Updates
4,578 -
Product Updates
323 -
Replication Flow
1 -
RisewithSAP
1 -
SAP BTP
1 -
SAP BTP Cloud Foundry
1 -
SAP Cloud ALM
1 -
SAP Cloud Application Programming Model
1 -
SAP Datasphere
2 -
SAP S4HANA Cloud
1 -
SAP S4HANA Migration Cockpit
1 -
Technology Updates
6,886 -
Technology Updates
395 -
Workload Fluctuations
1
Related Content
- Top Picks: Innovations Highlights from SAP Business Technology Platform (Q1/2024) in Technology Blogs by SAP
- Consuming SAP with SAP Build Apps - Connectivity options for low-code development - part 2 in Technology Blogs by SAP
- Deep dive into Q4 2023, What’s New in SAP Cloud ALM for Implementation Blog Series in Technology Blogs by SAP
- Identity Provisioning Documentation Joined the Family of SAP Cloud Identity Services in Technology Blogs by SAP
- Single Sign On to SAP Cloud Integration (CPI runtime) from an external Identity Provider in Technology Blogs by SAP
Top kudoed authors
| User | Count |
|---|---|
| 11 | |
| 10 | |
| 10 | |
| 10 | |
| 8 | |
| 7 | |
| 7 | |
| 7 | |
| 7 | |
| 6 |