
- SAP Community
- Products and Technology
- Technology
- Technology Blogs by SAP
- ESPM Webshop on light weight HTML5 applications
Technology Blogs by SAP
Learn how to extend and personalize SAP applications. Follow the SAP technology blog for insights into SAP BTP, ABAP, SAP Analytics Cloud, SAP HANA, and more.
Turn on suggestions
Auto-suggest helps you quickly narrow down your search results by suggesting possible matches as you type.
Showing results for
Former Member
Options
- Subscribe to RSS Feed
- Mark as New
- Mark as Read
- Bookmark
- Subscribe
- Printer Friendly Page
- Report Inappropriate Content
06-10-2014
12:25 PM
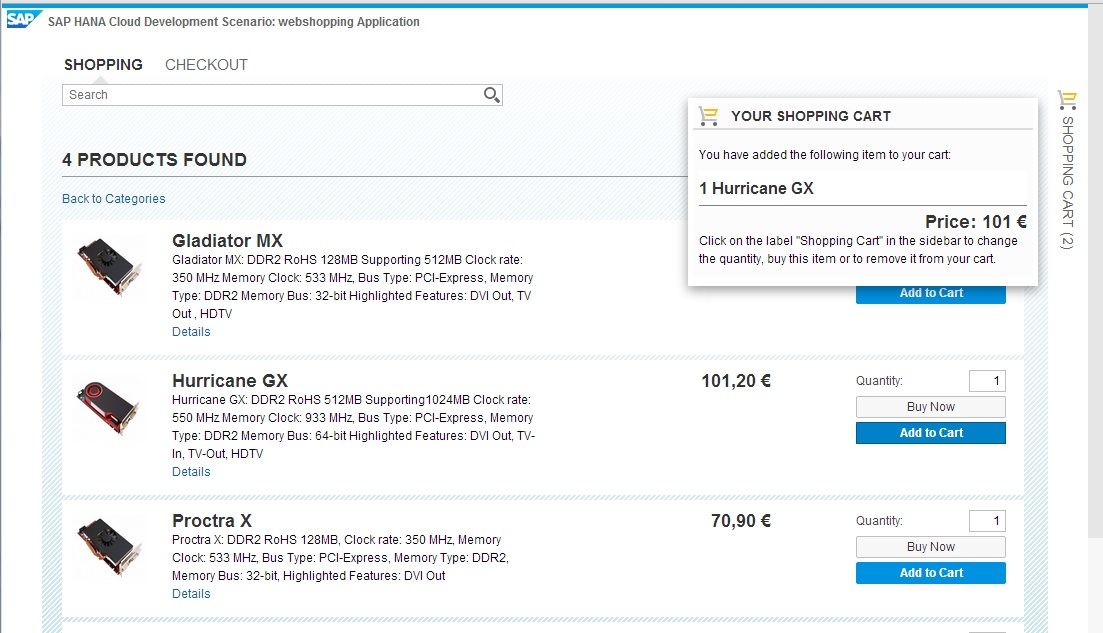
With the availability of HTML5 applications on the trial landscape and rui.nogueira blog post we decided to try it out for our ESPM webshop scenario. As we already had destinations present in the ESPM scenario and we had separate folders for UI code, it was a breeze to get our ESPM webshop application running on the cloud (with some minor tweaks :smile: ). You can check out the running application here.
We basically followed Rui's blog step-by-step replacing the destinations and UI code with our stuff wherever necessary. Also, going with the times we modified the theme of our application to blue crystal.
These minor changes required us to modify a few files, so we decided to create a new branch in our public github space so others don't have to worry about the modifications.
Prerequisites
Before we move on to how to get the code and get this application running some prerequisite checks.
1. Check that you are able to access the following service. It will be used to fetch the data (OData) and images in our application
https://cloudmodelespmhana.hana.ondemand.com/espm-cloud-web/espm.svc/
2. Create a trial account on SAP HANA Cloud Platform. If you don't have it already, you can register for free here:
https://help.hana.ondemand.com/help/frameset.htm?65d74d39cb3a4bf8910cd36ec54d2b99.html
3. Install the latest version of the Eclipse Kepler IDE (SR2 used for this scenario). You can find the latest release here:
http://www.eclipse.org/downloads/packages/eclipse-ide-java-ee-developers/keplersr2
Obtaining the code for this app
As mentioned above we have created a separate branch in out github space to help others run this application quickly.
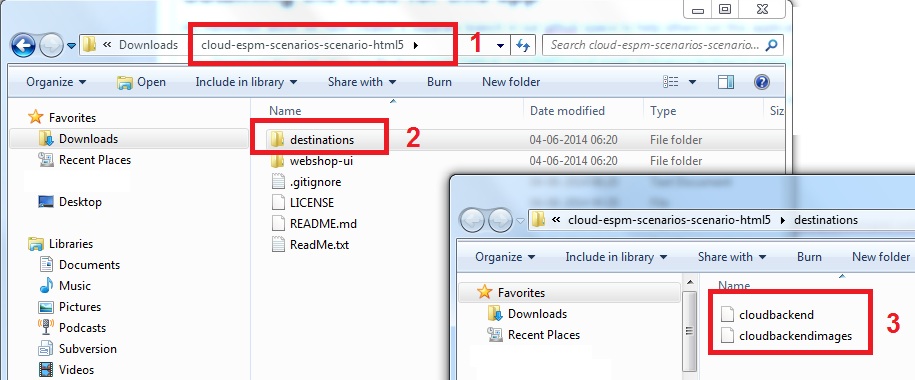
- Download the code as a zip file from https://github.com/SAP/cloud-espm-scenarios/archive/scenario-html5.zip
- Unzip and check the contents.
- There should be a ReadMe file which contains the exact same steps as mentioned here. Also, there will be two folders.
- "destinations" folder contains the destinations for the OData service and the images.
- "webshop-ui" folder contains the webshop UI code modified for this scenario.
Define destinations in your cloud account
- Navigate to the cockpit in your trial account, or copy paste this URL in your browser https://account.hanatrial.ondemand.com/cockpit
- Click on the Destinations tab, then click New Destination
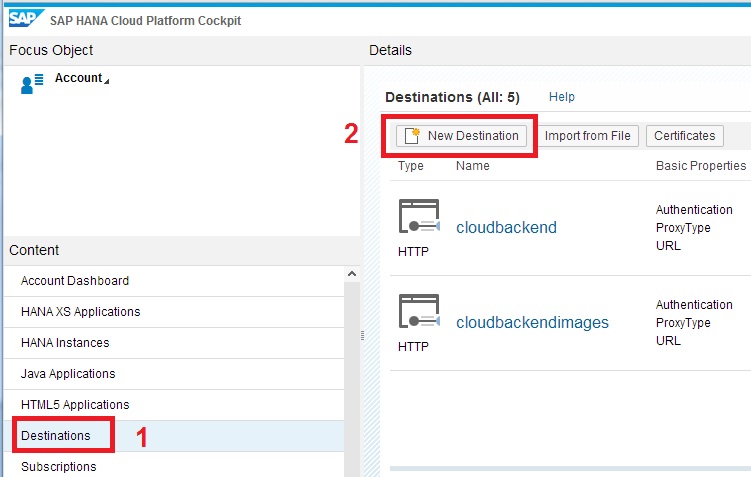
- Click on Import from File and select the cloudbackend file in the destinations folder you downloaded above.
- Save the destination once it is uploaded.
- Repeat step 3 to step 5 for the cloudbackendimages file.
Create the ESPM Webshop HTML5 application
- Navigate to the cockpit in your trial account, or copy paste this URL in your browser https://account.hanatrial.ondemand.com/cockpit
- Click on HTML5 Applications and then click on New Application

- Enter "espmwebshop" as the application name. (You can provide any other name also)
- Click Create.
- Click on "espmwebshop".
- Your application is now created and ready for use.
Clone Git Repository in Eclipse
- Once you have completed the above steps click on the Development tab in the left pane.
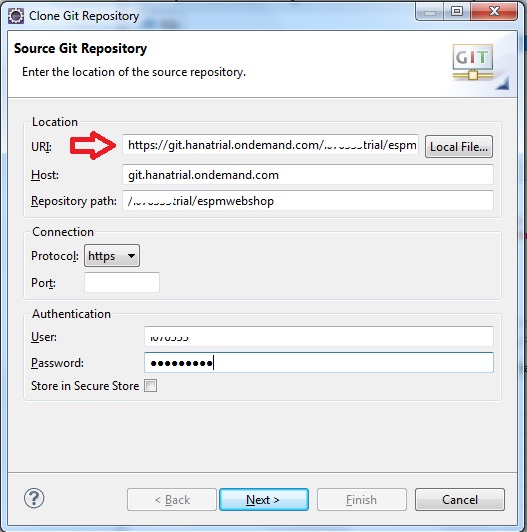
- Under "Source Location" copy the Git Repository Link

- It should be something like https://git.hanatrial.ondemand.com/<pNumber>trial/espmwebshop
- Start Eclipse and switch to the Git Perspective.
- Under Git Repositories, click on "Clone a Git Repository".
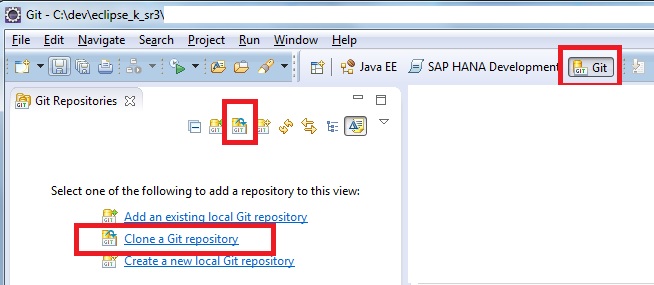
- Paste the Git-URL you've copied in step b above into the URI field of the popped-up window, enter your user name and password of your SAP HANA Cloud Platform trial account into the fields User and Password, click on Next, click on Next again and click on Finish.
- Check your connection settings, (proxy in Eclipse) ifany of the above steps fail.
- You should now have an empty repository configured in your Eclipse.
Copy and upload code to repository
- Once you have completed the steps above, right click on the Git repository and select the Import Projects command.
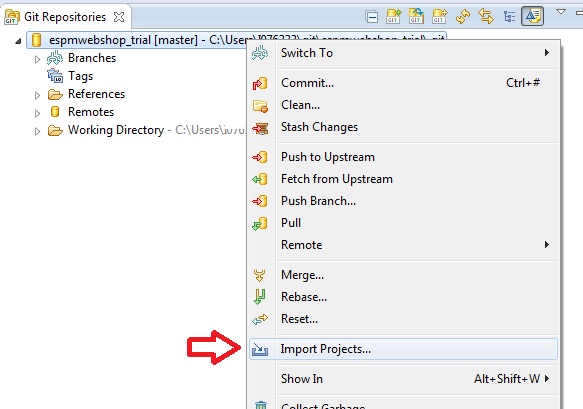
- Select Import as general project, click on Next (note the name of the project) and after that click on Finish.
- Switch to the Web perspective in Eclipse.
- Copy all the files and folders inside the webshop-ui folder from this branch.
- Right-click the project you just created and select Paste .

- Now you have copied all the UI code into your project.
- To upload the code to the Git repository right-click your project.
- Select Team -> Commit.
- Write a short Commit message.
- Select all files (Select-all button is on the right hand side of the "Files" panel)
- Click "Commit and Push".
- Provide your credentials if prompted.
- You should get a success message with the git repository link.
Version your code and Activate application URL for public access
- Navigate to the cockpit in your trial account, or copy paste this URL into your browser https://account.hanatrial.ondemand.com/cockpit
- Click on HTML5 Applications.
- Click on "espmwebshop" and select Development.
- You should be able to see the commit message you entered above.
- You should also be able to see your destinations under "Required Destinations".
- The status of the destinations should be green, indicating they are present in the account.

- Click on the commit message and the Webshop application should open up in a new tab.
- In the list of Available Commits select the commit message and click on the "Create Version" icon at the right end of the line.
- Provide a version name 1.0 and click on Add.
- Now switch to the Version Management tab.
- You should see the version you've just created before.
- Now click on the icon at the right end of the line to Activate this application version.
- You will get a message telling you that the version has been activated and that the Changes will be effective after (re)-start of the application.
- Confirm the question if you really want to do this with by clicking on Yes.
- Switch to the HTML5 Application Dashboard tab and click on the Application URL.
- This is the URL which others can now use to access your app.
With these simple steps you should have a running application which accesses data from the ESPM cloud backend.
Ankur
- SAP Managed Tags:
- SAP Business Technology Platform
13 Comments
You must be a registered user to add a comment. If you've already registered, sign in. Otherwise, register and sign in.
Labels in this area
-
ABAP CDS Views - CDC (Change Data Capture)
2 -
AI
1 -
Analyze Workload Data
1 -
BTP
1 -
Business and IT Integration
2 -
Business application stu
1 -
Business Technology Platform
1 -
Business Trends
1,661 -
Business Trends
91 -
CAP
1 -
cf
1 -
Cloud Foundry
1 -
Confluent
1 -
Customer COE Basics and Fundamentals
1 -
Customer COE Latest and Greatest
3 -
Customer Data Browser app
1 -
Data Analysis Tool
1 -
data migration
1 -
data transfer
1 -
Datasphere
2 -
Event Information
1,400 -
Event Information
66 -
Expert
1 -
Expert Insights
178 -
Expert Insights
293 -
General
1 -
Google cloud
1 -
Google Next'24
1 -
Kafka
1 -
Life at SAP
784 -
Life at SAP
12 -
Migrate your Data App
1 -
MTA
1 -
Network Performance Analysis
1 -
NodeJS
1 -
PDF
1 -
POC
1 -
Product Updates
4,577 -
Product Updates
338 -
Replication Flow
1 -
RisewithSAP
1 -
SAP BTP
1 -
SAP BTP Cloud Foundry
1 -
SAP Cloud ALM
1 -
SAP Cloud Application Programming Model
1 -
SAP Datasphere
2 -
SAP S4HANA Cloud
1 -
SAP S4HANA Migration Cockpit
1 -
Technology Updates
6,886 -
Technology Updates
415 -
Workload Fluctuations
1
Related Content
- AN INTRODUCTION TO QUADRATIC UNCONSTRAINED BINARY OPTIMIZATION (QUBO) in Technology Blogs by SAP
- SAP Enterprise Architect(P_SAPE_2023): From Aspirations to Achievement - My Roadmap, Insights & Tips in Technology Blogs by Members
- Deliver real-life use cases with SAP BTP - Sustainable Waste Management Solution for Healthcare - Part1 (overview) in Technology Blogs by SAP
- Rate Limiter Implementation in an SAP CAP Application in Technology Blogs by SAP
- AI in SAP BTP: Q3 2023 Highlights – SAP AI Business Services, SAP AI Core and SAP AI Launchpad in Technology Blogs by SAP
Top kudoed authors
| User | Count |
|---|---|
| 29 | |
| 21 | |
| 10 | |
| 7 | |
| 6 | |
| 6 | |
| 6 | |
| 5 | |
| 5 | |
| 4 |