
- SAP Community
- Products and Technology
- Technology
- Technology Blogs by SAP
- Unified Inbox portal integration - Part 1
Technology Blogs by SAP
Learn how to extend and personalize SAP applications. Follow the SAP technology blog for insights into SAP BTP, ABAP, SAP Analytics Cloud, SAP HANA, and more.
Turn on suggestions
Auto-suggest helps you quickly narrow down your search results by suggesting possible matches as you type.
Showing results for
Employee
Options
- Subscribe to RSS Feed
- Mark as New
- Mark as Read
- Bookmark
- Subscribe
- Printer Friendly Page
- Report Inappropriate Content
06-04-2014
8:52 AM
What is the portal integration?
Portal integration is a solution that offers tight integration of Unified Inbox with SAP NetWeaver enterprise portal technologies to help business users to view and interact with Unified Inbox, tasks directly from the portal. It is based on the standard knowledge management and portal capabilities of SAP NetWeaver.
The following sections are completely technical in nature and cover the following.
- Which iView to use
- How to make connection to backend where Unified Inbox is deployed.
- How to personalize content based on SAP user roles.
- How to setup authentication between portal and Unified Inbox
- How to apply theming. Unified Inbox portal integration part 2 – Theming
You can follow the steps described here and integrate Unified Inbox or any other UI5 application in portal within minutes. (Please have look at relevant SAP Notes mentioned at the end)
Step 1: Creating an UI5 application iView
Please refer SAP note #1737445 before continuing and follow the recomndations therein. Not doing so might result in UI rendering issues in IE browser.
The first decision to make is which iView template to make use of. If UI5 iView is available in your SAP Enterprise portal use it else you can also make use of URL iView. The steps described here apply to UI5 iView template, but URL iView template usage also would be somewhat similar if not same.
Login to portal with content administrator and system administrator privileges.
1a. Open Portal and navigate to Content Administration.
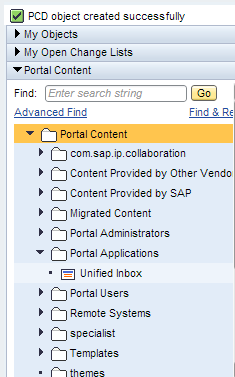
1b. Navigate to “com.sap.portal.appintegrator.sap” under Portal Applications within the Portal Content.

1c. In the context menu of the “UI5” application iView , choose Copy

1d. In the Portal Content folder, choose the location in which you want to create the iView, and from the context menu choose Paste as PCD Object. (In this example creating in “Portal Applications”). Enter details in the General Properties as shown below.

1e. Click on Next and then Finish, the PCD object should have been successfully created and should be seen in the folder where it was pasted (in this case inside “Portal Applications” folder with name ‘Unified Inbox’, which is nothing but the iView).
In the above steps, we have successfully used the UI5 application template to create the iVew within a folder "Portal Application" in Portal Content. However any other folder locations can also be used.
Now the iView needs to be configured to a system where Unified Inbox is deployed so that Unified Inbox can be viewed in this iView. The system configuration is done using system alias which we would configure in the next step.
Refer for creating UI5 iViews: Creating SAPUI5 iVIews
Step 2: Creating / Configure System Alias
The next step is to create portal system and configure the physical system where the Inbox is deployed. Use appropriate system template based on your requirements. I have used “SAP system using dedicated application server” system template for convenience. It does not mean you also need to use the same template.
2a. Select System Administration and navigate to System Lanscape.

2b. Under System Landscape Overview, click on New to create new system alias.
2c. In the Template Section, choose “SAP system using dedicated application server”.

2d. Enter fields under System Properties.

2e. Click on next to define the alias name for the system by entering a value and clicking on Add.
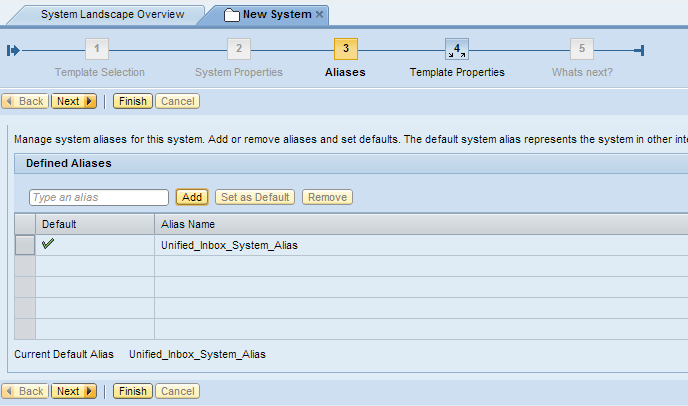
The value entered for Alias Name will be used in the iView configuration as it will be system alias name. (In this case “Unified_Inbox_System_Alias” will be the system alias name).
2f. Enter the Template Properties

Note: To configure the system alias to point to a BPM system i.e NetWeaver Java Server (BPM Inbox) use an appropriate portal system template.
2g. Enter “User Name” and “Password” to test the system connection state and click on Next. If the connection test is successful click on Finish to complete the step of creating and configuring System Alias.

Step 3: Configure iView with System Alias Details
After successfully creating portal system, now let’s configure the iView created earlier so that it can load the Unified Inbox in the iView.
3a. Switch to Content Administration, and navigate to the folder inside Portal Content where the iView was pasted/created (in this case it was Portal Applications).
3b. In the context menu of the iView (in this case “Unified Inbox” under Portal Applications), Navigate to Open -> Properties.

3c. Click on Modify Properties, and select “All”, from the Show Category drop-down choose “Content-SAPUI5”.
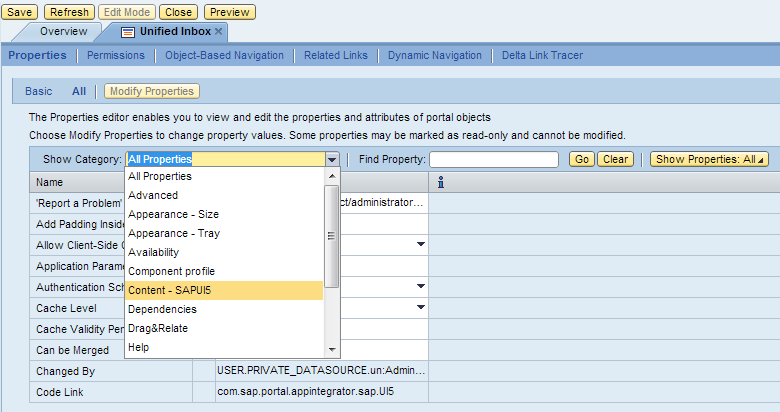
3d. Provide the “Relative Path for SAPUI5 Applications” (Example: “sap/bc/bsp/iwpgw/tgw_unif_inbox/index.htm”) and input System field with system alias name which was created in Step 2(it was created with name ‘Unified_Inbox_system_Alias’).

3e. Configuration can be tested by selecting “Preview” in the context menu of the iView (in our case ‘Unified Inbox’ under Portal Applications).
If user mapping or SSO is not done you need to enter User ID and password. You should be able to view the Unified Inbox application within a new pop-up (Make sure that pop-ups are not blocked by the browser)

Note: Step 4a & 4b are required if Single Sign-On (SSO) is not enabled.
Step 4: Creating User Mapping and Adding iView to a Workset
To simplify I will not describe SSO setup and configuration. You can find the details in SAP documentation easily and setup SSO. For this blog purpose I will use the following user mapping mechanism to achieve SSO. Please decide on what kind SSO to use based on your security requirements.
4a. Select User Administration workset search the portal user for which you would like to map the Unified Inbox user. Click on Modify, select ‘User Mapping for System Access’ tab in user details.

4b. Select the System from the drop-down which is the System Alias name we created and configured to iView. In the Mapping Data, provide the ‘Mapped User ID and ‘Mapped Password’ with values of Unified Inbox application User ID and Password.(i.e., which are the application login credentials). And click on Save to finish user mapping configuration.

The user mapping configuration can be tested by performing a Preview (refer: 3e) on the iView again, this time it should not show the login page.
4c. To create a Workset select Content Administration, and in the context menu of the folder where Workset needs to be created choose New -> Workset (in this case we choose Portal Applications folder).

4d. Provide the Workset Name which would appear along with other workset items in the Portal and click on Next.

4e. Click on Finish to complete the Workset creation.

4f. Select ‘Open the object for editing’ option, and click on ‘OK’.

4g. For the application to appear in the Workset, a Page has to be added to Workset, and iView to Page.

4h. Click on New and select Page to create and add new Page to a Workset.

4i. Provide ‘Page Name’ in the Page Properties and click on Next.

4j. Select “Default page Template” option in the Available Templates, and click on Next.

4k. Select the Page Layout, in this case we will use the default layout “1 Column (Full Width)” and click on Next .

4l. Check the summary of the Page created with its details, click on Finish and in next page select Close .

4m. Check the options “Entry Point”

4n. Select the Page (in our case InboxPage) and click on Open button to open ‘Page Content and layout Settings’.
Drag and drop the iView (in this case Unified Inbox) into the area of Column 1 and click on Save.

Workset has been created; a Page inside it has been created; iView has been added to the Page with a layout. For user to view the Workset on along with the other tabs in the portal user would need to add Workset to a Role.
Step 5: Adding Workset to a User Role.
In this step typically you manage content provisioning to users, roles or groups. For simplicity I have used “eu_role” as it is available by default in the portal. You can create roles, groups according to your requirements. For more details refer to SAP documentation.
5a. Search for “eu_role” (Standard User Role) using Find under the Portal Content. Select the ‘Standard User Role’ in the search result by selecting the checkbox and click on ‘Open Object’.

5b. In the context menu of Workset created (in this case Inbox) Add Workset to Role -> Copy.

After this operation user would see Workset name (in this case Inbox) under “Standard User Role” items
5c. In the context of iView, select Open -> Properties and modify Fixed Height(Pixels) to the use preference, (in this case are using 800). And click on Save.
5d. Re-Launch the portal to view the new Workset and application inside the workset.
I was unable to upload last couple of images due total size restrictions. But without the images also the last two steps should be easy to configure.
Now we have integrated Unified Inbox into SAP Enterprise portal. In the next part we will look at how to work with themes.
For more details on Unified Inbox refer : Unified Inbox - SAP NetWeaver Gateway - SAP Library
Relevent SAP Notes for integrating UI5 application in the portal
#1708020 - Support of UI5 based on ABAP applications in the portal
#1885476 - DSM support for UI5 application (To handle user session termination from portal)
#1737445 - Internet Explorer standards mode rendering for EP
For ABAP based UI5 application user session termination from the portal is provided out of the box once you implement SAP Note #1885476
For Java based UI5 application such out of the box xolution is not available, hence the application needs to handle the following additionally for user session termination from the portal.
To implement the session termination for the "Custom Java based UI5 application" Please implement SAP Note #1885476 but Do Not set the "ABAP HTTP Security Sessions Enabled" property to true on the system, as this needs to be configured for UI5 applications based on ABAP only.
This way you will be able to get the DSM terminator request in the following manner:
1. When navigating away -> request to the application with URL parameter sapsessioncommand=USR_ABORT
2. When closing the window or refreshing it -> request to the application with URL parameter sapsessioncommand=USR_ABORT
3. When logging off from the portal -> request to the application with URL parameter sapsessioncommand=USR_LOGOFF
You can use handle these URL parameters to implement the session termination mechanism in your "Custom Java based UI5 application".
7 Comments
You must be a registered user to add a comment. If you've already registered, sign in. Otherwise, register and sign in.
Labels in this area
-
ABAP CDS Views - CDC (Change Data Capture)
2 -
AI
1 -
Analyze Workload Data
1 -
BTP
1 -
Business and IT Integration
2 -
Business application stu
1 -
Business Technology Platform
1 -
Business Trends
1,661 -
Business Trends
88 -
CAP
1 -
cf
1 -
Cloud Foundry
1 -
Confluent
1 -
Customer COE Basics and Fundamentals
1 -
Customer COE Latest and Greatest
3 -
Customer Data Browser app
1 -
Data Analysis Tool
1 -
data migration
1 -
data transfer
1 -
Datasphere
2 -
Event Information
1,400 -
Event Information
64 -
Expert
1 -
Expert Insights
178 -
Expert Insights
281 -
General
1 -
Google cloud
1 -
Google Next'24
1 -
Kafka
1 -
Life at SAP
784 -
Life at SAP
11 -
Migrate your Data App
1 -
MTA
1 -
Network Performance Analysis
1 -
NodeJS
1 -
PDF
1 -
POC
1 -
Product Updates
4,577 -
Product Updates
330 -
Replication Flow
1 -
RisewithSAP
1 -
SAP BTP
1 -
SAP BTP Cloud Foundry
1 -
SAP Cloud ALM
1 -
SAP Cloud Application Programming Model
1 -
SAP Datasphere
2 -
SAP S4HANA Cloud
1 -
SAP S4HANA Migration Cockpit
1 -
Technology Updates
6,886 -
Technology Updates
408 -
Workload Fluctuations
1
Related Content
- Unify your process and task mining insights: How SAP UEM by Knoa integrates with SAP Signavio in Technology Blogs by SAP
- SAP HANA Cloud Vector Engine: Quick FAQ Reference in Technology Blogs by SAP
- 10+ ways to reshape your SAP landscape with SAP BTP - Blog 4 Interview in Technology Blogs by SAP
- 10+ ways to reshape your SAP landscape with SAP Business Technology Platform – Blog 4 in Technology Blogs by SAP
- What’s New in SAP Datasphere Version 2024.8 — Apr 11, 2024 in Technology Blogs by Members
Top kudoed authors
| User | Count |
|---|---|
| 13 | |
| 10 | |
| 10 | |
| 7 | |
| 6 | |
| 5 | |
| 5 | |
| 5 | |
| 5 | |
| 4 |