This article gives an overview of the new attestation feature that was released with SAP Identity Management 7.2 SP9. It will help you learn how to start an attestation process and manage it via SAPUI5 simple based Web User Interface application.
Attestation (also known as re-certification) means that managers or administrators periodically check and “attest” that a person only has those access rights that he or she should have.
Once the Attestation workflow is triggered the process steps are enabled trough SAP Identity Management 7.2 SP9 REST API v2 . With the presented in this article REST-based interfaces we would like to demonstrate how Attestation can be handled using UI5 Sap inbox and IdM attastation task .
- How to Start an Attestation
The attestation process starts for a given role (this is why it is called resource attestation). The first thing you need to do is to create a UI Task of type “Attestation Task” at the Identity Management (IdM) Management console. You can see the task on the following figure.

On the Parameters tab, you can select where to get the attester from: task, role/privilege, manager, etc. In our case we choose “task”. If you want to use the role as a source for attester, another UI task needs to be created. It will be similar to the “Change Identity Task” but will include the MX_ATTESTERS attribute. As attester in our task, you can set Administrator.
Once you have the attestation task defined and the business role created, you can start the attestation process by creating a job. This job should have toGeneric pass in which you specify javascript. In the javascript you simply call the following uFunction:
// Main function: attest
function attest(Par){
//Example calling DSE internal function
//uStop("Terminated by user");
uProvision(336, 1002172, 0, 0, "", 1);
return "";
}
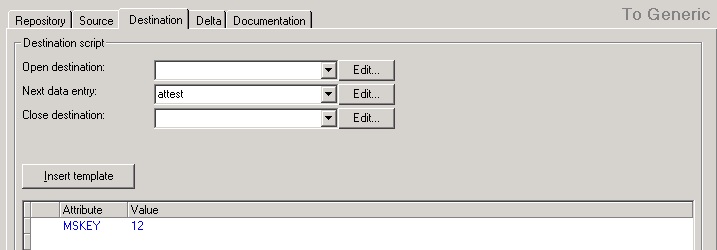
Here the first parameter is the ID of the role, the second is the ID of the attestation task and the rest can be left with the default values of the parameters. The last thing you need to do in order to have a functional job, is to specify at least one attribute in the Destination of the toGeneric pass. Just enter MSKEY and some value e.g. 12. This attribute is needed, because of the specifics of the pass.
Have in mind that in order to get some results, you need to have this role already assigned to some users.
Run the job and you will have the process started!
Note: The timeout must be set to something different then indefinite. The timeout shows for how long this attestation task is running. The best option is to put it to several days.
- How to use demo Web UI Application
Before start using the UI, please keep in mind that it is made for demo purposes only and it’s not officially supported by SAP. This is the reason why you cannot find it on the SAP Service Marketplace.
To use our Web UI you need to deploy the attached SCA file to your NetWeaver Application server.
Note: After deploying this SCA it will change your SAPUI5 inbox. The attestation request will be added to “MY ATTESTATION” tab. On this tab the currently logged-in user can see detailed information about the attestation tasks that are assigned to him or her.
Each role represents one attestation task. For example: if you have one role that is already assigned to users, these assignments are attested.
Example URI:
[GET]/idmrestapi/v2/service/TaskCollection(InstanceID='2x11',SAP__Origin='IDM')/?$expand=Assignments

If you click on the attestation task as a currently logged-in user, you can see detailed information about the custom attributes for all the resources identified by task InstanceID.
Example URI:
[GET]/idmrestapi/v2/service/TaskCollection(InstanceID='2x11',SAP__Origin='IDM')/?$expand=CustomAttributeData
By using this UI you are able to attest after you have opened the task. You can go on to perform the attestation and certify or reject the requested role for specific user:

There are two buttons:
Certify: The attester confirms that the attested role belongs to the attested user with the following settings:
DecisionKey: ATTEST
Action: CERTIFY
LinkId: ID of one particular resource to be attested
Example URI:
[POST] idmrestapi/v2/service/Decision?InstanceID='2x11'& SAP__Origin='IDM'&DecisionKey='ATTEST'&Action=’CERTIFY’&LinkId=’31’
Reject: The attester rejects that the attested role belongs to the attested user with the following settings:
DecisionKey: ATTEST
Action: REJECT
LinkId: ID of one particular resource to be attested
Example URI:
[POST] idmrestapi/v2/service/Decision?InstanceID='2x11'& SAP__Origin='IDM'&DecisionKey='ATTEST'&Action=’REJECT’&LinkId=’31’
The attestation status will be shown in the table immediately after executing the attestation action.
