In my previous document Create Webservice enabled word document in attachment assignment block,
the use case and detailed steps to use web service enabled word document in CRM Attachment assignment block are illustrated.
Since there are two alternative document types, this document will explain how to create web service enabled PDF attachment for CRM application.
Prerequisites
1. You should have Adobe Livecycle Designer installed so that you can use it to develop your adobe form template.
2. The ADS ( Adobe Document Service ) web service should correctly be configured in your application server. Run the health check report FP_PDF_TEST_00 and ensure the version information is successfully returned. The ADS will be used to render your adobe form template into PDF format in the runtime.

3. You should have an available web service created in CRM web client UI via web service tool. For detailed steps please refer to my previous document.
In this document I will use the Webservice ZJERRY_PROD_WS where the READ operation is defined on BOR type BUS1178 ( Product ).
Step by step processes
1. Create an Adobe form template like below. Maintain the web service you have created before.

Click the Download button first for "Download Schema", a pop up dialog will appear, save it locally.

The Schema is itself a xml file which describes the meta structure of your web service and will be confused by your adobe form template in next steps.
2. Click button "Start Designer", then the Adobe designer installed in your laptop will be opened automatically. Then Choose menu File->New to create a new form template.

if the open fails, check whether you have enabled the corresponding Active Control settings in your browser with reference to note 1018674.
In my opinion it is not a must to launch Adobe Designer via ActiveX, since you could manually start it at any time.
3. load the xsd schema file you stored locally in step1. Switch to tab "Data View" and choose "New Data Connection" from context menu,

Choose "XML Schema":

Load the local xsd schema file with default settings unchanged and click Finish button:

Now in Data View tab, you should see the hierarchy tree which has exactly the same appearance as what you have see in SAP Data panel in document Create Webservice enabled word document in attachment assignment block£º
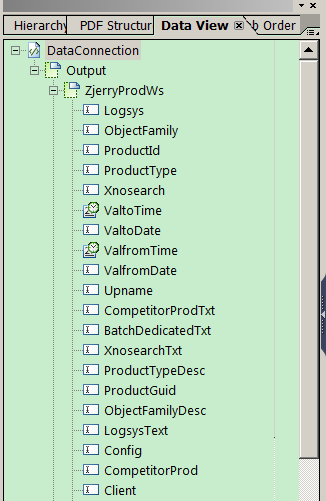
4. Now you can start to develop the layout of adobe form template. Create a new text field and bind it to the field ProductId in Data connection tree which you generate in step3 by importing xsd schema. Data binding means in the runtime, this text field will be filled with the actual transaction data of ProductId, which will be returned by service provider. The binding could be started by clicking the small triangle below:

Follow the path Use "DataConnection"->Output->ZjerryProdWs
->ProductId:

After binding the binding property for the text field should look like below. In the DataConnection tree view, there is a new icon which indicates the field ProductId is bound to a certain UI element in the template.

Finish the template layout design by adding several other fields and bind them to other fields in Data Connection.

5. Save the templage as xdp form via "Save as" menu in Adobe Designer, then upload it back to CRM via Upload button.

6. Now go to CRM product application, create a new attachment for a given product, select you form template in popup:

And ADS will render it as a PDF document for you:

Trouble shooting
The idea of trouble shooting is exactly the same as those explained in Create Webservice enabled word document in attachment assignment block.
