
- SAP Community
- Products and Technology
- Additional Blogs by SAP
- Quick Setup of Solution Manager Test Option #1 w/C...
Additional Blogs by SAP
Turn on suggestions
Auto-suggest helps you quickly narrow down your search results by suggesting possible matches as you type.
Showing results for
gussemeria
Discoverer
Options
- Subscribe to RSS Feed
- Mark as New
- Mark as Read
- Bookmark
- Subscribe
- Printer Friendly Page
- Report Inappropriate Content
04-17-2014
9:40 PM
General Information
Solution manager 7.1 now offers a robust testing solution that is relatively easy to setup, allows for manual and automated testing and is a great platform to handle most testing programs. In this three part blog series, I will discuss the setup of a Test Management Option #1 proof-of-concept (POC).
Part 1 will condense the basic setup of Solution Manager’s Test Work Bench and discuss it’s use through the 3 main phases (Preparation, Planning & Execution). Part 2 will include the setup and use of the Business Process Change Analyzer (BPCA) tool and Part 3 will include the creation and use of Component Based test Automation (CBTA)scripts. Test management reporting will be discussed at a later time.
Please note: Test Option #1 requires an existing Project/business blueprint in Solution Manager (transactions SOLAR01 & SOLAR02). The blueprint should include the following at a bare minimum: any business process structure (I.E. order to cash), transactions and test cases.
Part 1 – Main activities and duration (approximate) for setting-up a basic test management POC:
- Setting-up SAP Solution Manager Test Work Bench (a one-time activity - 2 hours)
- Test Preparation (5 – 15 minutes)
- Test Planning (10 - 30 minutes, depending on the number test cases/packages and testers)
- Test Execution (5+ minutes, depending on test case)
Solution Manager Authorization Roles
Test Engineer/Manager Roles: Tester Roles:
SAP_SOL_PM_COMP SAP_SOL_TESTER_COMP
SAP_SOL_AC_COMP SAP_STWB_WORKFLOW_CREATE
SAP_SOL_BC_COMP SAP_SUPPDESK_CREATE
SAP_SOL_TC_COMP SAP_SMWORK_BASIC_TEST_MAN
SAP_SUPPDESK_DISPLAY SAP_SMWORK_ITEST
SAP_SMWORK_BASIC_TEST_MAN
SAP_SMWORK_ITEST
SAP_SMWORK_BASIC_IMP
SAP_SMWORK_IMPL
Managed system (i.e. ECC) user authorizations should include the following:
- S_DATASET: Authorization for activities 06 and 33 is required
- S_PATH: Authorization for activities 02 and 03 is required
Setting-up SAP Solution Manager Test Work Bench
Step 1 – Activate “SM_IMPLEMENTATION” Service
How: execute transaction SPRO and follow the path shown below to activate the service

Please note: Steps 2 - 5 will be done from the Test Management Work Center “Administration” bar (transaction: solman_workcenter) as shown here:
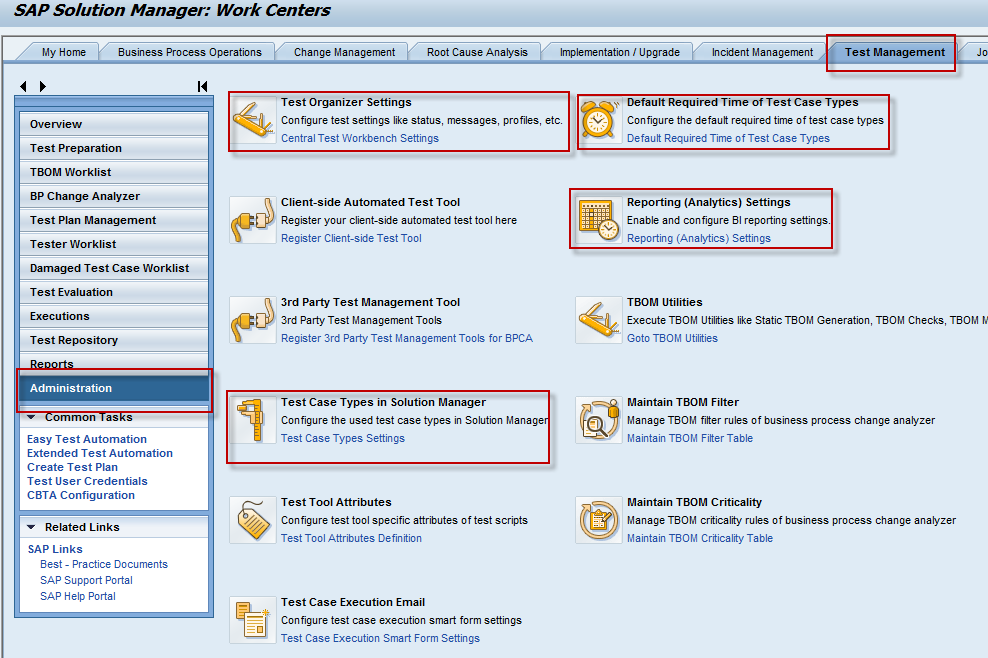
Step 2 – Activate BI reporting
How: From the Test Management Work Center (transaction solman_workcenter) click on the “Administration” bar and select “Reporting (Analytics)Settings”. Check the box marked “Enforce Content Activation” and click on “Apply Changes”.

Step 3 – Central Test Workbench Settings
How: : From the Test Management Work Center (transaction solman_workcenter) click on the “Administration” bar and select “Central Test Workbench Settings”. The following settings highlighted in yellow will be looked at from this main selection view:

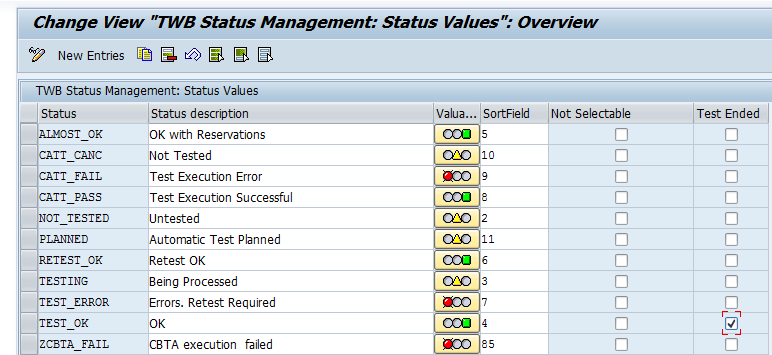
Status Definition – these statuses will be used to communicate test execution status
How: select “Status Definition” from the main view above and click on “Change”. You can add, change or disable status values as needed. Also, a value can designate the test has ended.
Test Set- defining test sets allow you to group test plans (i.e. a test cycle) – optional
How: select “Test Set” from the main view above, click Change. Add or delete sets as needed. Dates are optional.

Notes – allows you to select options for “test note” which are used to document manual test case execution results (optional, but recommended).
How: select “Notes” from the main view above, click Change. Select the behavior desired. For a POC, select all.

Release Status Value – here you can create values that are used in a “test plan schema” (i.e. New, Released). The defaults are typically adequate for a POC
How: select “Release Status Value” from the main view above, click Display.

Note: Release Status – allows you to create or modify a “status schema” for a test plan. It will dictate which status values will allow changes (“Change Lock”) to a test plan and/or which will allow a tester to begin testing (“Execution Lock”). Here you can also set the flag for BI reporting. For a POC, select “Simplest” or “Defaults”
How: select “Release Status” from the main view above, click Display. Select a Status Schema and double-click on “Test Plan release Status Values”. Change only once comfortable with test plan functionality. For a POC, use an existing release status schema.

Workflow – Activate Workflow (optional, but recommended)
Email capability must already be setup up see transaction SCOT and also ensure that each tester has an email address defined in their login (SU01).
How: How: select “Workflow” from the main view above, click Display and confirm the following:
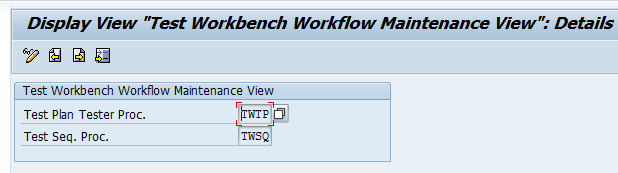
Transaction Type for TWB Service Desk Messages – confirm/change the type of ITSM incident management ticket type that is used when creating a test case issue.
How: How: select “Transaction Type for TWB Service Desk Messages” from the main view above, click Display and confirm the two types highlighted below. If a custom ticket type is created in ITSM, here is where you would designate its use.

Step 4 – Test Case Type Settings
How: From the Test Mgt Work Center select the “Administration” bar on the left and select “Test Case Type Settings”. Select the types you will deploy for the POC.

Step 5 – Set “Default Required Time of Test Case Types”
How: From the Test Mgt Work Center select the “Administration” bar on the left and then select “Default Required Time of Test Case Types”. Default imes are adequate, but can be changed as needed. These values are used in various reports and the BPCA optimization tool to determine/estimate total
test durations.

Next . . . We’ll focus on the main areas of testing: Preparation, Planning and Execution
Test Preparation
Step 1a – Run the “Evaluate” program
How: from the Test Mgt Work Center, select the “Preparation” bar , select your project and click on “Evaluate” (shown as “A” below). Execute the eport and look for any missing test cases (2nd screen shown below).


Step 1b. – Creating a test case document (i.e. manual) – if needed
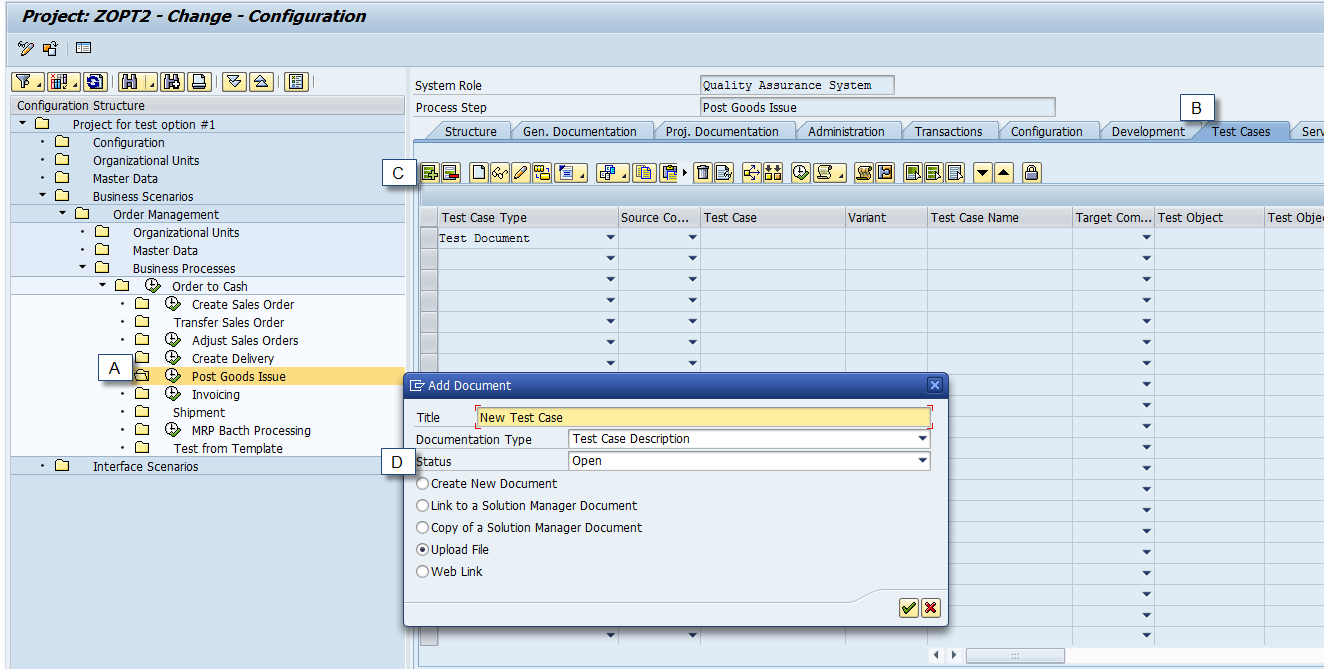
From the Test Mgt. Work center, select the “Preparation” bar->the project->click on “Configuration” (shown as “B” above). This will bring up (in a new screen) SOLAR02 or the project selected.
(A) Select the business process node (process or step)on the left and (B) click on the “Test Cases” tab on the right. Then (C) click on the add button. A pop-up (D) is presented and you can create, upload, link or copy a document.
Here is an example of a document that has been uploaded. You can make changes to it and set its’ status (i.e. open, released). Ensure it is set to “Released” when ready to be used for testing:

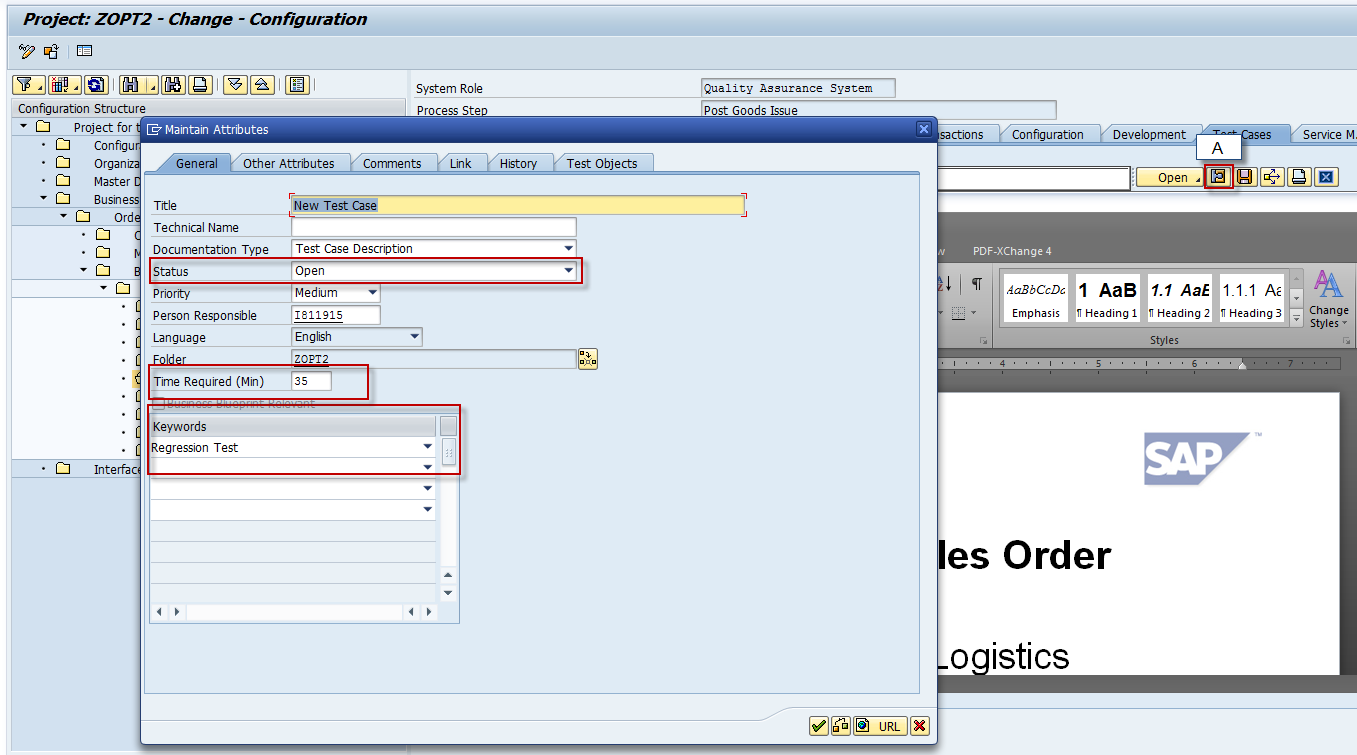
Step 1c. - Set test case document attributes
How: from the above screen select the button marked “A” and a pop-up appears. Here verify and/or change the items highlighted:
- “Priority” can be used later for filtering
- “Time Required” can be used later for test plan duration estimates
- “Keywords” need to be defined in the Project and can later be used to “tag” test cases and use these tags for filtering and test plan creation
Test Planning
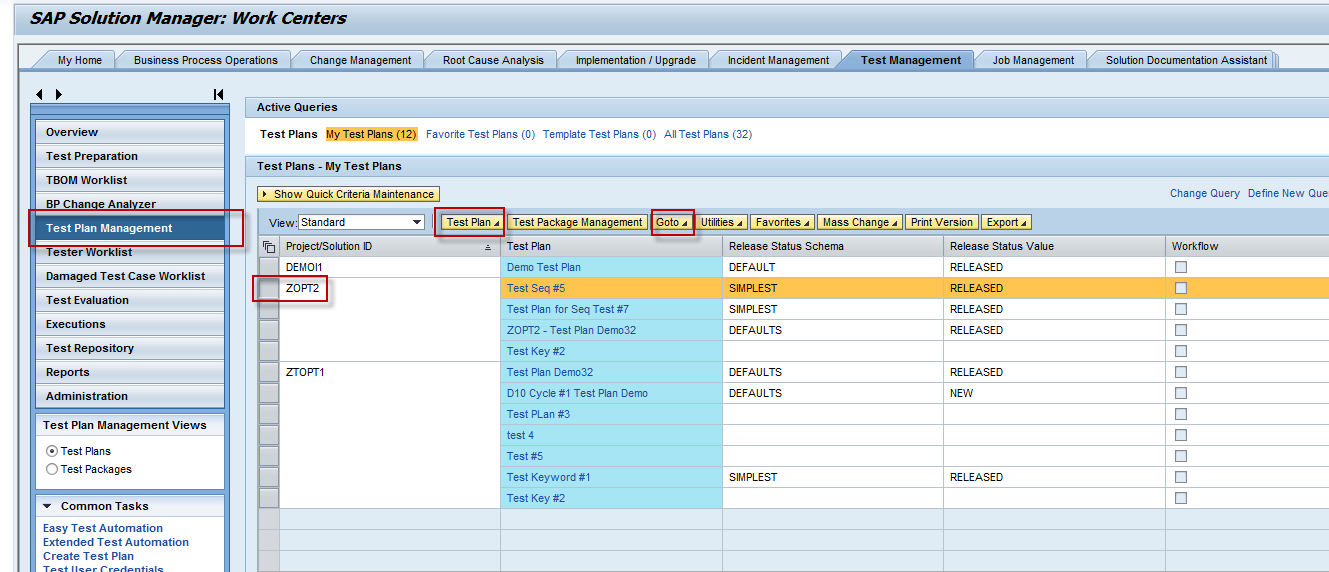
Step 1 – Select project, set test plan attributes, select test cases and generate test plan
How: In Test Mgt Work center, select “Test Plan Management”, then select the project. Click on the “Test Plan” button shown below and select “Create Test Plan” from the drop-down.
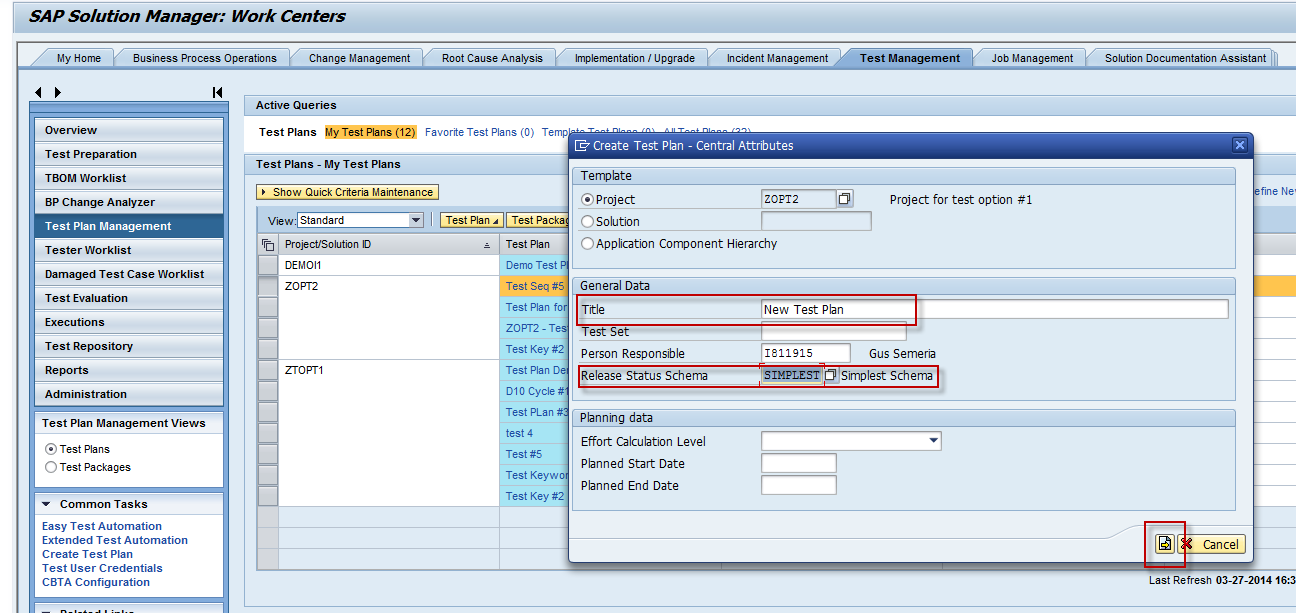
To complete the creation of the test plan follow the next three screen shots:
- Enter the test plan “title”
- Select the “Release Status Schema” for a POC “Simplest” is adequate
- Planning start and end dates are helpful for actual testing, but optional for a POC
- Click on the arrow below pointing right
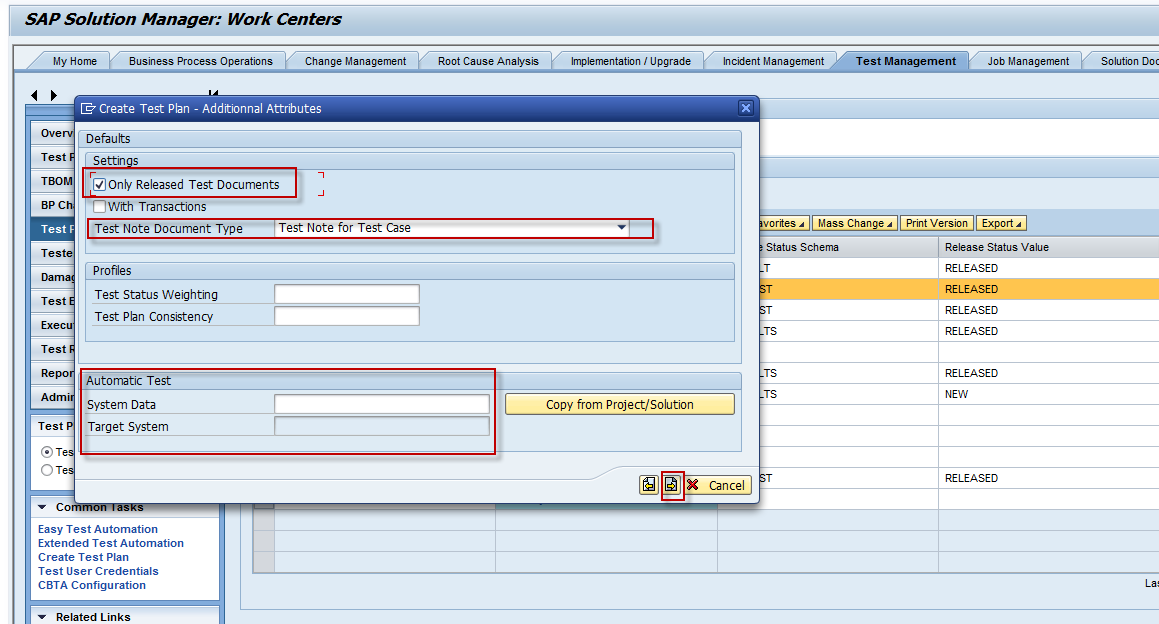
Next, confirm the type of documents that will be used for the “test note” (test results during execution). You can select if “only released test documents”
will be used – for a POC leave this unchecked. Click on the arrow below pointing right.
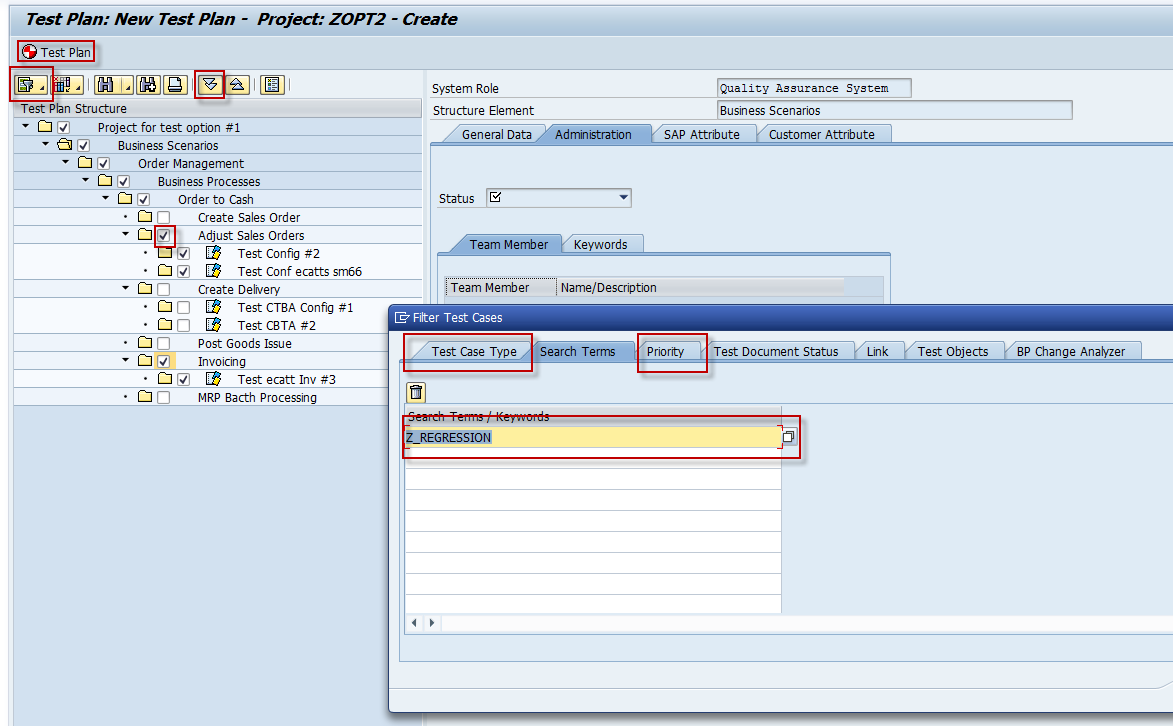
Lastly, select the business blueprint nodes/test cases required using the buttons highlighted below:
- Use the filter button to display the pop-up and filter by: test type, keywords, priority, etc.
- You can also manually select specific nodes/test cases
- Click on the “Test Plan” button to generate (if a transport screen pops-up, select “local transport”)
Note: A test plan contains 1 or more test packages. A test package contains 1 or more test cases. Testers are assigned to test packages.
Step 2 – Create one or more test packages and assign the test package to one or more users
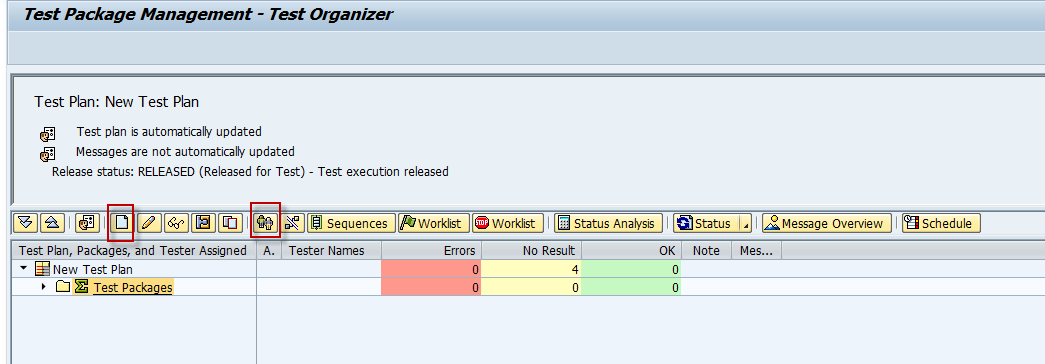
How: Select the test plan you just created and click on the “Test Package Management” button

This will display a new screen as shown below. Click on the “Create” button shown and select the test cases required from the test plan you just created. It
works similar to how a test plan is created.
- Select the test cases for this test package
- Click on the “Test Package” generate button
- Enter a Test Package name
- Click on execute (again, if a transport screen pops-up, select “local transport”)
Before leaving the screen above, select the new test package and click on the “add tester” button. Add one or more users and exit the screen.
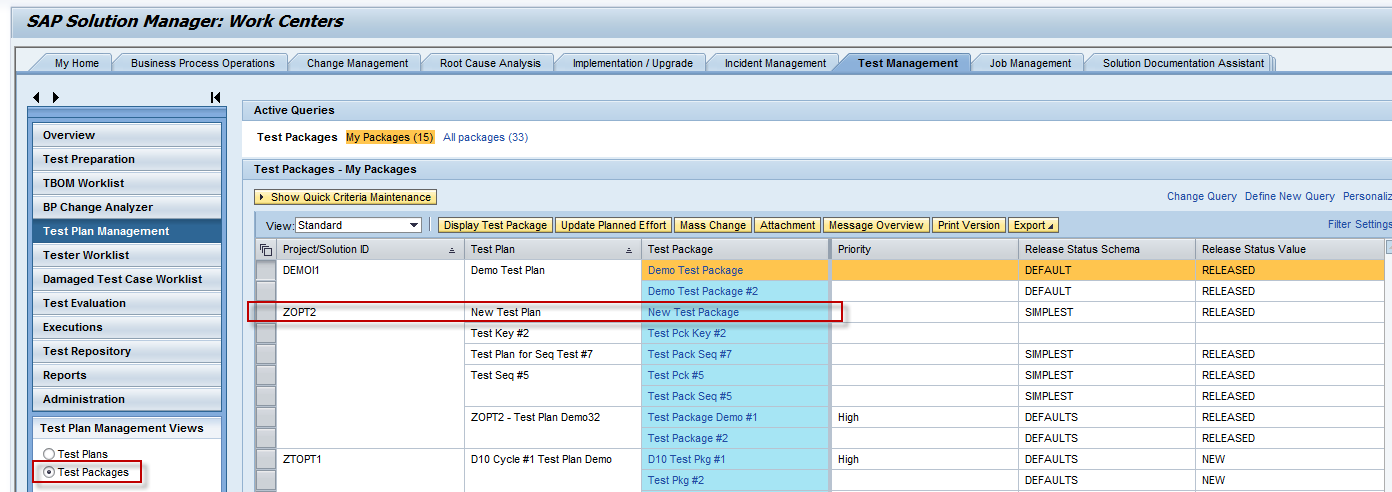
The test package can be seen by selecting the “Test Package” radio button on the left of the screen shown below:
Step 3 – Final step to release the test plan to the testers
How: Click on the “Goto” button and select “attributes”. This will display the following screen. Set the screen to “change mode” Set the “Release
Schema” to “Released”. If you use the “Simplest” status schema, it will already be set to released. Testers can now test. Ensure that the “System Role” set to the right test system.

Test Execution
In this last topic for the blog we will look at executing a test case.
Step 1 – Displaying a tester work list
How: From the Test Mgmt. Work Center perform the following:
- Select the “Tester Work list”bar on the left
- Select the test package required from the list
- Select a test plan to execute and click “run”

For a manual test, the following screen is displayed:
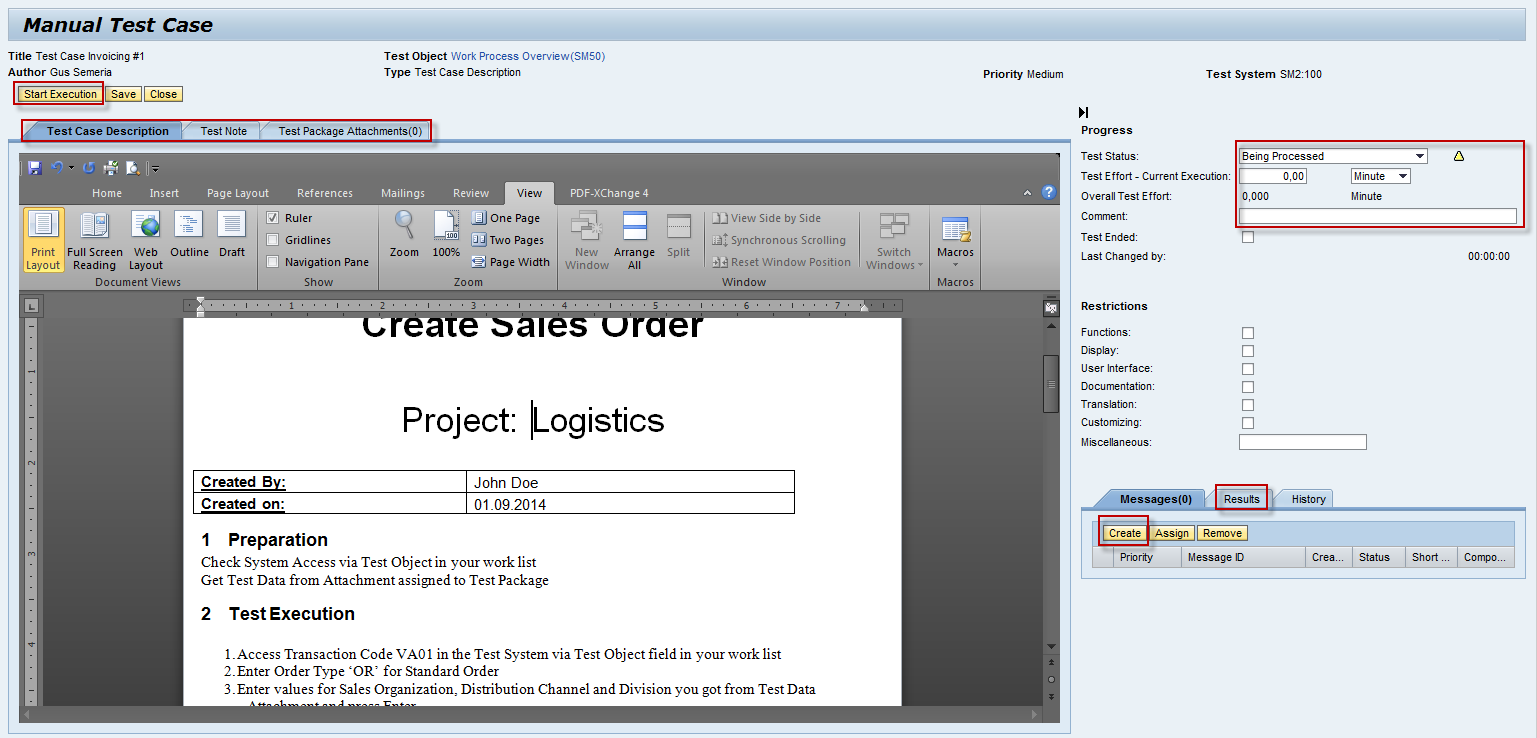
- From the screen above the tester can follow the test script.
- By clicking on the “Start Execution” button (upper left) the tester is logged into the system and the transaction is executed automatically.
- The “Test Note” tab allows for a document to be created where the tester can report results and provide screen shots.
- The “Test Package Attachment” tab can be used to display documents containing data to be used by the tester(s). And, can also be used to communicate results from one test which can be used for the next test (in the situation where the test case includes multiple transactions)
- Once the test is executed, the “Stop Execution” button is clicked. This will populate the “Test Effort” field with the elapsed time it took to execute the test case. If this feature is desired a flag must be set for a SPRO->Extended Configuration MTC_TIME_RECORDING parameter beforehand.
- After the tester has stopped testing, they will enter a “Test Status” (i.e. “OK”, “Error retest required”) There is also a comments field if needed. This
can be used to communicate information between testers of a multi-tester scenario. - Lastly, in the event that there is an error in the functionality being tested, the tester can create a “Message” (ITSM incident ticket). This can then be
routed to a developer for resolution and the test restarted.
There are some additional features in the SAP Solution Manager Test Work Bench tool that can be further discussed, but for now this should provide some basic information to create a Test Option #1 POC for manual testing.
In a subsequent blog I will include Parts 2 & 3 which will include BPCA and CBTA setup and use.
If you have any questions or suggestion please let me know. Thanks for reading.
1 Comment
Related Content
- Consolidation Extension for SAP Analytics Cloud – Automated Eliminations and Adjustments (part 1) in Technology Blogs by Members
- Usage of Custom Destination Service in BTP, ABAP Environment in Technology Blogs by Members
- LDPAS for Solution Manager in Product Lifecycle Management Q&A
- Validation for different Identity Cards via ABSL code in SAP C4C in Technology Blogs by Members
- Quick Start guide for PLM system integration 3.0 Implementation in Product Lifecycle Management Blogs by SAP