
- SAP Community
- Groups
- Interest Groups
- Application Development
- Blog Posts
- Label Printing in SmartForms
Application Development Blog Posts
Learn and share on deeper, cross technology development topics such as integration and connectivity, automation, cloud extensibility, developing at scale, and security.
Turn on suggestions
Auto-suggest helps you quickly narrow down your search results by suggesting possible matches as you type.
Showing results for
former_member18
Explorer
Options
- Subscribe to RSS Feed
- Mark as New
- Mark as Read
- Bookmark
- Subscribe
- Printer Friendly Page
- Report Inappropriate Content
03-18-2014
8:40 AM
NAVIGATION FOR LABEL PRINTING IN SMART FORMS
STEP 01: Open the smartForms application with Transaction Code ‘SmartFroms’.
STEP 02: Go to the Form Interface and click on the Table Tab and enter the internal table name from the Driver Program (Suppose: ITAB).

STEP 03: Go to the Global Definition and provide the global data. (You need to construct a Structure Type (suppose: ZJOYJIT_LABEL) and a table type (Suppose: ZJOYJIT_STR_MARA) with its line type as the structure type with the fields to be printed in the label.

STEP 04: Go to the initialization tab page in the Global Definition. Enter Input and Output Parameters.
Suppose,
Input Parameters Output Parameters
I IT_MAIN
ITAB ITAB
WA
IT_MAIN
WA_MAIN
Enter the piece of Code in the Initialization part.
* PUSH EVERY SIXTH ROW OF IT_FINAL INTO IT_MAIN .
I = 6.
DO.
READ TABLE ITAB INTO WA INDEX I.
IF SY-SUBRC = 0.
APPEND WA TO IT_MAIN.
I = I + 6.
ELSE.
EXIT.
ENDIF.
ENDDO.
* DELETE THE ROW FROM IT_FINAL WHICH ARE PRESENT IN IT_MAIN .
LOOP AT IT_MAIN INTO WA.
DELETE TABLE ITAB FROM WA.
ENDLOOP.

STEP 05: Now create 5 New Windows except the Main Window and set the positions of the in the page and resize them in Form Painter.

STEP 06: Set the windows in the Form painter of the page and resize them.

STEP 07: Now, Create a Program line in First Window (Suppose, WINDOW_01).

STEP 08: Write the piece of Code in the Program Lines General Attributes Tab.

STEP 09: Create five texts in the respective five Windows one by one.

STEP 10: In General Attribute tabs of each texts, mention the heading and the fieldnames (Suppose: WA1-MATNR,……., wa1-MTART And for the other windows WA2-MATNR,……., WA5-MTART).


STEP 11: Go to the Condition Tab Page of the five texts and set the conditions as follows.


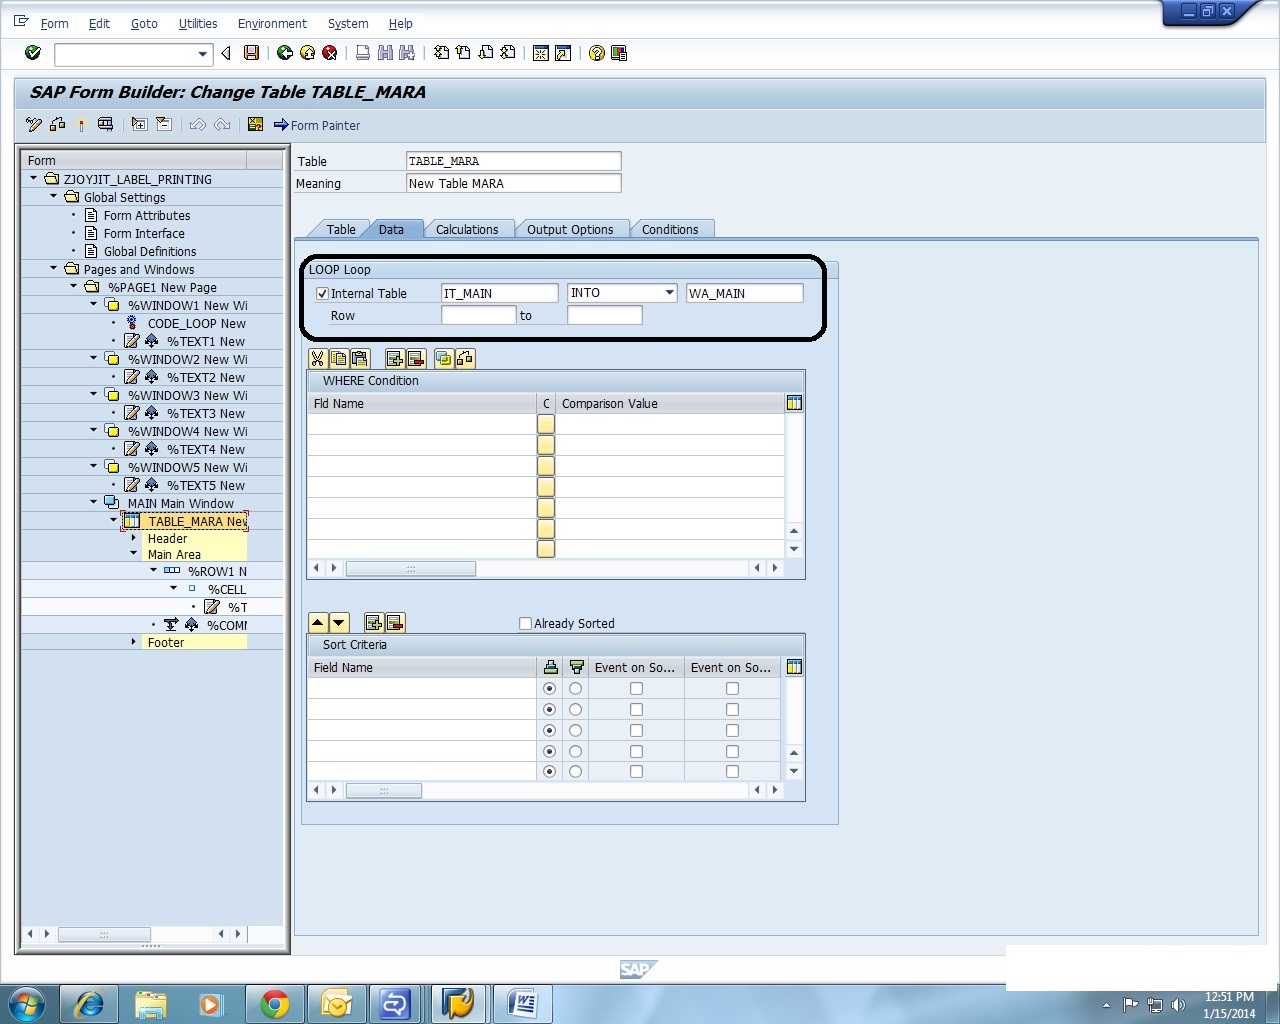
STEP 12: Now, in the main Window Create a table.

STEP 13: In the table, go to the Data tab page and set the internal table (Suppose, IT_MAIN INTO WA_MAIN).
STEP 14: Go to the Main Area of the Table and create a Table Line with Line Type: %LTYPE1.

STEP 15: The Output Option tab of the Table line.

STEP 15: Create a text inside the cell of the table and set the headings as well as fields.

STEP 16: Now, create a Command in the main area of the table.

STEP 17: In the general Attribute Tab page, click on the Checkbox “Go to New Page” and Set the Page name (Suppose: %PAGE1) and in the Condition tab page set the ITAB NOT EQUAL TO INITIAL.


Save, Activate and Test the program in the display mode.
STEP 18: Now, go to the SE38 Transaction and write the Driver program to pass the data to the smart form from Mara Table (Suppose: ZJOYJIT_LABEL_DRIVER).

STEP 19: Write the Code in the report program to pass data to the Smart Form.
report zjoyjit_label_driver.
tables : mara .
data : itab type zjoyjit_str_mara ,
wa type zjoyjit_label ,
fname type rs38l_fnam .
selection-screen : begin of block b1 with frame title t1 .
select-options : s_matnr for mara-matnr .
selection-screen : end of block b1 .
start-of-selection .
select matnr
ersda
laeda
mtart
matkl
from mara
into table itab
where matnr in s_matnr .
call function 'SSF_FUNCTION_MODULE_NAME'
exporting
formname = 'ZJOYJIT_LABEL_PRINTING'
* VARIANT = ' '
* DIRECT_CALL = ' '
importing
fm_name = fname
* EXCEPTIONS
* NO_FORM = 1
* NO_FUNCTION_MODULE = 2
* OTHERS = 3
.
call function fname
* EXPORTING
* ARCHIVE_INDEX =
* ARCHIVE_INDEX_TAB =
* ARCHIVE_PARAMETERS =
* CONTROL_PARAMETERS =
* MAIL_APPL_OBJ =
* MAIL_RECIPIENT =
* MAIL_SENDER =
* OUTPUT_OPTIONS =
* USER_SETTINGS = 'X'
* IMPORTING
* DOCUMENT_OUTPUT_INFO =
* JOB_OUTPUT_INFO =
* JOB_OUTPUT_OPTIONS =
tables
itab = itab
exceptions
formatting_error = 1
internal_error = 2
send_error = 3
user_canceled = 4
others = 5
.
STEP 20: Save, Compile, Activate and Run the Program with the printer.
OUTPUT:
THE SELECTION SCREEN:

THE PRINTER SELECTION SCREEN:

CLICK ON PRINT PREVIEW:

Thanks & Regards,
Joyjit Biswas
- SAP Managed Tags:
- User Interface
You must be a registered user to add a comment. If you've already registered, sign in. Otherwise, register and sign in.
Labels in this area
-
A Dynamic Memory Allocation Tool
1 -
ABAP
8 -
abap cds
1 -
ABAP CDS Views
14 -
ABAP class
1 -
ABAP Cloud
1 -
ABAP Development
4 -
ABAP in Eclipse
1 -
ABAP Keyword Documentation
2 -
ABAP OOABAP
2 -
ABAP Programming
1 -
abap technical
1 -
ABAP test cockpit
7 -
ABAP test cokpit
1 -
ADT
1 -
Advanced Event Mesh
1 -
AEM
1 -
AI
1 -
API and Integration
1 -
APIs
8 -
APIs ABAP
1 -
App Dev and Integration
1 -
Application Development
2 -
application job
1 -
archivelinks
1 -
Automation
4 -
BTP
1 -
CAP
1 -
CAPM
1 -
Career Development
3 -
CL_GUI_FRONTEND_SERVICES
1 -
CL_SALV_TABLE
1 -
Cloud Extensibility
8 -
Cloud Native
7 -
Cloud Platform Integration
1 -
CloudEvents
2 -
CMIS
1 -
Connection
1 -
container
1 -
Debugging
2 -
Developer extensibility
1 -
Developing at Scale
4 -
DMS
1 -
dynamic logpoints
1 -
Eclipse ADT ABAP Development Tools
1 -
EDA
1 -
Event Mesh
1 -
Expert
1 -
Field Symbols in ABAP
1 -
Fiori
1 -
Fiori App Extension
1 -
Forms & Templates
1 -
General
1 -
Getting Started
1 -
IBM watsonx
1 -
Integration & Connectivity
10 -
Introduction
1 -
JavaScripts used by Adobe Forms
1 -
joule
1 -
NodeJS
1 -
ODATA
3 -
OOABAP
3 -
Outbound queue
1 -
Product Updates
1 -
Programming Models
13 -
Restful webservices Using POST MAN
1 -
RFC
1 -
RFFOEDI1
1 -
SAP BAS
1 -
SAP BTP
1 -
SAP Build
1 -
SAP Build apps
1 -
SAP Build CodeJam
1 -
SAP CodeTalk
1 -
SAP Odata
1 -
SAP UI5
1 -
SAP UI5 Custom Library
1 -
SAPEnhancements
1 -
SapMachine
1 -
security
3 -
text editor
1 -
Tools
17 -
User Experience
5
Top kudoed authors
| User | Count |
|---|---|
| 3 | |
| 3 | |
| 3 | |
| 2 | |
| 2 | |
| 2 | |
| 2 | |
| 1 | |
| 1 | |
| 1 |