
- SAP Community
- Products and Technology
- Technology
- Technology Blogs by SAP
- Introducing the Yeoman generator for OpenUI5
Technology Blogs by SAP
Learn how to extend and personalize SAP applications. Follow the SAP technology blog for insights into SAP BTP, ABAP, SAP Analytics Cloud, SAP HANA, and more.
Turn on suggestions
Auto-suggest helps you quickly narrow down your search results by suggesting possible matches as you type.
Showing results for
sascha_kiefer
Explorer
Options
- Subscribe to RSS Feed
- Mark as New
- Mark as Read
- Bookmark
- Subscribe
- Printer Friendly Page
- Report Inappropriate Content
02-25-2014
5:06 PM
When building a web application there are allot of mundane tasks that you do over and over with each one. Tasks such as scaffolding out the basic outline of your app (index.html, UI5 bootstrap...), setting up best practices (automatic linting of your source files, a test framework, live-reloading...), plus much more…
Welcome Yeoman! An open source scaffolding toolset for modern web applications.
Yeoman allows you to scaffold the basic boilerplate tasks for building a new application. It is based on the concept of generators where each generator allows you to scaffold out the boilerplate and build tools for a basic webapp; an angular.js app and many many other apps based on various javascript frameworks...
...and now we have a generator for OpenUI5 applications.
The OpenUI5 generator enables you to quickly scaffold out the basics for an UI5 application based on a couple of different templates. It also sets up the build environment with live-reloading; watching source files for changes and linting with JSHint as well as testing. Not only that but with one command you can launch the applications in a local web server.
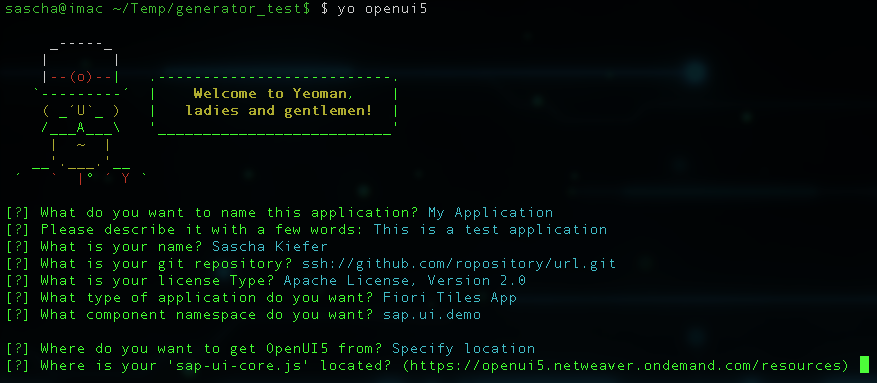
This is how it looks:
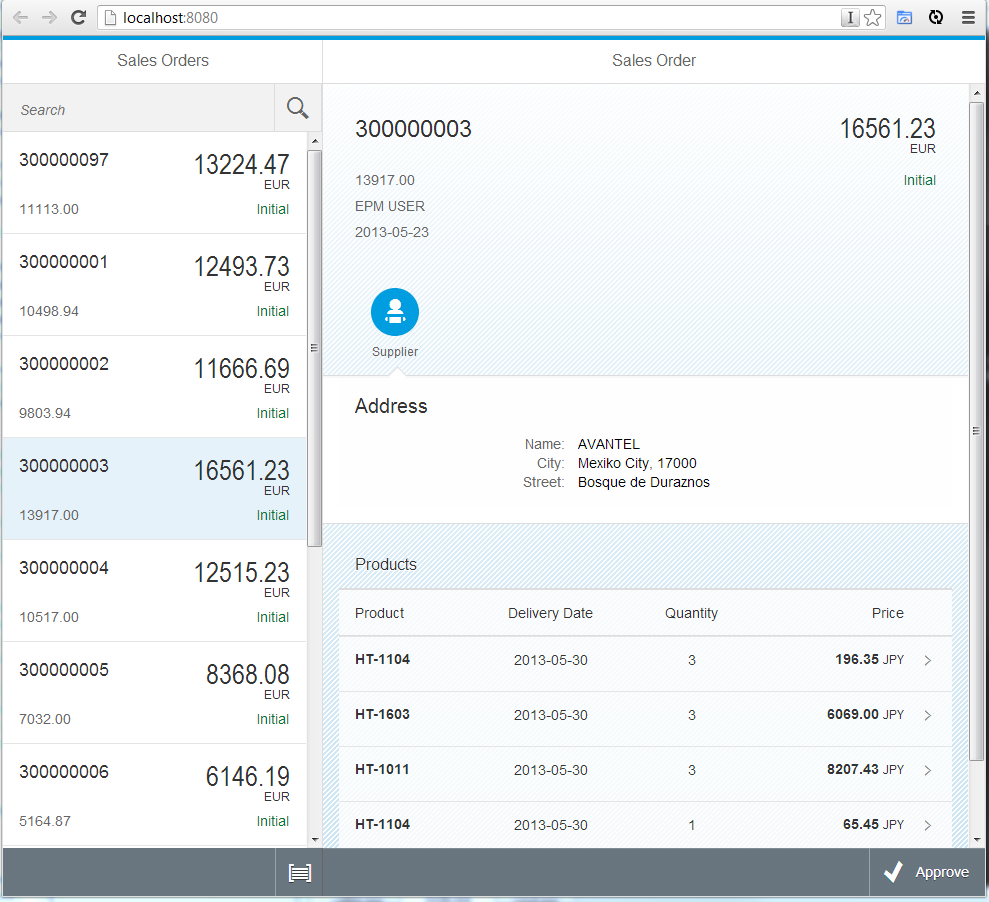
This is what it creates (among others):
Getting Started
Yeoman and the OpenUI5 generator are based on Node.js. So first of all, if you don’t have Node.js installed, you must install that now (don’t worry, it’s straight forward). Node also comes with a package manager for installing components/applications called npm. As soon as
npm --version
on your terminal returns something like 1.3.21, you’re good to go.
How to Install Yeoman
With npm, the installation of yeoman is a piece of cake. Just type
npm install -g yo
into your terminal. You can find more details on the Yeoman homepage.
How to Install the Generator
Installing the openui5 generator is just as simple. Just type
npm install -g generator-openui5
into your terminal and let npm do the magic. You can find more information here.
How to Create an application
The short version
Just run
yo openui5

grunt serve
in your terminal. After you provided the information the generator needs and some package resolution work, you should see the generated application in your default browser served from your local machine.
The little longer version
Run Yeoman with
yo

yo --help
at the command line. To get an overview of the sub-generators a generator provides, just type yo --help. This will give you a list of the sub-generators of every generator.
Starting yo without any arguments, it will give you a list of installed generators - select OpenUI5 to scaffold an OpenUI5 application. As a shortcut you can directly run the generator with
yo openui5
(which starts the default sub-generator app).
The OpenUI5 generator will ask a series of questions so as to scaffold an appropriate application to get you started. Questions such as:
- What is the name of your application? - The name is simply used as the <title> element in the generated index.html file as well as being used in the generated readme and package.json files.
- A description for the application? - This is used in the readme and package.json as above.
- Author name?
- A GitHub repository (if any) for the application? - Used in the package.json file.
- Licence Type? - Choose a licence type for your application (if any).
- Application type? - This is where we choose what architecture you want for your generated application. The different options are described further below. If a Fiori-type application is chosen then an additional component namespace must be entered.
- OpenUI5 library location? - You can choose whether or not you want to use the OpenUI5 libraries managed by Bower or choose another location (which defaults to: https://openui5.netweaver.ondemand.com/resources/sap-ui-core.js).
- Local Server Port? - This is the localhost port you will serve the application from during development. Defaulting to 8080.
- Live-reload? - Enable live-reloading of the browser when your development files change.
After you’ve gone through the above prompts the generator will scaffold out your boilerplate application and begin to download any dependencies. Dependency management is handled with bower and npm and you will see a flash of terminal output as each dependency and sub-dependency module is download, cached and version checked.
Of these dependencies only the bower OpenUI5 repository is required by your actual application (if you chose to use the bower repository). The rest are required by the build tools that are being setup for your to enable: a local http server with proxy capabilities; watching files; live-reloading; linting your code and so on.
Once all dependencies are installed, then
grunt serve
and you’re up and running...
Application-type scaffolding options
Classical
This option generates a “classical” UI5 application using the “sap.ui.commons” library based on an sap.ui.app.Application object.
Fiori Splitter App
This option generates a Fiori-style sap.m.SplitterApp application using some mock data so that the app runs out-of-the-box. The new component architecture is used as well as declarative XML views.
Fiori Tiles App
This option generates a Fiori-style sap.m.TileContainer application using a mock OData source. the new component architecture as well as XML views is used here as well.
Single Page MVC App
This option generates a simple single page MVC application, where the view and controller are all declared directly in the html file. This is handy for testing OpenUI5 features.
Add Elements to your Application
How to add a view
If you need additional views for you application just use the view sub-generator by running
yo openui5:view
on your terminal. You just have to provide a name of the view, the type and an namespace (optional). Views (with their controllers) are generated in the view sub-folder of your application.
How to add a Component
Additional components can be added with
yo openui5:facelessComponent

yo openui5:uiComponent
depending of what type of component you need.
The component name can contain a full package structure (e.g. foo.bar.myComponent). In that case the folder structure reflecting the package structure is generated and myComponent is placed in foo/bar/. If the package root (in the example above foo) is not yet registered as a local resource, the generator tries to fix that in the index.html file as well (alternatively you can add the full application namespace to the component package name).
Grunt Tasks
Yeoman comes with grunt as a task runner (similar to maven or ant).
Together with the UI5 application, the generator creates some tasks for you, which are useful for your application development and testing (they are defined in the file Gruntfile.js)
Running your generated application
For testing the application, there is a grunt server task configured which acts as a local web server. The really cool thing about it is, that you don’t need any configuration to run the basic application. Just start
grunt serve
This task starts the server and opens the application in your default browser.
If you need to access external resources (like oData services), you just need to add the information to the proxies section in Gruntfile.js. Further information can be found in the grunt-connect-proxy module documentation.
Testing
To run the unit tests of your application, just execute
grunt qunit:all
This task executes all unit tests located in the /test subfolder. Currently that folder is empty after the scaffolding and it’s up to you to implement your unit tests. We plan though, to deliver some example tests in the future.
Besides the qunit task, we have two other handy tasks in stock:
grunt jshint

grunt watch
- grunt jshint performs a jshint check on all your JavaScript files and gives you some hints about making your code cleaner. If you need to adjust the settings, you can modify them in the jshint.options section in the Gruntfile.js.
- grunt watch basically waits until you change a file and then automatically executes the jshint task and then the qunit task. This very smoothly supports a test driven development workflow (I, for example have my sublime text split in two editors. One with the file I’m working on and one with the unit test belonging to it. On the right hand side a grunt watch task constantly executes jshint and the unit test whenever I save a file):

What’s next
We have a couple of ideas how to enhance and optimize the generators and what features we could add (routing, Fiori Launchpad integration, building tasks, deployment options… just to name a few).
But we really would love to hear from you guys, what you would need or expect from the generator. So please leave your feedback or wishes either in the comments or directly on the generator issue page on github. For sure, contributors are more than welcome, any time!
One more thing...
Unfortunately I didn't manage to add a co-author to this post, therefore I'd like to express my thanks to jason.scott2 this way. Not only did he help writing this blog but he also did an awesome job in helping to develop the generator to it's current state. Thanks mate!
- SAP Managed Tags:
- SAPUI5,
- SAP Enterprise Portal
14 Comments
You must be a registered user to add a comment. If you've already registered, sign in. Otherwise, register and sign in.
Labels in this area
-
ABAP CDS Views - CDC (Change Data Capture)
2 -
AI
1 -
Analyze Workload Data
1 -
BTP
1 -
Business and IT Integration
2 -
Business application stu
1 -
Business Technology Platform
1 -
Business Trends
1,661 -
Business Trends
88 -
CAP
1 -
cf
1 -
Cloud Foundry
1 -
Confluent
1 -
Customer COE Basics and Fundamentals
1 -
Customer COE Latest and Greatest
3 -
Customer Data Browser app
1 -
Data Analysis Tool
1 -
data migration
1 -
data transfer
1 -
Datasphere
2 -
Event Information
1,400 -
Event Information
65 -
Expert
1 -
Expert Insights
178 -
Expert Insights
280 -
General
1 -
Google cloud
1 -
Google Next'24
1 -
Kafka
1 -
Life at SAP
784 -
Life at SAP
11 -
Migrate your Data App
1 -
MTA
1 -
Network Performance Analysis
1 -
NodeJS
1 -
PDF
1 -
POC
1 -
Product Updates
4,577 -
Product Updates
330 -
Replication Flow
1 -
RisewithSAP
1 -
SAP BTP
1 -
SAP BTP Cloud Foundry
1 -
SAP Cloud ALM
1 -
SAP Cloud Application Programming Model
1 -
SAP Datasphere
2 -
SAP S4HANA Cloud
1 -
SAP S4HANA Migration Cockpit
1 -
Technology Updates
6,886 -
Technology Updates
408 -
Workload Fluctuations
1
Related Content
- Deliver Real-World Results with SAP Business AI: Q4 2023 & Q1 2024 Release Highlights in Technology Blogs by SAP
- Introducing UI5 linter in Technology Blogs by SAP
- abap2UI5 - (12) Update II: Community Feedback, New Features & Outlook - January 2024 in Technology Blogs by Members
- SAP User Experience Update: What’s New for SAP S/4HANA 2023 (Private Cloud and On-Premise) in Technology Blogs by SAP
- SAP Fiori development newsletter September 2023 (issue #24) in Technology Blogs by SAP
Top kudoed authors
| User | Count |
|---|---|
| 13 | |
| 11 | |
| 10 | |
| 9 | |
| 9 | |
| 7 | |
| 6 | |
| 5 | |
| 5 | |
| 5 |