
- SAP Community
- Products and Technology
- Technology
- Technology Blogs by SAP
- Getting started with GWPA: Proxy Generation for Ja...
Technology Blogs by SAP
Learn how to extend and personalize SAP applications. Follow the SAP technology blog for insights into SAP BTP, ABAP, SAP Analytics Cloud, SAP HANA, and more.
Turn on suggestions
Auto-suggest helps you quickly narrow down your search results by suggesting possible matches as you type.
Showing results for
Product and Topic Expert
Options
- Subscribe to RSS Feed
- Mark as New
- Mark as Read
- Bookmark
- Subscribe
- Printer Friendly Page
- Report Inappropriate Content
02-20-2014
9:22 AM
UPDATE:
In the meantime, as of July 2014, GWPA has been retired.
Please find more information here: SAP Gateway Developer Tools – Bridging the Past, Present and Future
This tutorial describes how to use the so-called Service Proxies in GWPA (SAP NetWeaver Gateway Productivity Accelerator).
You may have seen the respective wizard entry in the OData category of the Eclipse “New” wizards, and you may have wondered what they’re meant for and how they can be used.
Summarizing, you can write a Java program that fires ODATA based HTTP requests, while using a very comfortable API, which is generated by the “Service Proxy” wizard.
GWPA provides the Toolkit for Java Platform, Standard Edition, which offers a wizard for generating a Starter Application.
When choosing to generate a Starter Application for Java SE, the result is a Java Project which contains an executable Java class.
Moreover, the toolkit offers the wizard for generating proxies based on an existing OData service.
A general introduction into GWPA can be found here: http://scn.sap.com/community/netweaver-gateway/blog/2013/05/10/new-gateway-tool--sap-netweaver-gatew...
I recommend to follow the tutorial for the Java SE toolkit, which can be found here.
This tutorial intends to be very detailed, such that it can be followed by any interested person, although being totally new to GWPA and Eclipse and Java development.
See prerequisites section for links to more detailed descriptions for preparing the environment.
Please let me know if anything remains unclear.
Note: Sample code.
For your convenience, I've attached the result of this tutorial, the Java source, to this document.
Please find it below.
It is a text file that you can use for your convenience.
Instead of copying code snippets, you can view and copy the full coding to your IDE.
There's only one thing you have to do: enter your user/pw for the sample service.
And now grab a coffee, go ahead and have fun…;-)
Prerequisites
In order to follow this tutorial you need the following prerequisites
Install Java
Install Eclipse
Install GWPA
Install JavaSE toolkit along with GWPA
Furthermore you need to have access to an OData service.
In this tutorial we use the service ZGWSample_SRV, which is located on the Gateway Demo System, such that everybody can access it.
Please refer to the following document, where all links and details about all prerequisites are collected: Getting started with GWPA: Prerequisites
Overview
This tutorial consists of the following 6 steps:
1) Create Project
2) Delete generated application code
3) Generate Proxy Classes
4) Understand the proxies
5) Use the proxies
6) Do additional examples
1) Create Starter Application Project for Java SE Toolkit
Start your Eclipse and create a Starter Application Project
Eclipse main menu -> File -> New -> Project -> OData Development -> Starter Application Project
Enter a project name, e.g. ProxyTest
In the drop down box, select Java SE (If the drop down is empty, install the Java SE toolkit, see Prerequisites)
Enter a package name, e.g. com.my.company.tests (This package will be generated)
Enter a name for the Java class which will be generated and which will contain the main-method, e.g. ProxyTest
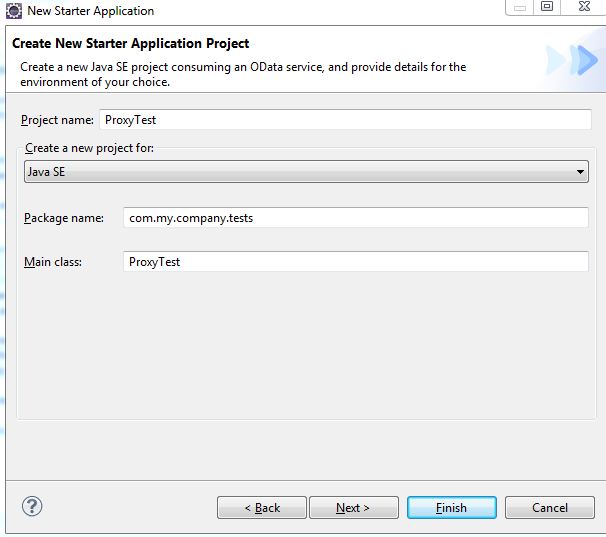
Press Next
Select the template Basic Application and finish the wizard.
The result is a normal eclipse project of type “Java”.
But the advantage is that the library com.sap.odata.dt.javalib is already there (located in the lib folder) and added to the build path.
Furthermore, the project contains a Java-class with generated code.
2) Delete the generated code
For this tutorial, we don’t need the generated code, because it doesn’t deal with proxies.
So we delete everything that is commented.
The result is a nearly empty Java class:

3) Generate proxy classes
Within this step, we will generate the proxy classes, which we will use later in our Java application.
Select your Java project and open the context menu.
Choose New -> other -> OData Development -> Service Proxy
Press Next
In the drop-down, select Java SE.
If the drop down is empty, or doesn’t contain the entry, you have to install the Java SE toolkit, see Prerequisites
Enter a new package name, e.g. com.my.company.proxies.gwsample
This will be the package, where all newly generated Java proxy classes will be located.
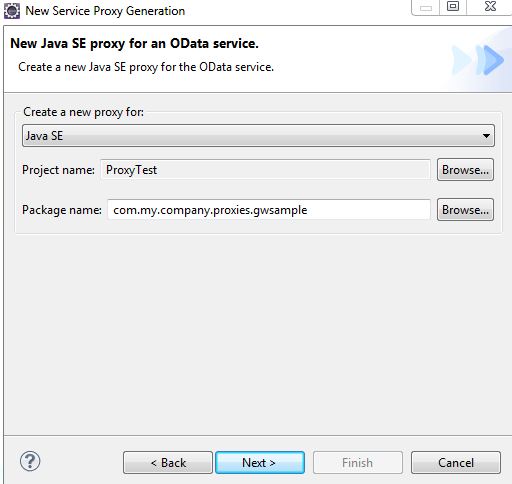
Press Next.
Now we have to specify a valid and existing OData Service, which will be used in our Java application and which will be the base for the proxy classes.
Choose “Remote Location” and enter the following URL of the Service to be used:
https://sapes1.sapdevcenter.com/sap/opu/odata/sap/ZGWSAMPLE_SRV
Press Go.
You’ll be prompted for the user credentials for accessing the service.
Enter the credentials (see Prerequisites section for user credentials) and confirm.
The wizard looks as follows:

Note: if you get an error related to SSL, please check again the prerequisites document which explains how to import a certificate into your Java vm.
Press Finish.
The proxy classes are generated into the specified package.
For each EntityType that has been displayed in the “Service details” pane of the wizard, one corresponding proxy class has been generated.
Additionally, there’s one generated class that acts as proxy for the service itself.

The service-proxy class is automatically opened after the generation process.
4) Understanding the proxies
Let’s have a look at the generated code.
Open the class BusinessPartner.java in Eclipse.
And open the metadata document of the service in a browser of your choice
The URL is https://sapes1.sapdevcenter.com/sap/opu/odata/sap/ZGWSAMPLE_SRV/$metadata?&sap-ds-debug=true
Compare the EntityType “BusinessPartner” with the Java class “BusinessPartner.java”

You can see that for each property of the EntityType, a member variable has been created in the Java class.
The type of the property has been mapped to a Java type.
In the above example we can also nicely see that a NavigationProperty is as well mapped to a member variable, and the type of the variable is a list of the EntityTypes where the association points to.
For each variable there are getter and setter methods.
For each NavigationProperty there are methods.
Furthermore, there are two constructors. One of them takes those variables, which form the key (primary key in database), as parameter.
All names are identical.
The paradigm of keeping the names identical has led to some inconvenient naming: e.g. variable and method names that start with uppercase.
You can always rename such names, if desired.
Now let’s open the service class, in our example the class ZGWSAMPLE_SRVService.
For each EntitySet, it contains methods, which correspond to the CRUD Q operations:
| Operation | HTTP request | Method name example | ||||
|---|---|---|---|---|---|---|
|
| createProductCollectionEntry() | ||||
|
| getProductCollectionEntry() | ||||
|
| updateProductCollectionEntry() | ||||
|
| deleteProductCollectionEntry() | ||||
|
| getProductCollection() |
Furthermore, the service class hosts the information about the base URL, the instance of IRestClient and the instance of the Parser, but we typically don’t need them because the proxies do the job internally.
The very convenient about the proxy classes is that the user of this API doesn’t deal with URLs anymore.
The user of this API doesn’t need to care about firing REST requests
The user of this API doesn’t need to parse any response string.
The user of this API simply uses the objects and their methods.
It’s now time to use these nice proxies.
5) Using the proxies
The proxy generation doesn’t generate any Starter Application.
Or, with other words, there’s no Starter Application Wizard template, that would generate project and ready-to-run Java application based on proxies and the Java SE Toolkit.
So, we have to create a project manually (as done in step 1) and after generating the proxies, we have to write our own application code.
For this tutorial, we do the same that we’ve done in the Basic Java SE tutorial.
Like that, we can compare the code.
I think that you’re already expecting that the code that uses proxies will be much shorter and simpler…
And I think that your expectations won’t be disappointed…;-)
In our Eclipse project, we have the class ProxyTest.java, which is currently empty.
Within the following steps, we’ll add the code, such that it looks similar to the class of the Basic Java SE tutorial
InitializeRestClient()
First, we need to specify the details of server, credentials etc
This is done in the same manner as in the basic Java SE tutorial (See there for a detailed description), creating the required parameters and passing them to an instance of IRestClient.
So let’s now create the method initializeRestClient().
Then, create a main() method which invokes the initialize method.
Don’t forget to generate the import statements (Ctrl + O).
The code looks like this:

ReadExample
Now we start using the proxies.
First thing is to create an instance of the service proxy.
Add the following line to the main() method:
ZGWSAMPLE_SRVService service = new ZGWSAMPLE_SRVService(restClient);
Next, we need to create a method named readExample().
In this method, we do a QUERY on the ProductCollection.
We don’t have to know URLs and collection names.
We simply type the following line:
List<Product> productCollection = service.getProductCollection();
The next, that was done in the generated BasicApplication template of the basic Java SE tutorial, was to loop over all OData entries and print the “Name”-property.
When using the proxies, we don’t have to look up names of properties anymore, because we have generated getter methods for each property.
As such, we can loop over the list of Products and ask them for their name.
Right after the above line, type “for”, then press Ctrl + SPACE in order to get the code completion proposals.
Since there are several templates available, you get a choice dialog.

Select “for – iterate over collection” and press Enter.
The code skeleton is generated.
In the loop, invoke the getName() method on the Product instance.
That’s it.
Then invoke the readExample() method in the main method.
See the screenshot below for the sample code.
The proxy itself of course has to fire HTTP requests in order to provide the data.
The proxy uses the javalib API.
You can see it in the method getResponseString() which can be found in the generated service proxy class (in our example, the Java class is called ZGWSAMPLE_SRVService.java).
The proxy provides its own typed Exception, which can be thrown whenever we deal with proxy operations.
So we have to catch this exception.
For the sake of simplicity and to be compliant to the generated BasicApplication of the basic Tutorial, we catch all exceptions in the main method.
You can see that the invocation of the readExample() method in the main() method has been marked as erroneous.
Now hover with your mouse over the error, a tooltip gets displayed which offers a solution for the error:

This is called quick fix. Alternatively, the quick fix can be obtained by placing the cursor on the error and pressing Ctrl + 1
The normal way to generate a try/catch block is to select a statement, then open the context menu in the editor and to choose "surround with -> Try/catch Block".
By the way, did you know that there’s a Blog which collects many useful tips&tips and keyboard shortcuts? Find it here.
OK, from the quick fix dialog, choose “Surround with try/catch”
As of now, our example class looks as follows:

You may now run the application.
Click into the Java editor, open the context menu and choose "Run as -> Java Application".
The result is a long list of product names and can be seen in the Eclipse Console View (opens automatically. If it doesn't, open it via Eclipse main menu -> Window -> Show View -> Console)

createExample()
Using the proxies, you’re working in an object-oriented environment.
So, if you want to create a Product, you start saying:
Product myProduct = new Product(…)
However, this is only half of the truth.
This statement doesn’t fire a POST request to the backend.
So we have to take care for that by invoking the corresponding service-method
service.createProductCollectionEntry(newProduct);
Corresponding to the HTTP POST request, invoking this method returns the newly created Product instance.
Note that the constructor of the proxy (in our example: the Product) only requires the key property in the constructor signature.
However, in our example service, the ABAP backend requires more fields to be specified upon product creation.
We have to fill these fields, otherwise we get a backend error.
We did this on ODataEntry level in the basic Java SE tutorial.
We do it here by invoking setter methods of the Product instance.
This is our example implementation of the createExample method:

Now we invoke this createExample() method in the main() method.
And run the application.
The result is again the list of products, but additionally the line which prints the name and ID of the newly created Product, as it was returned by the creation method.
Let’s enjoy the success for one second…
updateExample()
Unfortunately, while looking at the output, we’ve discovered that the Product name contains a typo…;-(

So we have to modify it.
That’s done with an UPDATE operation.
So let’s create method updateExample().
The update is done by simply invoking the setter method for the corresponding variable.
In this case:
product.setName("My Super Notebook");
Then do the actual HTTP PUT request:
service.updateProductCollectionEntry(product);
That’s all.
Invoke the method updateExample() in the main() method.
Before running the application, make sure that you change the productID in the createExample() Method, otherwise you’ll get an error in the backend, because you would be attempting to create a duplicate primary key.
Our example method looks as follows

And the result in the console:

deleteExample()
Now that we’ve reached the end of our tutorial, let’s do the housekeeping cleanup work.
The deletion of a proxy instance is done by invoking the respective delete method on the service class.
The method requires the key property, which can be obtained from the proxy instance:
service.deleteProductCollectionEntry(product.getProductId());
In our example implementation, we verify if the deletion has been successful by checking the response value.
Create the method deleteExample().
Insert the above line.
Then place the cursor somewhere in the line and press Ctrl + 1 in order to get a proposal.
Select: "Assign statement to new local variable", as shown in the screenshot:

The return value is a boolean that can be asked for successful execution.
Our example implementation looks as follows:

Now, for the last time, change the productID to a unique value, invoke the deleteExample() method in the main() method and run the application by pressing Ctrl + F11 (run last launched)

We’re done with the basic examples of this tutorial.
Do you agree that the Java SE Toolkit in conjunction with proxies is very easy to handle?
6) Additional examples
To round this tutorial off, let’s have a quick look at some further topics.
Navigation
in OData, you can easily follow a navigation link by getting it from the <link> section in the OData entry.
In our example, for a Product entry, you have a Navigation Link which takes us to the supplier of the product. In this case it is the respective entry of the BusinessPartnerCollection.

After navigating to the entry of the BusinessPartner, you can see that there’s a Navigation Link which takes us to the contacts for that BusinessPartner. Since a BusinessPartner can have more than one contact person, the target of the navigation link is a collection.
In a generated proxy class of the Java SE Toolkit, you get the navigation for free, you just have to invoke the respective method on the proxy instance.
In our example:
In case of relationship: 1 to zero-or-one
BusinessPartner supplier = product.Supplier();
In case of relationship: 1 to many
List<Contact> contacts = supplier.Contacts();
Our example code:

System Query Options
Typical usage of an OData service will always make use of system query options.
For example, in order to facilitate the usage of high amount of data, there’s the $filter.
In our example, a filter that would allow to display only those products which are supplied by a specific supplier, like for example SAP, would have the following URL:
When using the proxies, we have to invoke a different method, which allows to specify one or more system query options:
service.getProductCollection("$filter=SupplierName eq 'SAP'");
The javadoc of this method tells us which options are supported.
But what to do for other options or any other parameter, which one would like to add to the URL?
The answer that is given by the proxy API to this question is another different method on the service-proxy:
getResponseString(String url)
When using this method, you can pass any desired URL, which implies that you have to compose it on your own.
Example for $count:
String urlForCount = ZGWSAMPLE_SRVService.getBaseUrl() + "/ProductCollection/$count";
String responseForCount = service.getResponseString(urlForCount);
Our example code:

More freedom
In the last example, we’ve seen that the proxies don’t provide built-in support for everything – which of course is impossible, since there are lots of features described in OData spec, and furthermore there’s a lot that a specific implementation of an OData service can provide on top.
In order to comply with this, we have the possibility to switch to a self-composed request URL, as described above.
However, there can be other cases where you may need full control over the request and response.
Don’t worry, in such case you have still the option to use the good old IRestClient and proceed as described in the basic Java S tutorial.
The IRestClient instance can be obtained from the service-proxy:
service.getClient()
The parser can be obtained similarly.
Furthermore, you can ask any proxy class for its string representation (which is xml or json) and modify it using the parser.
In my eyes, such methods allow access to the layer below, the javalib-layer.
From my understanding, the proxy-generation provides one more layer of abstraction, on top of the javalib.
The javalib, which is provided by the Java SE Toolkit, already provides an abstraction of pure HTTP request sending and string parsing.
To me, it looks like there are 3 layers:
On top, the proxy with highest abstraction
Below, the javalib, that offers the RestClient and parsing support
Below, as an example, the apache client and manual xml parsing
I've listed if below, and provided some examples of usage, in order to compare
| Layer | Proxy |
|---|---|
| Object | BusinessPartner |
| CREATE Operation | Service.createProductCollectionEntry |
| Property access | Product.getDescription |
| Layer | javalib |
|---|---|
| Object | IRestClient |
| CREATE Operation | IRestClient.execute(Method.POST, URL) parser.parse(...) |
| Property access | ODataEntry…..getProperty(“Description”)…getValue |
| Layer | Any connectivity lib |
|---|---|
| Object | org.apache.http.impl.client.DefaultHttpClient DOM object |
| CREATE Operation | compose String(URL) HttpPost(URL) httpclient.execute(httppost) |
| Property access | Document = parse xml String search document object |
Conclusion
In my eyes, it is very comfortable to work with the Java SE proxies, provided by the Java SE Toolkit, which is part of the GWPA offering (Gateway Productivity Accelerator).
It is so straight-forward to use, that the coding work makes very fluid progress and provides the base for leaving for the day in good mood;-)
I’d like to ask you to try it out and to tell me in the comment-section of this posting if you’ve made similar experiences.
Please provide some coding snippets as well, if you’d like to share them with the community.
Thanks!
Appendix: Use the Service Catalog for Proxy Generation
In chapter 3, Generate proxy classes, we’ve pasted the URL of the service into the wizard page.
This was the most straight-forward way of doing it in the tutorial.
I don’t want to withhold that there’s a more comfortable way of obtaining the service:
GWPA offers the so-called Service Catalog.
The “Catalog” lists all services and its details which are found in the configured backend(s).
Let me quickly describe how to use it.
1) First, store the connection details of the SAP backend in Eclipse Preference page.
Go to Eclipse main menu -> Window -> Preferences -> OData Development -> SAP Netweaver Gateway -> Connections
Press Add.
In the “Create Connection” dialog, enter the hostname and the port of your ABAP backend.
If you’re not using the default client, you have to specify it as well (e.g. 100)
If the backend requires HTTPS, you have to enable this checkbox.
Note: in this case, you have to add the certificate of this HTTPS connection to your Java VM keystore
This is nicely explained in the following blog : http://scn.sap.com/community/netweaver-gateway/blog/2013/05/16/configuring-ssl-connection-to-sap-sys...
In the credentials section, provide the user and pw which you’ve received after registering for the Gateway Demo System (registration is very quick). See here: http://scn.sap.com/docs/DOC-40986
For me, the following settings are working:

That’s all.
Whenever you see a button “Catalog”, you can now press it;-)
e.g. in the Starter Application wizard or in the Service Proxy wizard (see chapter 3)
The third variant of selecting the service which you want to use for creating a Starter Application is the “Service Catalog” View in Eclipse.
If not already open, you can open it via
Window -> Show View -> other -> SAP NetWeaver Gateway -> Service Catalog
After opening it, you can see the connection which you’ve created above
You can expand it and browser the services, or you can type a filter text for quickly finding the service which you want to use.

You can expand the details and – more interestingly – you can open the context menu on the service node and you can start the Starter Application wizard and the Service Proxy wizard from here.
I like this option – do you like it too?
Appendix: Project Type
It should be mentioned, that service proxies can be generated into any Eclipse project of type "Java".
So it isn't necessarily required to generate a Starter Application, as described in this tutorial.
The procedure could as well be as follows:
Create Java Project.
Create Service Proxies.
Create Java class and main() method.
The Service Proxy Wizard will copy the javalib.jar into the project.
Further readings
The official documentation for the Java SE Toolkit with proxies can be found at:
https://help.neo.ondemand.com/gateway_gwpa/frameset.htm?eeaa30799ac74b1bbad11b6d13d10778.html
Or navigate to it as follows:
https://help.neo.ondemand.com -> Platform Solutions -> SAP NetWeaver Gateway Productivity Accelerator -> Developer Guide -> Service Consumption -> OData Toolkit for Java Platform -> Generating Proxy for Java SE
- SAP Managed Tags:
- Java,
- SAP Gateway
1 Comment
You must be a registered user to add a comment. If you've already registered, sign in. Otherwise, register and sign in.
Labels in this area
-
ABAP CDS Views - CDC (Change Data Capture)
2 -
AI
1 -
Analyze Workload Data
1 -
BTP
1 -
Business and IT Integration
2 -
Business application stu
1 -
Business Technology Platform
1 -
Business Trends
1,658 -
Business Trends
91 -
CAP
1 -
cf
1 -
Cloud Foundry
1 -
Confluent
1 -
Customer COE Basics and Fundamentals
1 -
Customer COE Latest and Greatest
3 -
Customer Data Browser app
1 -
Data Analysis Tool
1 -
data migration
1 -
data transfer
1 -
Datasphere
2 -
Event Information
1,400 -
Event Information
66 -
Expert
1 -
Expert Insights
177 -
Expert Insights
296 -
General
1 -
Google cloud
1 -
Google Next'24
1 -
Kafka
1 -
Life at SAP
780 -
Life at SAP
13 -
Migrate your Data App
1 -
MTA
1 -
Network Performance Analysis
1 -
NodeJS
1 -
PDF
1 -
POC
1 -
Product Updates
4,577 -
Product Updates
342 -
Replication Flow
1 -
RisewithSAP
1 -
SAP BTP
1 -
SAP BTP Cloud Foundry
1 -
SAP Cloud ALM
1 -
SAP Cloud Application Programming Model
1 -
SAP Datasphere
2 -
SAP S4HANA Cloud
1 -
SAP S4HANA Migration Cockpit
1 -
Technology Updates
6,873 -
Technology Updates
420 -
Workload Fluctuations
1
Related Content
- Consuming SAP with SAP Build Apps - Mobile Apps for iOS and Android in Technology Blogs by SAP
- What’s new in Mobile development kit client 24.4 in Technology Blogs by SAP
- SAP HANA Cloud Vector Engine: Quick FAQ Reference in Technology Blogs by SAP
- Harnessing the Power of SAP HANA Cloud Vector Engine for Context-Aware LLM Architecture in Technology Blogs by SAP
- CAP LLM Plugin – Empowering Developers for rapid Gen AI-CAP App Development in Technology Blogs by SAP
Top kudoed authors
| User | Count |
|---|---|
| 37 | |
| 25 | |
| 17 | |
| 13 | |
| 7 | |
| 7 | |
| 7 | |
| 6 | |
| 6 | |
| 6 |