
- SAP Community
- Products and Technology
- Technology
- Technology Blogs by SAP
- Getting started with GWPA: Toolkit for Java SE
Technology Blogs by SAP
Learn how to extend and personalize SAP applications. Follow the SAP technology blog for insights into SAP BTP, ABAP, SAP Analytics Cloud, SAP HANA, and more.
Turn on suggestions
Auto-suggest helps you quickly narrow down your search results by suggesting possible matches as you type.
Showing results for
Product and Topic Expert
Options
- Subscribe to RSS Feed
- Mark as New
- Mark as Read
- Bookmark
- Subscribe
- Printer Friendly Page
- Report Inappropriate Content
02-17-2014
2:09 PM
UPDATE:
In the meantime, as of July 2014, GWPA has been retired.
Please find more information here: SAP Gateway Developer Tools – Bridging the Past, Present and Future
---
This tutorial describes how to use the Toolkit for Java Platform, Standard Edition, which is part of the Gateway Productivity Accelerator (GWPA).
Built into Eclipse, this toolkit allows to easily consume OData Services, programmatically within Java code.
GWPA provides a wizard which generates a Starter Application. The aim of the Starter Application is to demonstrate how the API can be used - and it is really easy and intuitive.
When choosing to generate a Starter Application for Java SE, the result is a Java Project which contains an executable Java class (with main-method).
When executing this class, some basic operations are performed against a Gateway Service.
The generated class can then be enhanced and can be used e.g. for an automated Test, which could be scheduled to run regularly on a Continuous Integration Server like Hudson/Jenkins Server
Like that, you can easily create lots of automated tests for your Gateway Services.
You can also use the API (that is: the Odata Java library) to write code that is used in a productive web application.
A general introduction into GWPA can be found here: http://scn.sap.com/community/netweaver-gateway/blog/2013/05/10/new-gateway-tool--sap-netweaver-gatew...
Note: Sample code.
For your convenience, I've attached the result of this tutorial, the Java source, to this document.
Please find it below.
It is a text file that you can use for your convenience.
Instead of copying code snippets, you can view and copy the full coding to your IDE.
There's only one thing you have to do: enter your user/pw for the sample service.
Prerequisites
In order to follow this tutorial you need the following prerequisites
Install Java
Install Eclipse
Install GWPA
Install JavaSE toolkit along with GWPA
Furthermore you need to have access to an OData service.
In this tutorial we use the service ZGWSample_SRV, which is located on the Gateway Demo System, such that everybody can access it.
Please refer to the following document, where all links and details about all prerequisites are collected: Getting started with GWPA: Prerequisites
Overview
This tutorial consists of the following 4 steps:
1) Create Project
2) Adapt the Code
3) Run the Java Application
4) Understand the code
1) Create the project
Start your Eclipse and create a Starter Application Project:
Eclipse main menu -> File -> New -> Project -> OData Development -> Starter Application Project
(Alternative: press Ctrl + N in order to open the “New” wizard)

Press Next.
Enter a project name, e.g. JavaSeBasicTest
In the drop down box, select Java SE (If the drop down is empty, install the Java SE toolkit, see Prerequisites)
Enter a package name, e.g. com.my.company.tests.basic (This package will be generated)
Enter a name for the Java class which will be generated and which will contain the main-method, e.g. BasicTest
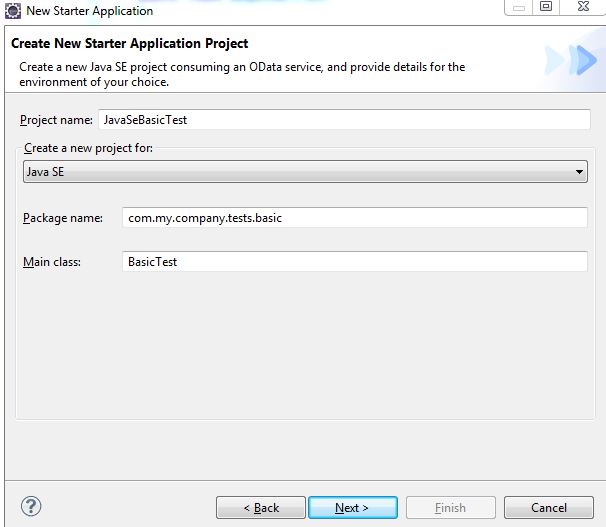
Press Next
In the Template wizard page, you can select a template which will be used to generate the code accordingly.
In case of the Starter Application for Java SE, there’s only one template available, the Basic Application
Select it and press Finish.
After a short generation process, we can see the newly generated Project in the Project Explorer View.
The generated project layout
Let’s have a quick look at the generated project.
The project layout is simple:
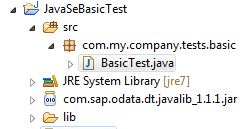
We have
- the generated project itself
- the generated java file
- the generated code in the java file
- the com.sap.odata.dt.javalib.jar file
- the generation of the classpath entry for the lib (see my Eclipse Tips&Tips document for making the classpath file visible)
In summary, the benefit of the wizard is the generated code and the copied library.
Let’s have a short look at the copied library.
Expand the node com.sap.odata.dt.javalib in the Eclipse Project Explorer.

You’ll see quite a lot of packages.
The first bunch of packages, those which have different icons, contain resources.
In this case, the javadoc is contained here.
These packages are responsible for providing that useful information at the place where it is needed most: in the code.
You can move your cursor to a type or method, wait a second and you get the tooltip with the javadoc (please refer as well to my Eclipse Tips document)
The second bunch of the packages, below the resource-packages, contain the actual java classes, the API which you will use when following this tutorial.

You can see such interesting expressions like
Connectivity
Here, we have the classes and interfaces, e.g. RestClient, the RestResponse, the Authentication
odatamodel
Here are the classes which contain the information related to all atom specific elements
json
we see that working with json is supported as well
parser
we have support for parsing the response of a call to a server
And much more…
2) Adapt the generated code
Now it’s really time to get the hands dirty.
However, there’s not much dirt over there.
After finishing the Starter Application project, the specified Java class is automatically opened.
Let’s have a look at it now.
Everything’s commented out.
The reason is that the newly created class doesn’t compile.
And the reason for the compile errors is that otherwise developers wouldn’t recognize that they have to enter a few information.
So, in our tutorial, the next step is to uncomment the code.
Select all commented lines and press Ctrl + 7
Alternative way of uncommenting: right mouse click into the selection, then source -> ToggleComment
Note: make sure that you only select lines which are commented. Because if your selection contains any not-commented line, the command will add comments instead of removing them.

Adapting the method initializeRestClient ()
After removing the comments, you get one compile error.
Don’t worry, it indicates that you have to do some manual adjustments:
The generator doesn’t know about the server and the service you want to invoke and you have to specify as well your credentials.
The following screenshot shows the generated code and highlights the parts which need to be adapted:

Note:
if you’re working from a corporate network, it might be required to add the proxy settings.
This would be done inside this method.
It is not enough, to enter the proxy information in the Eclipse “Network Settings” preference page, it has to be set in the Java code.
Add the following lines at the end of the method initializeRestClient():
System.setProperty("https.proxyHost", "theProxy");
System.setProperty("https.proxyPort", "0000");
In case you need it, the snippet for proxy bypass is the following:
System.setProperty("http.nonProxyHosts", "*.corp");
More changes;
- Service: In our example, we use a sample service from the SAP Netweaver Gateway Demo System.
- Service host: sapes1.sapdevcenter.com
- Port: 443
- The user and password, which are provided after registration, have to be entered in the code as well.
- Furthermore, please don’t forget to set the parameter “USE_SSL” to true.
- SAP client: In our example, when using this connection, we don’t need to specify the SAP_CLIENT, since the default client will be used.
After adjustments, the method looks as follows:

But this is not the only place where we have to modify the generated code.
Adapting the method readExample()
The generated code looks like this:

In order to make the generated sample-code work, you have to enter the URL of a collection.
Not the collection name, but the full URL, including host, etc.
The code will do a QUERY on the collection.
In our example, we choose to do a query on the ProductCollection, in order to see all available Product entities:
The URL is:
https://sapes1.sapdevcenter.com/sap/opu/odata/sap/ZGWSAMPLE_SRV/ProductCollection
Afterwards, all existing entries will be READ and the value of one property will be printed to the console.
You have to enter this property name in the code.
The properties and their names can be obtained from the metadata (the edmx) of the service.
The URL of the metadata-document of the service we're using, the ZGWSAMPLE_SRV:
https://sapes1.sapdevcenter.com/sap/opu/odata/sap/ZGWSAMPLE_SRV/$metadata
In our example, we choose the property Name of the EntityType Product, because we’ve executed the query for the Product feed, and we want to print a list of all Product names.

The following screenshot shows how the readExample() method looks in our example:

Adapting the method createExample() and createOdataEntry()
After invoking the ProductCollection and reading a property, the generated sample code for the JavaSE Toolkit demonstrates how to do a CREATE operation.
But before doing so, we have to again provide some information that is specific to our chosen service.
Since the method createExample() invokes the helper method createOdataEntry(), we have to first adapt the method createOdataEntry().
In order to navigate to the method, press Ctrl + O (the Java Editor has to be active). This shortcut opens that quick little dialog in Eclipse (which I like so much, because it allows you to work with maximized editor, with no need to use other Eclipse-Views).
Click on the method createOdataEntry() (or use arrow keys and press enter).

Within this method, we have to provide the actual data which we want to create.
The data is provided via values of properties.
In the Java code, we have to specify the name of the property and the value.
Now, which properties do we have to specify?
All?
The answer is: it depends on the backend implementation of the service, which properties are required and which are optional.
Also the metadata document (see above) tells us that the property ProductId is the key for the EntityType Product. So we have to provide this property.
Furthermore, the property has the attribute Nullable=false, which means that when creating such EntityType, this property cannot be empty.
So it is mandatory for us to provide a unique value for this property.
Other properties can remain empty, it is optional to provide a value.
Of course, in a productive scenario, we would provide all properties.
Now, how to find out if a value for the ProductId is unique?
Just try it with your favorite browser, do a READ operation of a product.
E.g.
The result is: the browser displays the details of the Product.
Now change the key in the URL
E.g.
Result: If the key is not yet assigned, then the browser displays an error message. This means you can use this ProductId it in the Java code.
In our example, the method createOdataEntry() looks as follows, containing all mandatory properties:

Within the method createExample(), we have to enter the full URL of the ProductCollection.
Remember that the URL for a HTTP POST-Request is always a collection.
In our example, the method createExample() looks as follows

Adapting the method updateExample()
This method shows how to UPDATE an existing entry.
The HTTP request is a PUT, which requires the URL of the entry.
We have to provide this URL.
The updateExample method requires an ODataEntry instance. In order to make the generated code short and easy, the entry which has been just created above, is used.
So, if the create operation fails, the rest of the sample application will fail as well. Let’s keep our fingers crossed;-)
This means that the URL of the entry doesn’t exist at this moment, because we haven’t run the creation yet. So we have to guess it.
Therefore, we do a READ operation of any existing Product in the browser, then change the key in the URL to the one we’ve given in the method createExample(). Please refer to the screenshot below.
Furthermore, the instance of the ODataEntry is modified in the updateExample() method.
We have to specify the name of the property, which will be modified.
And we have to provide the new, modified value.
All other properties won’t be changed.
In our example, we’ve decided to change the name of the Product, because there was a typo.
As well in our example, we keep the adapted code short and easy…;-)

Adapting the method deleteExample()
Within this method, we have to specify the URL of the entry that we want to delete.
Just like above, in order to obtain such URL, we can do a READ of an existing Product in a browser.
Then delete this Product entity.
But since we don’t want to destroy the data of the sample service ZGWSAMPLE_SRV, we delete the product entry which we have created above.
So the URL is the same as we used in the updateExample() method.
In our example:

3) Running the Starter Application
Now we’re through and we’ve done all required adaptations:
The details of the server host and user credentials, the sample service which we use to play with and the collection and property names.
(Yes, there’s one more method at the end of the generated code, but it isn’t invoked, so we can ignore it for today)
Now we can run the application.
Do a right mouse click into the Java Editor and choose
Run As -> Java Application

And hold your breath…
Result:
What does the generated Starter Application do?
It prints some information to the console.
After the application is launched, the Eclipse Console View should be automatically opened and brought to front.
In case you don’t see it, you can manually open it via
Eclipse main menu -> Window -> Show View -> Console
Each of the 4 methods which are invoked in the main method of our java program, provides some output to the console.
1. The readExample() method prints a list of names of products
2. The createExample() method creates a product.
The response body of the HTTP POST request is the payload of the created product entity.
Our createExample() method prints the response xml string to the console, in one line, without formatting.
You can copy this line to clipboard and paste it into a text editor, in order to check how the created product entity looks like,
and if the properties that were provided in the java code have been created as expected.
Our create example does a second output to the console: the status code of the HTTP request.
If the POST request has been successful, the Gateway server returns the HTTP status code 201.
With these 2 outputs, we can verify if the CREATE operation has been successful.
An alternative way to check if the creation has been as expected would be:
Place a breakpoint after the creation, run the application in debug mode and pause the execution after the creation.
Then invoke the product in a browser.
You can do a QUERY on the product collection and search for the product with the provided ProductId.
Or invoke directly the READ URL, like this:
https://sapes1.sapdevcenter.com/sap/opu/odata/sap/ZGWSAMPLE_SRV/ProductCollection('NB-0001')
Then continue debugging and pause the execution after the UPDATE operation.
3. The updateExample() method does a PUT request.
The HTTP status code of the request is printed to the console.
If the PUT request has been successful, the Gateway server returns the HTTP status code 204.
The response body is empty after PUT.
4. The deleteExample() method does a DELETE request.
If the DELETE request has been successful, the Gateway server returns the HTTP status code 204.
The response body is empty.
In our example, the Eclipse console looks as follows:

4) Understanding the code
The main intent of this tutorial is to help you to get familiar with the API that is provided by GWPA.
The API, which is provided by the OData Java Client library, allows to programmatically use OData services.
In order to achieve this, it provides a class that is used like a rest client and a parser class for OData based strings.
Let's have a closer look at them.
1. The interface IRestClient
a) Connectivity
The RestClient knows how to connect to the server.
- including authentication
- including support for x-csrf-token, basic authentication, SSL and SAML
This is done by configuring the instance of a IRestClient (as can be seen in method initializeRestClient).
Example:
First create a configuration object and provide all the required details to it:
IServerConnectionParameters serverConnectionDetails = new ServerConnectionParameters("sapes1.sapdevcenter.com", "443");
serverConnectionDetails.put(IServerConnectionParameters.AUTHENTICATION, new UsernamePasswordCredentials("myUser", "myPassword"));
serverConnectionDetails.put(IServerConnectionParameters.ODATA_FORMAT,"ATOM");
serverConnectionDetails.put(IServerConnectionParameters.USE_SSL, true);
Then create the IRestClient instance and pass the configuration object to it.
IRestClient restClient = RestClientFactory.createInstance(serverConnectionDetails);
b) HTTP requests
The RestClient instance can execute the most important HTTP requests:
GET, POST, PUT and DELETE
The details of the request itself are encapsulated in an IRestRequest object.
Such details are for example
the HTTP method,
the URL,
the requestBody,
HTTP headers.
Example:
First create an instance of IRestRequest and configure it (as seen for example in method readExample):
IRestRequest request = new RestRequest("https://sapes1.../.../ProductCollection");
request.setMethod(Method.POST);
request.setBody(body);
Then execute the request using the instance of IRestClient:
restClient.execute(request);
2. The interface IODataParser
a) Parsing a response
When doing a HTTP GET request to a Gateway service, you get a response, that is the payload, as string. The format of the response string can be either xml or json.
What do you (programmatically) do with that string?
You now want to extract the desired information from that string.
This string can be the service document, the metadata document, a collection of entries, an entry itself, a property of an entry and also a ComplexType of a property.
The desired information is e.g. a list of Products, from which you want to know e.g. the names and prices.
In order to extract the desired infornation from the response string, you don’t want to deal with string-methods.
You want to work in object-oriented manner.
You want to have an object for each OData artifact (e.g. entry, property, title, author, etc).
And this is exactly what is nicely provided by the GWPA java client library.
You don’t have to take care of strings. You only have to invoke the relevant method of the parser.
Example:
You have executed a GET request on a collection and as a result you’ve obtained a string which contains the payload:
String response = restClient.execute(request);
String responseBody = response.getBody();
Now you create a parser according to the format which is used in this application:
IODataParser parser = ODataParserFactory.createInstance(Representation.ATOM);
More elegant:
IODataParser parser = ODataParserFactory.createInstance(restClient.getRepresentation());
Now you can invoke the parser-method which corresponds to the content of the responseBody.
Since we’ve done a query on a collection, the responseBody contains the collection, so we use the method parseODataCollection():
ODataCollection oDataCollection = parser.parseODataCollection(responseBody);
Now you can work with the ODataCollection object.
b) Composing the request
The other way ‘round is supported as well:
You have an OData object (e.g. collection or entry) and you want to use it for firing an HTTP POST request.
Since the HTTP requests deal with strings only, you have to convert the OData object into a string.
This is done by the IODataParser instance, using one of its format- methods.
E.g.
String requestBody = parser.format(oDataEntry);
Conclusion
In this tutorial we have learned how to use the Toolkit for Java Platform, Standard Edition, provided by SAP Gateway Productivity Accelerator.
We’ve focused on getting the generated code running.
We haven’t introduced any enhancements, the modifications which we’ve done were only adjustments to the actually used service.
I strongly believe that very soon after doing this tutorial, you’ll start playing with it and using it with great virtuosity…;-)
Anyway, there's a follow-up to this tutorial: the following document explains how to do batch requests with the Java SE toolkit.
Thanks for your attention!
Post Scriptum
After finishing the tutorial, I’m sure you cannot avoid playing around with the capabilities offered by the Java SE toolkit API …;-)
I think it would be nice if you could post your findings as code snippets in the comment section below.
Thanks in advance!
- SAP Managed Tags:
- SAP Gateway
2 Comments
You must be a registered user to add a comment. If you've already registered, sign in. Otherwise, register and sign in.
Labels in this area
-
ABAP CDS Views - CDC (Change Data Capture)
2 -
AI
1 -
Analyze Workload Data
1 -
BTP
1 -
Business and IT Integration
2 -
Business application stu
1 -
Business Technology Platform
1 -
Business Trends
1,661 -
Business Trends
91 -
CAP
1 -
cf
1 -
Cloud Foundry
1 -
Confluent
1 -
Customer COE Basics and Fundamentals
1 -
Customer COE Latest and Greatest
3 -
Customer Data Browser app
1 -
Data Analysis Tool
1 -
data migration
1 -
data transfer
1 -
Datasphere
2 -
Event Information
1,400 -
Event Information
66 -
Expert
1 -
Expert Insights
178 -
Expert Insights
293 -
General
1 -
Google cloud
1 -
Google Next'24
1 -
Kafka
1 -
Life at SAP
784 -
Life at SAP
12 -
Migrate your Data App
1 -
MTA
1 -
Network Performance Analysis
1 -
NodeJS
1 -
PDF
1 -
POC
1 -
Product Updates
4,577 -
Product Updates
337 -
Replication Flow
1 -
RisewithSAP
1 -
SAP BTP
1 -
SAP BTP Cloud Foundry
1 -
SAP Cloud ALM
1 -
SAP Cloud Application Programming Model
1 -
SAP Datasphere
2 -
SAP S4HANA Cloud
1 -
SAP S4HANA Migration Cockpit
1 -
Technology Updates
6,886 -
Technology Updates
415 -
Workload Fluctuations
1
Related Content
- How to host static webpages through SAP CPI-Iflow in Technology Blogs by Members
- Developing & Deploying the UI5 App to Cloud Foundry and Accessing from App-router End-to-End Steps in Technology Blogs by Members
- ABAP Cloud Developer Trial 2022 Available Now in Technology Blogs by SAP
- New Machine Learning features in SAP HANA Cloud in Technology Blogs by SAP
- SAP Analytics Cloud - Performance statistics and zero records in Technology Blogs by SAP
Top kudoed authors
| User | Count |
|---|---|
| 29 | |
| 21 | |
| 10 | |
| 7 | |
| 7 | |
| 6 | |
| 6 | |
| 5 | |
| 5 | |
| 5 |