
- SAP Community
- Groups
- Interest Groups
- Application Development
- Blog Posts
- Screen Enhancement For RECN Transaction
Application Development Blog Posts
Learn and share on deeper, cross technology development topics such as integration and connectivity, automation, cloud extensibility, developing at scale, and security.
Turn on suggestions
Auto-suggest helps you quickly narrow down your search results by suggesting possible matches as you type.
Showing results for
Former Member
Options
- Subscribe to RSS Feed
- Mark as New
- Mark as Read
- Bookmark
- Subscribe
- Printer Friendly Page
- Report Inappropriate Content
01-29-2014
8:06 AM
This is the common requirement while implementation of REFx Module.
The Requirement is to add the additional fields in RECN transaction. As their are no appropriate BADIs or User Exits available for addressing the requirement, the approach of Business Data Toolset (BDT) is taken up to achieve the same. Following are the steps which would contribute in adding the custom fields.
Addition Fields for T-Code RECN

Steps to Add Additional Fields:-
1. To add fields in master data table go to SE11(ABAP Dictionary) and display table VICNCN. Select the Include CI_VICNCN and add fields in this structure (fields names should start with ZZ or YY).

2. Display the Function Group ‘REGC_EXT_EXAMPLE’ in SE80(Object Navigator).

Copy the Function Group & name the new Funtion Group starting with ‘ZZZZ’( For eg. ZZZZ_REGC_EXT)
Rename the Old Funcion Modules to New Function Modules(Starting with ‘ZZZZ’)as follow:-
REGC_REGC_EVENT_FMOD2_EXAMPLE | ZZZZ_REGC_EVENT_FMOD2 |
REGC_REGC_PBO_EXAMPLE | ZZZZ_REGC_PBO_Z901 |
REGC_REGC_PAI_EXAMPLE | ZZZZ_REGC_PAI_Z901 |

3. Publish your application. For publishing call the following transactions for each Application Object.
Transaction | Object |
REBDAO0001 | Architectural object |
REBDBE0001 | Business entity |
REBDBU0001 | Building |
REAJCG0001 | Comparative group of apartments |
REGC0001 | RE contract |
RESCPG0001 | Participation group |
REBDPR0001 | Property |
REBDRO0001 | Rental object |
RESCSU0001 | Settlement unit |
In our case REGC0001,
Create the New Entry in the table naming Application starting with ‘Z’ (Eg.‘ZT_E’)

4. Publish your Screen, For Publishing the Screen follow the below steps:-
(All settings are Client Specific & hence to be transported to into all Clients where required)
a. Go To Transaction ‘RECACUST’ or follow the path in ‘SPRO’ as below:-

b. Create a new FIELD GROUP for your fields by choosing IMG activity 'Dialog -> Screen Layout -> Field Groups -> Field Groups'.
Choose a number starting with ‘7’ (for example 701).
In the 'General data' area, enter a Description in the 'Description' field for your new fields(Eg Additional Fields in RECN).
In addition, enter the name of the Function Module from point 2 (ZZZZ_REGC_EVENT_FMOD2) in field 'FM for fld grouping'.
You can leave the remaining fields empty.

Double-click 'Field Group -> Fields' in the dialog structure for the new field group and assign all fields of the sub screen to the field group
For Example:
Table: RECN_CONTRACT_CI
Field name: ZZEBELN
Input field: Selected (This checkbox must be selected for all fields that are ready for input. In addition, these fields must be defined as input fields in the Screen Painter. When you save, the system displays a warning message which you can ignore.)

c. Create a VIEW for your fields by choosing 'Dialog -> Screen Layout -> Views'. For this purpose, copy an existing entry(For example REGC02).
The name of the new view must begin with ZZZZ(For Eg ZZZZ01) with the text as required(For Eg. ‘Additional Fields in RECN’).
In 'Application' field, enter the name of your application (In our case ‘ZT_E’).
Enter the program name (SAPLaaaaaa with aaaaaa being the name of your function group.) and the screen number of the subscreen created before:
Program name: SAPLZZZZ_REGC_EXT
Screen number: 0901
In the 'Function module' area, enter the name of your PBO module in field 'Before Output' (For Eg ZZZZ_REGC_PBO_Z901), and enter the name of your PAI module in the 'After Entry' field (For Eg ZZZZ_REGC_PAI_Z901).
Leave the values of the remaining fields for the view unchanged.

In the navigation tree, double-click 'View -> Field Groups' and enter the field group (701) created before.
Under 'Further checks’, you do not have to make any entries.

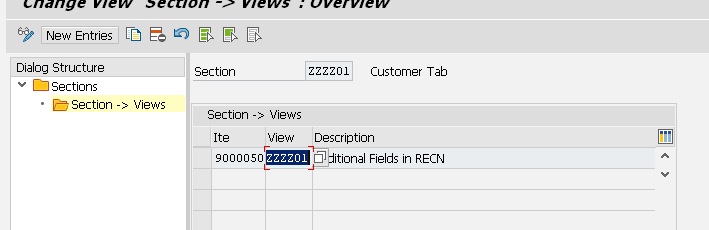
d. Define a section by choosing 'Dialog -> Screen Layout -> Sections'. The name of the section must begin with ‘ZZZZ’(For Eg, ZZZZ01) with description as required (For Eg, Customer Tab ) and title Customer Tab The title you enter here will be displayed as a group heading on the screen.

In the dialog structure, double-click 'Section -> Views' to assign the view created before to the section.
The last two digits of the line item number have to be different from '00'(For Eg '9000050').
e. Choose 'Dialog -> Screen Layout -> Screens' and define the screen on which the new fields are to be displayed.
For example, if you want the file number to be displayed on the 'General Data' screen, select line REGC02

and double-click 'Screen -> Sections' in the dialog structure.
The line item number that you assign here to the new section should be between the range but it must not end with '00' either.
(For Eg, if you want the file number to be displayed after the Contract, choose a line item number between 300000 and 400000,
For Eg 300050 for section ‘ZZZZ01’ ).

5. Call Transaction RECN and check whether the added fields respond correctly when you change, display and create a contract.
6. Try saving the data. If data is not getting save in Standard DB Table VICNCN, then follow the below steps.
a. Go To SE37(Function Builder) and display the Function Module in our case ‘ZZZZ_REGC_PAI_Z901’ and comment the following code and activate.
* CALL FUNCTION 'API_RE_CN_GET_DETAIL'
* EXPORTING
* io_object = lo_busobj
* IMPORTING
* es_ci_data = recn_contract_ci
* EXCEPTIONS
* error = 1
* OTHERS = 2.
* IF sy-subrc <> 0.
* MESSAGE ID sy-msgid TYPE 'S' NUMBER sy-msgno
* DISPLAY LIKE sy-msgty
* WITH sy-msgv1 sy-msgv2 sy-msgv3 sy-msgv4.
* ENDIF.

b. Add the following code in Function Group created above PBO Module
FIELD-SYMBOLS <fs_mix> TYPE any.
DATA : lv_recnnr TYPE RECNNUMBER.
ASSIGN ('(SAPLRECA_BDT_APPL_TOOL)GS_OBJECT_INFO-OBJIDENT') TO <fs_mix>.
IF RECN_CONTRACT_CI-ZZEBELN = GV_ZZEBELN AND RECN_CONTRACT_CI-ZZEBELN IS INITIAL.
GV_ZZEBELN = RECN_CONTRACT_CI-ZZEBELN .
lv_recnnr = <fs_mix>+5(6).
CALL FUNCTION 'CONVERSION_EXIT_ALPHA_INPUT'
EXPORTING
INPUT = lv_recnnr
IMPORTING
OUTPUT = lv_recnnr .
SELECT SINGLE ZZEBELN
FROM VICNCN
INTO RECN_CONTRACT_CI-ZZEBELN
WHERE BUKRS = <fs_mix>+0(4)
AND RECNNR = lv_recnnr.
ENDIF.
Define GV_ZZEBELN in TOP Include as :-
DATA GV_ZZEBELN TYPE RECN_CONTRACT_CI-ZZEBELN.

I hope you find it helpful. Please feel free to make suggestions and/or comments.
With Regards,
Kanak Tendle(KT)
- SAP Managed Tags:
- ABAP Development
16 Comments
You must be a registered user to add a comment. If you've already registered, sign in. Otherwise, register and sign in.
Labels in this area
-
A Dynamic Memory Allocation Tool
1 -
ABAP
8 -
abap cds
1 -
ABAP CDS Views
14 -
ABAP class
1 -
ABAP Cloud
1 -
ABAP Development
4 -
ABAP in Eclipse
1 -
ABAP Keyword Documentation
2 -
ABAP OOABAP
2 -
ABAP Programming
1 -
abap technical
1 -
ABAP test cockpit
7 -
ABAP test cokpit
1 -
ADT
1 -
Advanced Event Mesh
1 -
AEM
1 -
AI
1 -
API and Integration
1 -
APIs
8 -
APIs ABAP
1 -
App Dev and Integration
1 -
Application Development
2 -
application job
1 -
archivelinks
1 -
Automation
4 -
BTP
1 -
CAP
1 -
CAPM
1 -
Career Development
3 -
CL_GUI_FRONTEND_SERVICES
1 -
CL_SALV_TABLE
1 -
Cloud Extensibility
8 -
Cloud Native
7 -
Cloud Platform Integration
1 -
CloudEvents
2 -
CMIS
1 -
Connection
1 -
container
1 -
Debugging
2 -
Developer extensibility
1 -
Developing at Scale
4 -
DMS
1 -
dynamic logpoints
1 -
Eclipse ADT ABAP Development Tools
1 -
EDA
1 -
Event Mesh
1 -
Expert
1 -
Field Symbols in ABAP
1 -
Fiori
1 -
Fiori App Extension
1 -
Forms & Templates
1 -
IBM watsonx
1 -
Integration & Connectivity
10 -
JavaScripts used by Adobe Forms
1 -
joule
1 -
NodeJS
1 -
ODATA
3 -
OOABAP
3 -
Outbound queue
1 -
Product Updates
1 -
Programming Models
13 -
Restful webservices Using POST MAN
1 -
RFC
1 -
RFFOEDI1
1 -
SAP BAS
1 -
SAP BTP
1 -
SAP Build
1 -
SAP Build apps
1 -
SAP Build CodeJam
1 -
SAP CodeTalk
1 -
SAP Odata
1 -
SAP UI5
1 -
SAP UI5 Custom Library
1 -
SAPEnhancements
1 -
SapMachine
1 -
security
3 -
text editor
1 -
Tools
16 -
User Experience
5
Top kudoed authors
| User | Count |
|---|---|
| 6 | |
| 5 | |
| 3 | |
| 3 | |
| 2 | |
| 2 | |
| 2 | |
| 2 | |
| 1 | |
| 1 |