
- SAP Community
- Products and Technology
- Enterprise Resource Planning
- ERP Blogs by Members
- How to Create an LIS info structure - Purchasing -...
Enterprise Resource Planning Blogs by Members
Gain new perspectives and knowledge about enterprise resource planning in blog posts from community members. Share your own comments and ERP insights today!
Turn on suggestions
Auto-suggest helps you quickly narrow down your search results by suggesting possible matches as you type.
Showing results for
Prasoon
Active Contributor
Options
- Subscribe to RSS Feed
- Mark as New
- Mark as Read
- Bookmark
- Subscribe
- Printer Friendly Page
- Report Inappropriate Content
01-01-2014
6:55 PM
This is a continuation for the document: How to Create an LIS info structure - Purchasing - Part 1
Now, Select the Key figures (Output fields)
Double click on the key figures created in the first step:

- Double click on the fields to be selected to the selection screen.
- You can select the fields from any key figures.
Click on Copy + Close.Click on “Copy”
Generate the info structure:
Now, click on “Generate” as shown below:

- System will ask the package name. Enter the package name and click on “save button”
- If it’s a test system and you don’t want to transport, you can save it as local object.
Table Generate Log will be displayed:
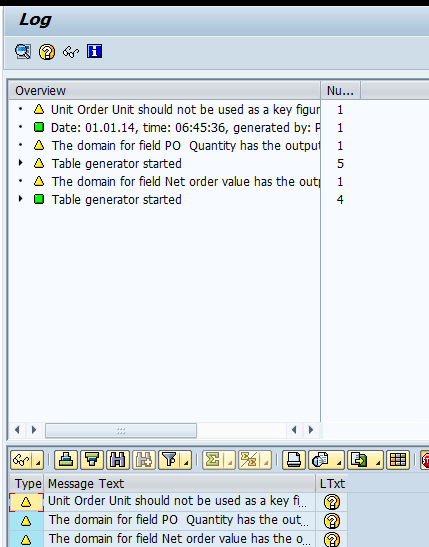
- If there is no error, the table will be generated.
- Go back to the previous screen and save .

- You may check the table created (here, S973) in SE16.

- Check the number of entries:

Step 4:Create updating:
By defining the update process, you define the flow of statistical data from the application to the information system. Means you can define when the data to be updated in the info table created in the previous step.
The definition of the update rules depends on the information structure and update group.
Update rules consist, for example, of the source field, the event which triggers the update, requirements and formulas.
Once you have defined the update rules, the corresponding update programs are automatically generated.
Transaction Code: MC24
- Enter the info structure created in the previous step.
- Select the update group: (standard update group: PURCH - Purchase Order header Update Group)

- Press ENTER.
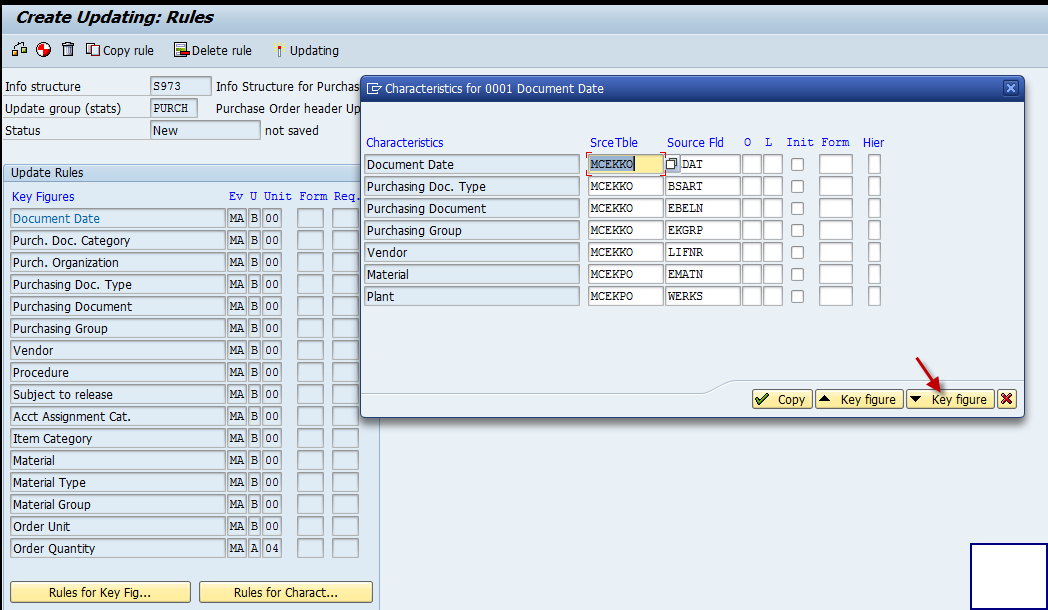
Now, you can define the update rules:
- Click on the “Rules for Key Fig”

Select the required fields from F4 list manually or click on “Suggest Rules”

Click on next key figure as shown below:

Repeat the same process for all key figures and click on "Copy":
Now define the update rules for characteristics for each key figure:
Select the first key figure and click on "Rules for characteristics"
Repeat the Rules for the characteristics for each key figure.
Click on “Generate” as shown below:

Generation Log will be displayed:

Go back and click on “Activate Updating”

Place the cursor on the info structure created and go to details:

Maintain the update rules as shown below:

Note:
In the update rules, you could find the following options:
1. Period split:
Here, you can define the period for which the report / info table to be analyzed. If you select "day", you can analyze based on date, if you select week, you can analyze based on week and so on. The corresponding period only will be updated in the table.
2. Updating:
Here, you can define the time / sequence when the info table to be updated. The following options are available.
- No Updating: The info table wont be updated.
- Synchronous Updating (V1 update): The info table will be updated simultaneously along with standard tables after every relevant transaction. In this case, the document update will be terminated in case there is any error in the info table update, as in case of standard tables.
- Asynchronous Updating (2) (V2 update) : Here, the info table is updated after actual document update, that is the document update and the statistics update take place in different tasks. In case any error occurs in info table update, it doesnt have any effect on actual document update. However, It doesnt require any scheduled job for update.
- Asynchronous Updating (3) (V3 update) : Here, the document update and info table update are carried out separately. The difference between V2 update and V3 update is that in V3, the update can be carried out at a later time. In short, it is a collective update with a separate (scheduled) job.
Here, I choose the period as "Month" in order to analyze the report on monthly basis and the update as "Synchronous Update" in order to update the table simultaneously along with standard tables.

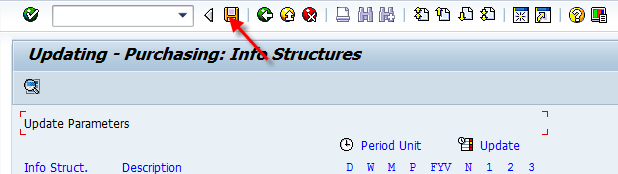
Save the update:
Now, the configuration part is over:
Testing:
Complete a purchasing cycle and check whether the table is updated correctly: (Create PO – GR – Invoice) and check the table in SE16

To Analyze the report:
Transaction Code:: MCSJ (Path: Easy Access - SAP Menu - Information Systems - Logistics - Purchasing - Tools - MCSJ_User Defined Analysis
( for purchase - MCSJ, for Sales - MCSI )
Select the info structure.

Enter the selection parameters and execute:

Click on “Switch drill down” for further analysis.

You may select any other analysis criteria for analysis.
You may change the output layout as below:
Go to MCSJ and select the info structure: and click on “User Settings”
Click on Key figures for setting the output layout.
Note: 1. You may follow the same logic for creation of info structure for other areas like inventory, LIV, sales etc.
2. For more details about LIS transporting, refer the documentation in the path: SPRO- Logistics General --> Logistics Information System (LIS) --> Logistics Data Warehouse - "Technical information about the transport of LIS objects"
Also, refer the notes: 37845 - Technical Information: Transporting Info Structures and 50237 - Techn. info.: transport of update, field catalog
3. For further FAQ, please refer the following notes:
552152 - FAQ: General questions for LIS
552503 - FAQ: Questions for updating and reporting in LIS
Note: Currently, the info table will be updated from the date the info table is created. If you want the info table to be updated with previous data, you may follow the procedure explained in the doc: Update History Data to user defined LIS (Purchasing)
Reference: SAP Library - Logistics Information System (LO-LIS)
- SAP Managed Tags:
- MM (Materials Management)
12 Comments
You must be a registered user to add a comment. If you've already registered, sign in. Otherwise, register and sign in.
Labels in this area
-
"mm02"
1 -
A_PurchaseOrderItem additional fields
1 -
ABAP
1 -
ABAP Extensibility
1 -
ACCOSTRATE
1 -
ACDOCP
1 -
Adding your country in SPRO - Project Administration
1 -
Advance Return Management
1 -
AI and RPA in SAP Upgrades
1 -
Approval Workflows
1 -
ARM
1 -
ASN
1 -
Asset Management
1 -
Associations in CDS Views
1 -
auditlog
1 -
Authorization
1 -
Availability date
1 -
Azure Center for SAP Solutions
1 -
AzureSentinel
2 -
Bank
1 -
BAPI_SALESORDER_CREATEFROMDAT2
1 -
BRF+
1 -
BRFPLUS
1 -
Bundled Cloud Services
1 -
business participation
1 -
Business Processes
1 -
CAPM
1 -
Carbon
1 -
Cental Finance
1 -
CFIN
1 -
CFIN Document Splitting
1 -
Cloud ALM
1 -
Cloud Integration
1 -
condition contract management
1 -
Connection - The default connection string cannot be used.
1 -
Custom Table Creation
1 -
Customer Screen in Production Order
1 -
Data Quality Management
1 -
Date required
1 -
Decisions
1 -
desafios4hana
1 -
Developing with SAP Integration Suite
1 -
Direct Outbound Delivery
1 -
DMOVE2S4
1 -
EAM
1 -
EDI
2 -
EDI 850
1 -
EDI 856
1 -
edocument
1 -
EHS Product Structure
1 -
Emergency Access Management
1 -
Energy
1 -
EPC
1 -
Financial Operations
1 -
Find
1 -
FINSSKF
1 -
Fiori
1 -
Flexible Workflow
1 -
Gas
1 -
Gen AI enabled SAP Upgrades
1 -
General
1 -
generate_xlsx_file
1 -
Getting Started
1 -
HomogeneousDMO
1 -
IDOC
2 -
Integration
1 -
Learning Content
2 -
LogicApps
2 -
low touchproject
1 -
Maintenance
1 -
management
1 -
Material creation
1 -
Material Management
1 -
MD04
1 -
MD61
1 -
methodology
1 -
Microsoft
2 -
MicrosoftSentinel
2 -
Migration
1 -
MRP
1 -
MS Teams
2 -
MT940
1 -
Newcomer
1 -
Notifications
1 -
Oil
1 -
open connectors
1 -
Order Change Log
1 -
ORDERS
2 -
OSS Note 390635
1 -
outbound delivery
1 -
outsourcing
1 -
PCE
1 -
Permit to Work
1 -
PIR Consumption Mode
1 -
PIR's
1 -
PIRs
1 -
PIRs Consumption
1 -
PIRs Reduction
1 -
Plan Independent Requirement
1 -
Premium Plus
1 -
pricing
1 -
Primavera P6
1 -
Process Excellence
1 -
Process Management
1 -
Process Order Change Log
1 -
Process purchase requisitions
1 -
Product Information
1 -
Production Order Change Log
1 -
Purchase requisition
1 -
Purchasing Lead Time
1 -
Redwood for SAP Job execution Setup
1 -
RISE with SAP
1 -
RisewithSAP
1 -
Rizing
1 -
S4 Cost Center Planning
1 -
S4 HANA
1 -
S4HANA
3 -
Sales and Distribution
1 -
Sales Commission
1 -
sales order
1 -
SAP
2 -
SAP Best Practices
1 -
SAP Build
1 -
SAP Build apps
1 -
SAP Cloud ALM
1 -
SAP Data Quality Management
1 -
SAP Maintenance resource scheduling
2 -
SAP Note 390635
1 -
SAP S4HANA
2 -
SAP S4HANA Cloud private edition
1 -
SAP Upgrade Automation
1 -
SAP WCM
1 -
SAP Work Clearance Management
1 -
Schedule Agreement
1 -
SDM
1 -
security
2 -
Settlement Management
1 -
soar
2 -
SSIS
1 -
SU01
1 -
SUM2.0SP17
1 -
SUMDMO
1 -
Teams
2 -
User Administration
1 -
User Participation
1 -
Utilities
1 -
va01
1 -
vendor
1 -
vl01n
1 -
vl02n
1 -
WCM
1 -
X12 850
1 -
xlsx_file_abap
1 -
YTD|MTD|QTD in CDs views using Date Function
1
- « Previous
- Next »
Related Content
- Advance Return Management complete configuration(SAP ARM) in Enterprise Resource Planning Blogs by Members
- Is it possible to restrict which Business Role is assignable to a Business User? in Enterprise Resource Planning Q&A
- Create Purchase requisition advanced source of supply in Enterprise Resource Planning Q&A
- Migrating data from SAP ECC to SAP S4/HANA with the migration cockpit in Enterprise Resource Planning Blogs by Members
- Subcontracting requirements does not consider plant's inventory in Enterprise Resource Planning Q&A
Top kudoed authors
| User | Count |
|---|---|
| 2 | |
| 2 | |
| 2 | |
| 2 | |
| 2 | |
| 2 | |
| 2 | |
| 1 | |
| 1 |