
- SAP Community
- Products and Technology
- Technology
- Technology Blogs by SAP
- SAP HANA SP07 brings New Improved Decision Table t...
Technology Blogs by SAP
Learn how to extend and personalize SAP applications. Follow the SAP technology blog for insights into SAP BTP, ABAP, SAP Analytics Cloud, SAP HANA, and more.
Turn on suggestions
Auto-suggest helps you quickly narrow down your search results by suggesting possible matches as you type.
Showing results for
Product and Topic Expert
Options
- Subscribe to RSS Feed
- Mark as New
- Mark as Read
- Bookmark
- Subscribe
- Printer Friendly Page
- Report Inappropriate Content
12-13-2013
11:44 AM
In this blog I unveil new features, of Business Rules, introduced in SAP HANA SP07 release. One of the major highlight in this release - is the Team Provider integration - that helps to model decision table in more robust and easy access mode; more importantly without system connection - this lets you to model rules in an offline mode and can later synchronize them with your HANA server. Besides, there is new, improved, richer and engaging OneView user experience of working with decision table - the Same with More stuff.
The concept of Team is well known in eclipse world. It is a component that is responsible for providing repository tooling integration in eclipse . For example EGit is eclipse Team Provider for Git - one form version control system . Version control system is a way in which multiple version of the files are managed and maintained. Version control becomes important when developers work in distributed environment from various locations – in connected or disconnected manner and comes with additional benefits of collaboration, change management and continuous integration. Here are certain terms and operations that you must know before venturing into the team provider – Repository, History, Latest, Revision, Share, Unshare, Checkout, Commit, Synchronize, Merge etc. If you interested in more, refer official eclipse guide or any other material shared over Internet.
Now as you have become familiar with Team Provider by eclipse, let me also broadly give you an overview of SAP adaptation to eclipse 'Team Provider'. Since SP06, a new perspective named as SAP Development Perspective was introduced. This perspective is now recommended approach to model information models like Attribute view, Calculation view etc. Users can model their information model in an offline mode and later connect them to HANA system. Users may then choose to remodel or modify them from Modeling perspective or SAP Development perspective, in HANA Studio, depending upon their preference to work. While former works only in Online mode, the latter is well equipped to support development in Offline mode. These modes and their benefits lies only during modeling in HANA Studio, they are not related to activated objects and does not contribute in any way to the performance when used in application. This blog, however, does not focus on these working modes and their benefits or short comings. You may read SAP HANA Developer Guide to know more about them. As these terms and features must be known to users before working with decision table in SAP Development perspective, I chose to brief you on them before starting on real content of the blog. Write to me if you need more information on them.
Let us explore the benefits of decision table venturing into SAP HANA Development space. The very first and most important benefit is the capability to work in offline mode and later connecting it to system. Second benefit lies in the fact that modeling is done at the intermediate layer in much faster way as there is no communication of local files with the system which nullifies the latency which at-times occur due to network problems. Third major benefit is better reliability, tracking and collaboration in distributed development environment and final benefit lies in the fact that version control mechanism that is known-to-most and can be explained with ease Users can now create, modify and delete decision table in offline mode and commit and activate in online mode.
Here I would guide you to important steps that would help you do the understand various operations pertaining to Decision Table in Team Provider. You may choose to use these operations in same or different sequence.
- Open SAP Development perspective in HANA Studio
- Select Repositories view and Create repository workspace

- Select Project Explorer view and Create a project if not already done
- Select the project and right click menu option New > Others…
- In the dialog, choose Decision Table under SAP HANA > Database Development
ℹ Note: As the project is not yet shared, decision table will open in Read-Only mode.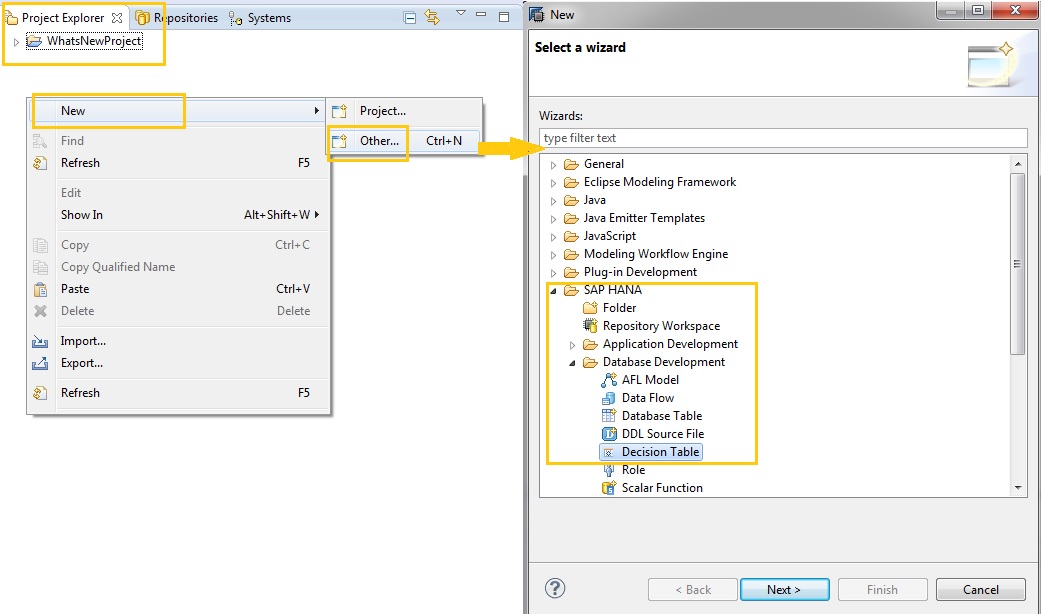
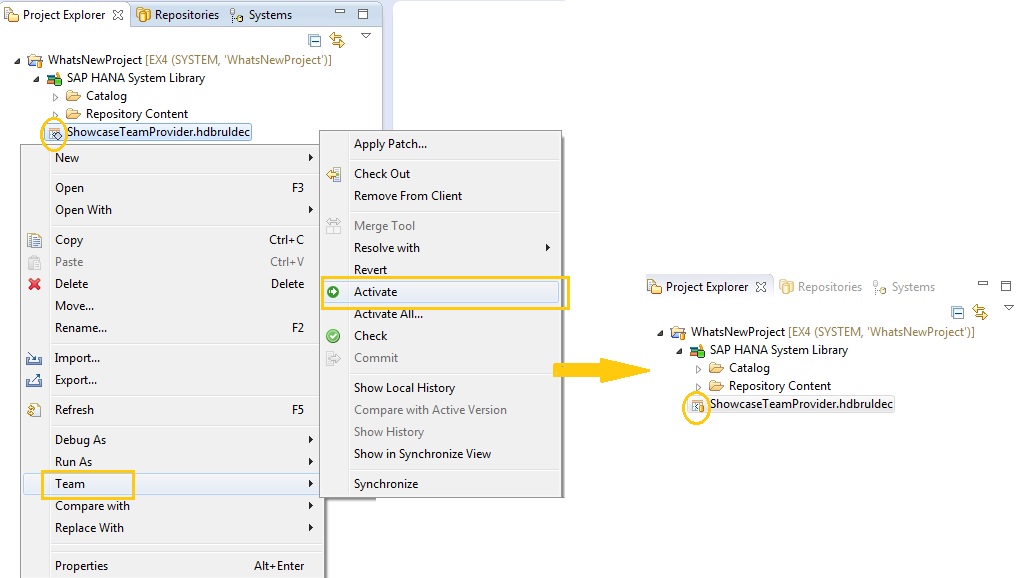
- Share the project
ℹ Note: After sharing the project, you will see system information beside the project name

7. Model the decision table with new enhanced and improved editor - OneView Editor
[See the section below on OneView editor]
8. After modeling the decision table, the last step is to Commit and Activate the decision table.
ℹ Note: The change in the marker of decision table before and after Activation.
ℹ Note : As soon as you Share the project with HANA Server, you can as well see your Decision Table in Modeler perspective under the Package with same name as that of the project. If you have specified a package while creating decision table in SAP HANA Development Perspective then you will it in that respective package. See below -

Decision Table OneView Editor
With SP07, Decision table has now a new improved look – similar to other information models – named as OneView editor. OneView implies to providing same user experience for all information models in HANA Modeler. As a result, you will see decision table editor with four panels – Scenario, Details and Output and Properties. Each of these panels have a characteristics associated with them.

(a) Scenario Panel
This is one of the important panels which has two nodes ( i ) Data Foundation ( ii ) Decision Table
( i ) Data Foundation
When you select this, you will find provision to add physical table/table type/information models on Data Foundation node in Scenario panel.

ℹ Note : All the physical table and table types in the System could be found at Content node under SAP HANA System Library in your project. You can use them drag-n-drop them directly from here onto the Data Foundation.
ℹ Note : All the information models in the System could be found at Repository Content node under SAP HANA System Library. You need to checkout them in your project first before using them in Data Foundation.

Once the data foundation is ready – with decision table condition and actions, select Decision Table segment in Scenario panel to further modify the content of the decision table.
Decision table
When you select this, you see decision table structure in the Details panel. Use various options to complete the modeling of decision table by filling the required adding cells values or changing the layout etc.

(b) Details Panel
This panel changes based on the selection in Scenario panel nodes.
(c) Output Panel
Unlike Details panel, output panel is independent on the selection of Scenario nodes. It contains Vocabulary, Condition and Actions of Decision table. This is same as the decision table output panel in old editor, with same set of operations like change layout, Add Condition, Add Actions, Create Parameters, Create calculated attribute, Edit, Remove etc.
(d) Properties Panel
This panel is based on the selection on nodes of the Output panel. It is mainly used to view the metadata information of all the nodes, including decision table node in the output panel. It is only through this panel that an attribute can be aliased.
With OneView editor and Team Provider integration, we have provided a major overhaul to what you see when we launched the decision table for first time in SP05. While the underlying content and execution model has not changed, the look-and-feel of how you author and manage the decision table has been significantly altered. This new interface, together with techinical benefits of Team Provider - is to better end the hassels of those who remain divided with different set of user experiences in same modeling environment.
You are now well equipped with the first-hand information required to work with decision table in OneView editor and SAP Development perspective. For more information refer Developer Guide. Write to me or drop in comments if you have any suggestions.
- SAP Managed Tags:
- SAP HANA
You must be a registered user to add a comment. If you've already registered, sign in. Otherwise, register and sign in.
Labels in this area
-
ABAP CDS Views - CDC (Change Data Capture)
2 -
AI
1 -
Analyze Workload Data
1 -
BTP
1 -
Business and IT Integration
2 -
Business application stu
1 -
Business Technology Platform
1 -
Business Trends
1,658 -
Business Trends
93 -
CAP
1 -
cf
1 -
Cloud Foundry
1 -
Confluent
1 -
Customer COE Basics and Fundamentals
1 -
Customer COE Latest and Greatest
3 -
Customer Data Browser app
1 -
Data Analysis Tool
1 -
data migration
1 -
data transfer
1 -
Datasphere
2 -
Event Information
1,400 -
Event Information
66 -
Expert
1 -
Expert Insights
177 -
Expert Insights
299 -
General
1 -
Google cloud
1 -
Google Next'24
1 -
Kafka
1 -
Life at SAP
780 -
Life at SAP
13 -
Migrate your Data App
1 -
MTA
1 -
Network Performance Analysis
1 -
NodeJS
1 -
PDF
1 -
POC
1 -
Product Updates
4,577 -
Product Updates
344 -
Replication Flow
1 -
RisewithSAP
1 -
SAP BTP
1 -
SAP BTP Cloud Foundry
1 -
SAP Cloud ALM
1 -
SAP Cloud Application Programming Model
1 -
SAP Datasphere
2 -
SAP S4HANA Cloud
1 -
SAP S4HANA Migration Cockpit
1 -
Technology Updates
6,873 -
Technology Updates
422 -
Workload Fluctuations
1
Related Content
- Accelerate Business Process Development with SAP Build Process Automation Pre-Built Content in Technology Blogs by SAP
- Best Practice: How to Structure the Shared Document Folder in Technology Blogs by SAP
- Empowering Retail Business with a Seamless Data Migration to SAP S/4HANA in Technology Blogs by Members
- 10+ ways to reshape your SAP landscape with SAP Business Technology Platform – Blog 4 in Technology Blogs by SAP
- Partner-2-Partner Collaboration in Manufacturing in Technology Blogs by SAP
Top kudoed authors
| User | Count |
|---|---|
| 40 | |
| 25 | |
| 17 | |
| 13 | |
| 8 | |
| 7 | |
| 7 | |
| 7 | |
| 6 | |
| 6 |