
- SAP Community
- Products and Technology
- Enterprise Resource Planning
- ERP Blogs by Members
- LSMW:Upload Master Data Using Batch Input Recordin...
Enterprise Resource Planning Blogs by Members
Gain new perspectives and knowledge about enterprise resource planning in blog posts from community members. Share your own comments and ERP insights today!
Turn on suggestions
Auto-suggest helps you quickly narrow down your search results by suggesting possible matches as you type.
Showing results for
jazib_tariq
Active Participant
Options
- Subscribe to RSS Feed
- Mark as New
- Mark as Read
- Bookmark
- Subscribe
- Printer Friendly Page
- Report Inappropriate Content
11-13-2013
7:53 AM
Introduction
The Legacy System Migration Workbench (LSMW) is a instrument to transmit data from legacy systems into an R/3 System. LSMW supports a step-by-step process; if one step is executed and saved then next step automatically follows. Apart from formation of project/ subproject/ object and recording, there are 14 basic steps included in LSMW. This article explains clearly about each and every step.
Example, I am showing how to upload Personnel Data for an employee i.e. Infotype 0002 .
Creating Project/ Subproject and Object:
Go to LSMW
Give the name of the Project, Subproject and Object as desired

Recording:
In menu bar, Goto---->Recordings
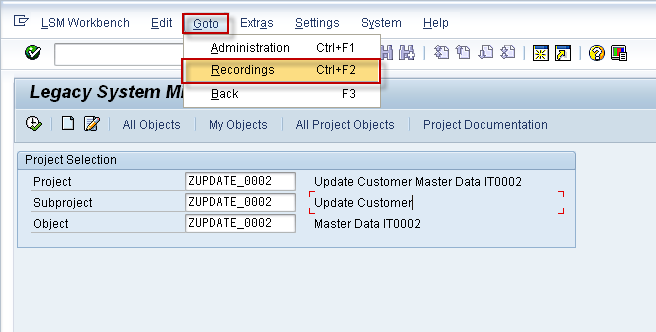
Now, Select ‘Recordings’ and create ---->Give recording name and description

Go to Transaction ‘PA30’

In Master data maintain screen, give Personnel No, infotype and subtype (if any), and click on create

Select The fields in whioch you want to input the data.

Save the Entry . The following screen will appear.

Now, click on Default All and save and press back
We are clicking ‘Default all’ button, so that all the fields which we touched during recording are included


Save and back to main Screen.
Processing basic steps in LSMW:
LSMW need to be configured 14 basic steps. Below you will find detailed step-by step procedure.
Click On execute

Step 1: Maintain Object Attributes
Select this radio button and click on execute

Now, click on Display/ Change icon Here, we are telling system that what kind recording should take into consideration while performing upload.
Select ‘Batch Input Recording’ and give name as shown below (Recording Name)

Save and Back.
Step 2: Maintain Source Structures
Source structures are helpful in building hierarchical relationships. While uploading the data system always checks highest level structure first before going for subordinate structure.
Select source structure and create

First click on Change button and then click on create button.

Save and Back.
Step 3: Maintain Source Fields
Here we assign all the fields which need to upload to source structure.
Click on Object Overview---->select table

Click on Object Overview---->select table
Click on change and then select the source field and then Table.

Copy the fields and length in excel sheet (for temporary)
Note: exclude TABNAME and TCODE which are not required to maintain separately, system will take these from recording we made.


Save and back.
Step 4: Maintain Structure Relations
Here we check whether structure relations between legacy and R/3 established or not.
In this step there is no need to change, just save and come back.

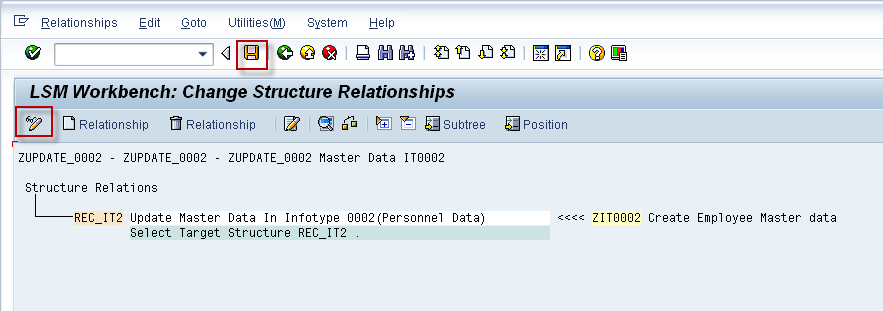
Save and Back.
Step 5: Display Field Mapping and Conversion
Here we establish the relationship between legacy and R/3 based on object fields.
In menu bar, go to ExtrasàAuto Field Mapping

After Execute go to Extra and then Auto Field Mapping.
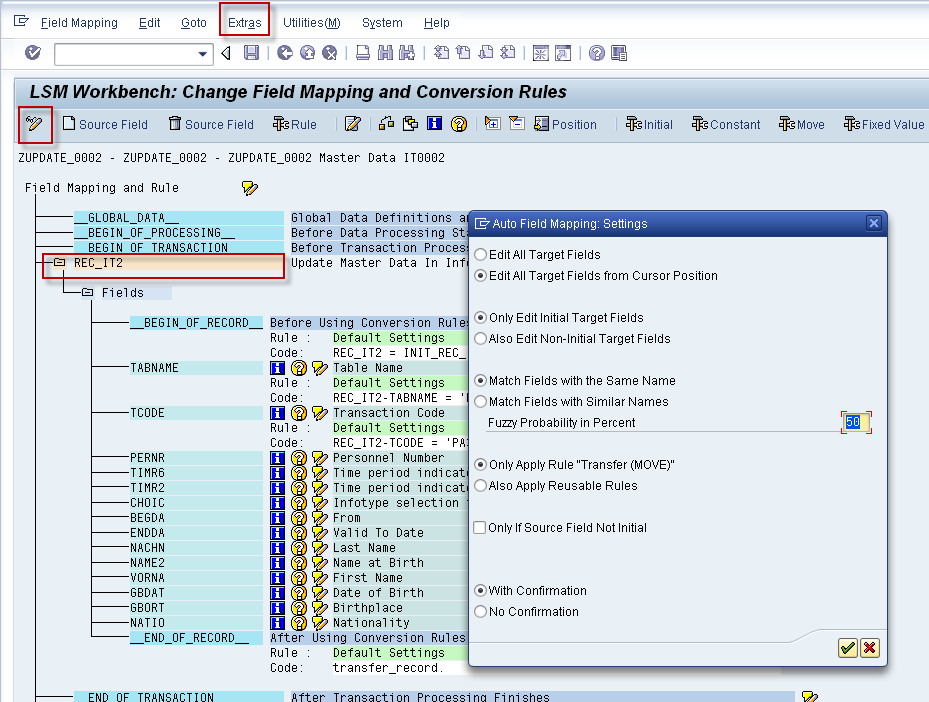

Now accept proposal for all the fields which need to upload
Step 6: Maintain Fixed Values, Translations, User-Defined Routines
No need to maintain this step, unless and until if there exist any user defined routines, which helpful for reusable.
Step 7: Specify Files
In this step, you specify the location of the legacy file.
Note: Generally we receive legacy file in excel format, so save this file as Text
Now, double click on ‘Legacy Data – On the PC (Front End)

- SAP Managed Tags:
- HCM (Human Capital Management)
31 Comments
You must be a registered user to add a comment. If you've already registered, sign in. Otherwise, register and sign in.
Labels in this area
-
"mm02"
1 -
A_PurchaseOrderItem additional fields
1 -
ABAP
1 -
ABAP Extensibility
1 -
ACCOSTRATE
1 -
ACDOCP
1 -
Adding your country in SPRO - Project Administration
1 -
Advance Return Management
1 -
AI and RPA in SAP Upgrades
1 -
Approval Workflows
1 -
ARM
1 -
ASN
1 -
Asset Management
1 -
Associations in CDS Views
1 -
auditlog
1 -
Authorization
1 -
Availability date
1 -
Azure Center for SAP Solutions
1 -
AzureSentinel
2 -
Bank
1 -
BAPI_SALESORDER_CREATEFROMDAT2
1 -
BRF+
1 -
BRFPLUS
1 -
Bundled Cloud Services
1 -
business participation
1 -
Business Processes
1 -
CAPM
1 -
Carbon
1 -
Cental Finance
1 -
CFIN
1 -
CFIN Document Splitting
1 -
Cloud ALM
1 -
Cloud Integration
1 -
condition contract management
1 -
Connection - The default connection string cannot be used.
1 -
Custom Table Creation
1 -
Customer Screen in Production Order
1 -
Data Quality Management
1 -
Date required
1 -
Decisions
1 -
desafios4hana
1 -
Developing with SAP Integration Suite
1 -
Direct Outbound Delivery
1 -
DMOVE2S4
1 -
EAM
1 -
EDI
2 -
EDI 850
1 -
EDI 856
1 -
EHS Product Structure
1 -
Emergency Access Management
1 -
Energy
1 -
EPC
1 -
Find
1 -
FINSSKF
1 -
Fiori
1 -
Flexible Workflow
1 -
Gas
1 -
Gen AI enabled SAP Upgrades
1 -
General
1 -
generate_xlsx_file
1 -
Getting Started
1 -
HomogeneousDMO
1 -
IDOC
2 -
Integration
1 -
Learning Content
2 -
LogicApps
2 -
low touchproject
1 -
Maintenance
1 -
management
1 -
Material creation
1 -
Material Management
1 -
MD04
1 -
MD61
1 -
methodology
1 -
Microsoft
2 -
MicrosoftSentinel
2 -
Migration
1 -
MRP
1 -
MS Teams
2 -
MT940
1 -
Newcomer
1 -
Notifications
1 -
Oil
1 -
open connectors
1 -
Order Change Log
1 -
ORDERS
2 -
OSS Note 390635
1 -
outbound delivery
1 -
outsourcing
1 -
PCE
1 -
Permit to Work
1 -
PIR Consumption Mode
1 -
PIR's
1 -
PIRs
1 -
PIRs Consumption
1 -
PIRs Reduction
1 -
Plan Independent Requirement
1 -
Premium Plus
1 -
pricing
1 -
Primavera P6
1 -
Process Excellence
1 -
Process Management
1 -
Process Order Change Log
1 -
Process purchase requisitions
1 -
Product Information
1 -
Production Order Change Log
1 -
Purchase requisition
1 -
Purchasing Lead Time
1 -
Redwood for SAP Job execution Setup
1 -
RISE with SAP
1 -
RisewithSAP
1 -
Rizing
1 -
S4 Cost Center Planning
1 -
S4 HANA
1 -
S4HANA
3 -
Sales and Distribution
1 -
Sales Commission
1 -
sales order
1 -
SAP
2 -
SAP Best Practices
1 -
SAP Build
1 -
SAP Build apps
1 -
SAP Cloud ALM
1 -
SAP Data Quality Management
1 -
SAP Maintenance resource scheduling
2 -
SAP Note 390635
1 -
SAP S4HANA
2 -
SAP S4HANA Cloud private edition
1 -
SAP Upgrade Automation
1 -
SAP WCM
1 -
SAP Work Clearance Management
1 -
Schedule Agreement
1 -
SDM
1 -
security
2 -
Settlement Management
1 -
soar
2 -
SSIS
1 -
SU01
1 -
SUM2.0SP17
1 -
SUMDMO
1 -
Teams
2 -
User Administration
1 -
User Participation
1 -
Utilities
1 -
va01
1 -
vendor
1 -
vl01n
1 -
vl02n
1 -
WCM
1 -
X12 850
1 -
xlsx_file_abap
1 -
YTD|MTD|QTD in CDs views using Date Function
1
- « Previous
- Next »
Related Content
- The Role of SAP Business AI in the Chemical Industry. Overview in Enterprise Resource Planning Blogs by SAP
- SAP Table Creation, Maintenance, and Authorization in Enterprise Resource Planning Blogs by Members
- Lesson learnt on Process Industry with Production Information System (S4 HANA Custom Development) in Enterprise Resource Planning Blogs by Members
- Lesson learnt on Process Industry with Production Information System (S4 HANA Custom Development) in Enterprise Resource Planning Blogs by Members
- Hi, I am getting an error "No personal master record exists for person 0" in Perform Maintenance Job in Enterprise Resource Planning Q&A
Top kudoed authors
| User | Count |
|---|---|
| 2 | |
| 2 | |
| 2 | |
| 2 | |
| 2 | |
| 1 | |
| 1 | |
| 1 | |
| 1 |