
- SAP Community
- Products and Technology
- Technology
- Technology Blogs by SAP
- Learn how to use SAP Lumira SP12 with SAP NetWeave...
Technology Blogs by SAP
Learn how to extend and personalize SAP applications. Follow the SAP technology blog for insights into SAP BTP, ABAP, SAP Analytics Cloud, SAP HANA, and more.
Turn on suggestions
Auto-suggest helps you quickly narrow down your search results by suggesting possible matches as you type.
Showing results for
IngoH
Active Contributor
Options
- Subscribe to RSS Feed
- Mark as New
- Mark as Read
- Bookmark
- Subscribe
- Printer Friendly Page
- Report Inappropriate Content
10-10-2013
12:35 AM
In the first part you learned how you can leverage the SAP NetWeaver BW on SAP HANA trial to start your very own SAP BW and BI4 system – that was yesterday. Today we will focus on getting the system updated with SAP Lumira SP12 and we will setup our Universe on top of the SAP NetWeaver Demo model in the SAP BW system.
- Navigate to the SAP Cloud Appliance Library
- Navigate to the tab Instances.
- Activate your Instances. The instances should be ready in a few minutes.
- Log on to the BI4 environment using Remote Desktop.
Today we want to update our BI4 system to Lumira SP12. Right now the BI4 system has Predictive Analysis SP11 installed, so for us to install SAP Lumira SP12 means we first need to remove SAP Predictive Analysis, download SAP Lumira SP12 and install it.
So let’s start with removing SAP Predictive Analysis from the system:
- Log on to the BI4 instance using Remote Desktop.
- Navigate to Start • Control Panel.
- Select Programs.
- Select Programs and Features.
- Scroll down to SAP Predictive Analysis.
- Click Uninstall.
After we uninstalled SAP Predictive Analysis, we now need to download SAP Lumira SP12.
- Navigate to Service Marketplace – http://service.sap.com/swdc
- On the left hand side select Installations and Upgrades
- Select Browse our Download Catalog
- Click on Analytics Solutions
- Click on Lumira (Visual Intelligence)
- Select Lumira 1.0
- Select Lumira 1.0 64 Bit
- Select Windows on X64 64 bit
- Select SAP Lumira 1.0 SP12 and add it to the Download basket.
The SAP Download Manager is installed on the SAP BusinessObjects BI 4 Instance so you can directly download the Software to the BI4 instance.
- Log on to the BI4 instance using Remote Desktop.
- Navigate to Start • Programs • SAP Download Manager • SAP Download Manager
- In the SAP Download Manager select the menu View • Download Manager configuration
- Enter your user and password for SAP Service Marketplace.
- Click OK.
- Start the download. The software will be downloaded to C:\download.
When the download is finished you can start the installation of SAP Lumira SP12. First you set the destination folder.

In the next step you accept the License Agreement. On Step 3 …

… you can use “Register later” for now.
When the installation is finished…

.. make sure the “Launch SAP Lumira 1.12 after installation completes” checkbox is activated and click Finish.
SAP Lumira is being started but you need to enter a keycode. Navigate to the menu Help • Enter KeyCode.
You can receive temporary keycode from SAP Service marketplace: http://service.sap.com/licensekeys.
At this point we have a running SAP BW on SAP HANA system and we installed SAP Lumira SP12 on our BI4 server. Lets now create the Universe (UNX) on top of the MultiProvider for the SAP NetWeaver Demo model.
...but before we can leverage a Universe (which uses the SAP Java Connector) in combination with our SAP NetWeaver BW system we need to configure the Gateway security. The default in a BW 7.3 is "locked" so the Information Design Tool would not be able to communicate to SAP NetWeaver BW.
You can do this in two ways:
Option 1:
You configure the profile parameter gw/acl_mode to the value 0 as part of the Default profile and restart the BW server.
Option 2:
You ensure that in the files secinfo and reginfo on the operating system (on the BW on HANA server) include the following entry:
P TP=* USER=* USER-HOST=* HOST=*
Both of the configurations are for sure not something you would do in a production environment but should be ok in our environment as we are using this for our education purposes.
After we configured that, we can now start creating the Universe:
- Start the Information Design tool by following the menu Start • All Programs • SAP Business Intelligence • SAP BusinessObjects BI Platform 4 Client Tools • Information Design Tool.
- Select the menu File • New • Project to create a new project for your Universe.
- Enter BW_UNIVERSE as name for the new project and click Finish.
- Select your new project in the list of Local Projects.
- Select the menu Window and make sure the window Repository Resources is shown.
- Select the menu Insert Session in the Repository Resources to establish a session to your SAP BusinessObjects system.

- Use the following details to log on
- System: localhost
- User BWH~001/DEMO
- Password Welcome!
- Authentication SAP
- Click OK.
- Open the context menu of your established server connection in the area Connections.

- Select the menu item Insert Relational Connection
SAP NetWeaver BW Connection
To establish a relational connection towards the SAP NetWeaver BW connection you need to first establish a session towards the SAP BusinessObjects system, and then create a connection starting with the repository of your SAP BusinessObjects system, which is slightly different to the usual workflow
- Enter a name for the connection – BW_CONNECTION
- Click Next.

- Select the connection type SAP Java Connector in the category SAP NETWEAVER BW.
- Click Next.

- Enter the necessary details of your SAP NetWeaver BW system:
- Authentication Mode: Use Single Sign On
- Client Number : 001
- Language : EN
- System ID : BWH
- Application Server : imdbhdb.sapcoe.sap.com
- System Number 01
(Yes - when you are using the BW on HANA Trial you can use the values written here!)
- You can use the Save Language option to save your settings as configured in the relational connection. In case you leave the checkbox open, the user can influence the language by setting the user preferences in the BI Launchpad.
- Use the button next to the box InfoProvider to receive a list of possible InfoProvider.

- You can use the filter as part of the screen to limit the list of InfoProvider based on the type of InfoProvider:
- IOBJ = InfoObject
- CUBE = InfoCube
- ODSO = Operational Data Store
- MRPO = MultiProvider
- VIRT = Virtual InfoProvider
- In our example we are using the MultiProvider 0D_NW_M01 from the NetWeaver Demo Model. The entry will have a “I” in front of the technical name.
- Click OK.
- Click Finish.
- You will be asked if you would like to create a shortcut for your connection. Click Yes.
- Select your local project.
- Click OK
- Click Close.
- Select your local project.
- Select the menu File • New • Data Foundation.
- Enter BW_DATA_FOUNDATION as name for the Data Foundation.
- Click Next.
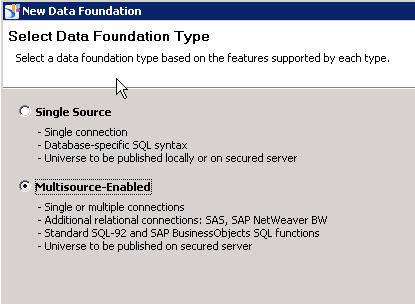
- Select the option Multi-Source-Enabled. The connection towards SAP NetWeaver BW is not available when using the Single Source option.
- Click Next.
- You will be asked to logon to your SAP BusinessObjects Enterprise system. Your credentials should already be entered.
- Click Next.
- Select the shortcut which was created for the connection we established previously.
- Click Next.

- Click Advanced.
- Ensure the option AUTOMATICALLY CREATES TABLES AND JOINS is activated.
- Click Finish.
You are presented with a default generated star schema for the selected InfoProvider.
- Select the menu File • New • Business Layer
- Select the entry Relational Data Foundation
- Click Next.
- Enter BW_BUSINESS_LAYER as name for the Business Layer.
- Click Next.
- Use the button and select the newly created Data Foundation - BW_DATA_FOUNDATION.
- Click OK

- Ensure the option Automatically create folders and objects for SAP NetWeaver BW connections (recommended) is activated.
- Click Finish.
You are being presented with a list of classes, dimensions, and measures that have been generated based on the information retrieved from SAP NetWeaver BW.
- Select the menu File > Save All.
- Right-Click the newly generated Business Layer entry as part of your local project.
- Select the menu Publish > To a Repository
- Select the integrity checks you would like to perform.
- Click Next
- Select a folder for the Universe.
- Click Finish.
- Click Close.
- Close the Information Design Tool
At this point we installed SAP Lumira SP12 on the BI4 Server environment, we configured our BW system to allow the RFC communication and we created a relational Universe (UNX) on top of the MultiProvider from the SAP NetWeaver BW Demo model.
So we are ready to use SAP Lumira with the relational Universe.....tomorrow ! =:)
Here are some additional resources:
- SAP NetWeaver BW on SAP HANA Trial
- SAP NetWeaver BW on SAP HANA – Getting Started Guide
- SAP NetWeaver BW on SAP HANA – Getting Started Video
- SAP NetWeaver BW on SAP HANA - FAQ
- SAP NetWeaver BW on SAP HANA – Trial Tutorials
- SAP Cloud Appliance Library
- Using SAP Lumira SP12 with SAP NetWeaver BW on SAP HANA Trial - Part 1
- SAP Managed Tags:
- BW (SAP Business Warehouse),
- SAP BusinessObjects Business Intelligence platform
24 Comments
You must be a registered user to add a comment. If you've already registered, sign in. Otherwise, register and sign in.
Labels in this area
-
ABAP CDS Views - CDC (Change Data Capture)
2 -
AI
1 -
Analyze Workload Data
1 -
BTP
1 -
Business and IT Integration
2 -
Business application stu
1 -
Business Technology Platform
1 -
Business Trends
1,661 -
Business Trends
87 -
CAP
1 -
cf
1 -
Cloud Foundry
1 -
Confluent
1 -
Customer COE Basics and Fundamentals
1 -
Customer COE Latest and Greatest
3 -
Customer Data Browser app
1 -
Data Analysis Tool
1 -
data migration
1 -
data transfer
1 -
Datasphere
2 -
Event Information
1,400 -
Event Information
64 -
Expert
1 -
Expert Insights
178 -
Expert Insights
274 -
General
1 -
Google cloud
1 -
Google Next'24
1 -
Kafka
1 -
Life at SAP
784 -
Life at SAP
11 -
Migrate your Data App
1 -
MTA
1 -
Network Performance Analysis
1 -
NodeJS
1 -
PDF
1 -
POC
1 -
Product Updates
4,577 -
Product Updates
327 -
Replication Flow
1 -
RisewithSAP
1 -
SAP BTP
1 -
SAP BTP Cloud Foundry
1 -
SAP Cloud ALM
1 -
SAP Cloud Application Programming Model
1 -
SAP Datasphere
2 -
SAP S4HANA Cloud
1 -
SAP S4HANA Migration Cockpit
1 -
Technology Updates
6,886 -
Technology Updates
405 -
Workload Fluctuations
1
Related Content
- It has never been easier to print from SAP with Microsoft Universal Print in Technology Blogs by Members
- SAP PI/PO migration? Why you should move to the Cloud with SAP Integration Suite! in Technology Blogs by SAP
- Safeguard your SAP BW conversion with SAP Enterprise Support services in Technology Blogs by SAP
- Monitoring of sap systems through Azure_Part-3 in Technology Blogs by Members
- From Certified ABAP Developer on SAP NetWeaver to Certified Back-End Developer with ABAP Cloud in Technology Blogs by SAP
Top kudoed authors
| User | Count |
|---|---|
| 13 | |
| 10 | |
| 10 | |
| 7 | |
| 7 | |
| 6 | |
| 5 | |
| 5 | |
| 5 | |
| 4 |