
- SAP Community
- Products and Technology
- Technology
- Technology Blogs by SAP
- Creating an OData Service using R
Technology Blogs by SAP
Learn how to extend and personalize SAP applications. Follow the SAP technology blog for insights into SAP BTP, ABAP, SAP Analytics Cloud, SAP HANA, and more.
Turn on suggestions
Auto-suggest helps you quickly narrow down your search results by suggesting possible matches as you type.
Showing results for
Former Member
Options
- Subscribe to RSS Feed
- Mark as New
- Mark as Read
- Bookmark
- Subscribe
- Printer Friendly Page
- Report Inappropriate Content
10-08-2013
9:52 AM
Introduction
OData service, a kind of RESTful service, is a very popular topic today. By using OData service, you can query, update, insert and delete data through a unified way using HTTP.
The deployment of an OData service is very simple and rapid in HANA, by using the XS Engine. On the other hand, for doing some data analysis development, it is also very flexible and rapid using R. So what about bring these two stuffs together?
This article illustrates a way to combine the OData service and R together, in order to deploy a predictive analysis OData Service in HANA really simple and fast.
The key technology here is to use the RESULT VIEW of a procedure. By using RESULT VIEW, developers can call this procedure by simply querying this RESULT VIEW. An OData service in HANA can be set to query on a result view, which makes calling a procedure through the OData Service possible.
Here I’ll use an example to illustrate how to combine the OData service and R procedure.
In this example, I write a simple R procedure to calculate the mean and standard deviation of one column of a table.
Preparation
We assume that you have a workspace in HANA Studio to track a HANA system. In this example, our HANA system’s SID is: “HDB”, and instance number is: “00”. Our workspace name is: “dm-dingshun_HDB_00”.
Also we assume you have created a HANA XS project for this demo, and have shared this project to the workspace you want to apply. In this example, our project name is “TestOData”, and the content of this project will be deployed to the “helloodata” package in the HANA instance. After the project is created and shared. You will find the project in the Project Explorer:

Create the Schema and Data Table
The first step is to create the schema of this demo. This step is optional. You can also use an existing schema and existing data tables. Here we will create a schema called ‘HELLO_ODATA’. We create a file called ‘HELLO_ODATA.xsschema’ in our project, and write down the following contents:
schema_name="HELLO_ODATA";Then you activate this file. After that, you’ll see the schema in this HANA instance.
Then, you create a table for input data in this demo. We create a file called “otable.hdbtable” . Here is the content:
table.schemaName = "HELLO_ODATA";

table.tableType = COLUMNSTORE;

table.columns = [

    {

        name = "ID";

        sqlType = INTEGER;

        nullable = false;


    },

    {

        name = "NAME";

        sqlType = NVARCHAR;

        nullable = false;

        length = 20;

        comment = "dummy comment";

    },

    {

        name = "VAL";

        sqlType = DOUBLE;

        nullable = true;

        defaultValue = "0";

    }

];

table.primaryKey.pkcolumns = ["ID"];
Then you activate this file, and you can find this table in the Catalog of this instance:

OK. You can insert some data into it. It might possible that the user you used could not insert data on it. You can firstly grant privileges on the user. Here I use the user “SYSTEM”:
CALL _SYS_REPO.GRANT_SCHEMA_PRIVILEGE_ON_ACTIVATED_CONTENT(

    'select', 'HELLO_ODATA', 'SYSTEM'

);

CALL _SYS_REPO.GRANT_SCHEMA_PRIVILEGE_ON_ACTIVATED_CONTENT(

    'insert', 'HELLO_ODATA', 'SYSTEM'

);

CALL _SYS_REPO.GRANT_SCHEMA_PRIVILEGE_ON_ACTIVATED_CONTENT(

    'update', 'HELLO_ODATA', 'SYSTEM'

);

CALL _SYS_REPO.GRANT_SCHEMA_PRIVILEGE_ON_ACTIVATED_CONTENT(

    'delete', 'HELLO_ODATA', 'SYSTEM'

);
Then insert some data into it:
TRUNCATE TABLE HELLO_ODATA."helloodata::otable";

INSERT INTO HELLO_ODATA."helloodata::otable" VALUES (1, 'AAA', 1.1);

INSERT INTO HELLO_ODATA."helloodata::otable" VALUES (2, 'BBB', 2.2);

INSERT INTO HELLO_ODATA."helloodata::otable" VALUES (3, 'CCC', 3.3);

INSERT INTO HELLO_ODATA."helloodata::otable" VALUES (4, 'DDD', 3.1415926);
Create the R procedure
The script of the R procedure is really easy: It calculates the mean and standard deviation of the ‘VAL’ column of the table. Here is the script to create the output table type as well as the procedure. Open a SQL console and execute the following script:
DROP TYPE HELLO_ODATA.DUMMY_OUTPUT_T;

CREATE TYPE HELLO_ODATA.DUMMY_OUTPUT_T AS TABLE(

    KEY VARCHAR(64),

    VAL DOUBLE

);

DROP PROCEDURE HELLO_ODATA.DUMMY_R_PROC;

CREATE PROCEDURE HELLO_ODATA.DUMMY_R_PROC(

    IN input1 HELLO_ODATA."helloodata::otable",

    OUT result HELLO_ODATA.DUMMY_OUTPUT_T

)

LANGUAGE RLANG READS SQL DATA

AS

BEGIN

    result <- data.frame(

        KEY=c("Average", "Standard Deviation"),

        VAL=c(mean(input1$VAL), sd(input1$VAL))

    )

END;
Key Part: Creating a Result View
Next thing we need to do is to create a result view on that. This step is the most important part of the whole process. Because the user cannot specify the input table name, we need to wrap a SQL script procedure on this R procedure, with no input parameters and only one output parameter, specify the input table inside it, and expose it as a result view. If you create a read only procedure with only one output parameter, you can set it as a result view. Here is the code snippet:
DROP VIEW HELLO_ODATA.DUMMY_R_RESULT_VIEW;

DROP PROCEDURE HELLO_ODATA.DUMMY_R_WRAPPER;

CREATE PROCEDURE HELLO_ODATA.DUMMY_R_WRAPPER(

    OUT result HELLO_ODATA.DUMMY_OUTPUT_T

)

LANGUAGE SQLSCRIPT READS SQL DATA

WITH RESULT VIEW HELLO_ODATA.DUMMY_R_RESULT_VIEW

AS

BEGIN

    inputTable = CE_COLUMN_TABLE(HELLO_ODATA."helloodata::otable");

    CALL HELLO_ODATA.DUMMY_R_PROC(:inputTable, result);

END;
In this procedure, we specify the procedure a ‘read only’ one with “READS SQL DATA”, and assign this procedure to a Result view, the name is: “HELLO_ODATA.DUMMY_R_RESULT_VIEW”. After creating this procedure, an extra result view can be seen on the Column View folder:

OK. You can try on the result view. When you query on this result view using ‘SELECT’, it would actually call the wrapper SQL Script procedure, which in turn calls the R Procedure. Very interesting.

Expose the Result View as an OData Service
The last step is to expose this result view as an OData service. We create a file in our project called “hello.xsodata”, and specify the data sources need to be exposed:
service {

    "helloodata::otable" as "MyTable";

    "HELLO_ODATA"."DUMMY_R_RESULT_VIEW" as "ResultView"

    keys generate local "GenID";

}
Here we exposed two entries, separated by ‘;’. The first entry is our input table, and the exposed name is “MyTable”, and the second is our result view, named “ResultView”.
Then you need to create an empty file called ‘.xsapp’, which means this package is ready to receive external HTTP requests.
Also an authentication file, called ‘.xsaccess’, is needed. This file specifies which database users are allowed to access this package contents through URL. Here is the content:
{

    "exposed": true

}
Now you can have a try on the web browser: Type in the following URL to retrieve the input table:
http://<host>:<8000 + instance #>/helloodata/hello.xsodata/MyTable

Type in the following URL to retrieve the analysis result using R:
http://<host>:<8000 + instance #>/helloodata/hello.xsodata/ResultView

By default the data is retrieved as an ATOM format. You can add the query parameter: $format=json to make it transferred as the JSON format:

Now let’s try something interesting: You can insert data into the input table by sending an HTTP request. There is a command line tool in Linux to issue HTTP requests: ‘curl’. Type in the following command and see what happened:
curl -H 'Authorization: Basic U1lTVEVNOm1hbmFnZXI=' \

-H 'Content-Type: application/json' \

-X POST 'http://dm-dingshun.dhcp.pvgl.sap.corp:8000/helloodata/hello.xsodata/MyTable' \

-d '{"ID": 5, "NAME": "EEE", "VAL": "5.5"}'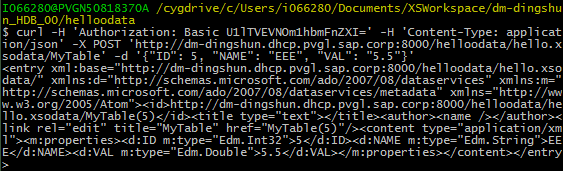
Note here we send a HTTP POST command to our Input table URL, with the header ‘Authorization’ and ‘Content-Type’, as well as one line of data: {5, “EEE”, “5.5”}. The content of an ‘Authorization’ key can be obtained through some Web tracing tools. For example, here is how to get the value from Google Chrome:

Now when you retrieve the input table through URL again in the web browser, you can see that the data is actually inserted into the table!

Now when we retrieve the analysis OData, the data is also changed. Average is changed from about 2.43 to about 3.048, and standard deviation is changed from about 1.014 to about 1.6278:

OK. Up to now, we have built a complete analysis OData service using R. It’s really simple and deployment process is quite fast. We can easily build a Web application or a smartphone application on top of that.
Discussion about Parameter Issue
Here we use the result view with no input arguments. It might be possible that we build a calculation view accepting some input parameters. The HANA OData service configuration files support parameters for an OData data source. You can use the configuration ‘parameters via entity’ to make it a data source accepting parameters. You can refer to this article: http://scn.sap.com/community/developer-center/hana/blog/2013/01/22/rest-your-models-on-sap-hana-xs
Conclusion
Throughout the whole process of building this OData service utilizing R. The key steps can be summarized as follows:
- Input data is needed.
- Create one or several R procedure(s) doing the (different) analys(es)
- Create one or several wrapper procedure(s), each for one R procedure, and export it(them) as a result view(s)
- Build the OData service, making the result view(s) as the data source.
The process of building an OData service utilizing R is very simple and fast. Developers only need to write very little code to make it work.
Building this kind of analysis OData service makes it possible to doing some data analytics through a HTTP interface, which could be a data source for a Web application or smartphone application.
Reference
- SAP HANA Developer Guide (http://help.sap.com/hana/SAP_HANA_Developer_Guide_en.pdf)
- SAP HANA SQLScript Reference (http://help.sap.com/hana/SAP_HANA_SQL_Script_Reference_en.pdf)
- REST your Models on SAP HANA XS (http://scn.sap.com/community/developer-center/hana/blog/2013/01/22/rest-your-models-on-sap-hana-xs)
- SAP Managed Tags:
- SAP HANA
1 Comment
You must be a registered user to add a comment. If you've already registered, sign in. Otherwise, register and sign in.
Labels in this area
-
ABAP CDS Views - CDC (Change Data Capture)
2 -
AI
1 -
Analyze Workload Data
1 -
BTP
1 -
Business and IT Integration
2 -
Business application stu
1 -
Business Technology Platform
1 -
Business Trends
1,658 -
Business Trends
93 -
CAP
1 -
cf
1 -
Cloud Foundry
1 -
Confluent
1 -
Customer COE Basics and Fundamentals
1 -
Customer COE Latest and Greatest
3 -
Customer Data Browser app
1 -
Data Analysis Tool
1 -
data migration
1 -
data transfer
1 -
Datasphere
2 -
Event Information
1,400 -
Event Information
66 -
Expert
1 -
Expert Insights
177 -
Expert Insights
299 -
General
1 -
Google cloud
1 -
Google Next'24
1 -
Kafka
1 -
Life at SAP
780 -
Life at SAP
13 -
Migrate your Data App
1 -
MTA
1 -
Network Performance Analysis
1 -
NodeJS
1 -
PDF
1 -
POC
1 -
Product Updates
4,577 -
Product Updates
344 -
Replication Flow
1 -
RisewithSAP
1 -
SAP BTP
1 -
SAP BTP Cloud Foundry
1 -
SAP Cloud ALM
1 -
SAP Cloud Application Programming Model
1 -
SAP Datasphere
2 -
SAP S4HANA Cloud
1 -
SAP S4HANA Migration Cockpit
1 -
Technology Updates
6,873 -
Technology Updates
422 -
Workload Fluctuations
1
Related Content
- Configuring SAP CI/CD pipeline for Deploying ReactJS application in Cloud Foundry in Technology Q&A
- Sorting not working on object Page Item table SAP CAP BTP Fiori elements in Technology Q&A
- Business Partner customizing for Automotive Industry in Technology Blogs by Members
- I am using exit_saplkedrcopa_001 for enhancement to populate characteristics values in KEDR. in Technology Q&A
- Extend Your Crystal Reports Solutions in the DHTML Viewer With a Free Function Library in Technology Blogs by Members
Top kudoed authors
| User | Count |
|---|---|
| 40 | |
| 25 | |
| 17 | |
| 13 | |
| 7 | |
| 7 | |
| 7 | |
| 6 | |
| 6 | |
| 6 |