
- SAP Community
- Products and Technology
- Enterprise Resource Planning
- ERP Blogs by Members
- ESS MSS Multi-Client Configuration - Part1
Enterprise Resource Planning Blogs by Members
Gain new perspectives and knowledge about enterprise resource planning in blog posts from community members. Share your own comments and ERP insights today!
Turn on suggestions
Auto-suggest helps you quickly narrow down your search results by suggesting possible matches as you type.
Showing results for
former_member21
Explorer
Options
- Subscribe to RSS Feed
- Mark as New
- Mark as Read
- Bookmark
- Subscribe
- Printer Friendly Page
- Report Inappropriate Content
07-25-2013
12:42 PM
1. Introduction
This blog is based on my experience in one of the projects that I have worked sometime ago!!!. It describes how to configure SAP Enterprise Portal to point to multiple backend clients in ESS/MSS scenarios.
Within EP 7.0 / ESS MSS 600, Web Dynpro ESS/MSS package is pre-configured by default for a unique Logical System. This causes severe restrictions in a multi-client environment.
2. Business Scenario
To support provider’s shared methodology, it must be possible to maintain ESS/MSS landscape in a manner that allows multiple customers to be implemented within multiple clients on the same system with a unique Portal.
Below scenario shows a portal pointing to multiple clients from the same backend system containing ESS/MSS scenarios. It is a pre-requisite that the usernames in backend clients and portal should be the same. In this scenario, the users logged in to portal are able to access the backend using SSO logon tickets. And also, a Central User Administration (CUA) as to be implement in the landscape, one system or one client can dedicated for


3. Single-Client Configuration Information
By default ESS/MSS is configured for a single backend client. There are a number of configurations required in Portal as well as the backend like setting up JCo, System landscape, ADS and so on. The entire set of standard configurations can be found here:
http://help.sap.com/saphelp_erp2005/helpdata/en/f6/263359f8c14ef98384ae7a2becd156/frameset.htm
4. Multi-Client Configuration Information
This document assumes that all the ESS/MSS scenarios are working for a single backend client (e.g.: 100). In the following steps we will configure the portal to point to a new client (200)

5. Implementation Multi-client steps
5.1 Set up JCo Destinations
Various JCo connections are already setup for client 100 on the Web Dynpro J2EE server on which the self-service components have been implemented. To create a new set of JCo connections for client 200, implement the steps provided in the following URL and ensure that the parameter for property ‘client’ is provided as 200: Suffix “CL2” with the name as shown in below screenshot.
http://help.sap.com/saphelp_erp2005/helpdata/en/ca/115e4088dc0272e10000000a155106/content.htm

5.2 Business Package copy for the new client
The default downloaded ESS/MSS Business Package will be paced under:
Portal Content > Content Provided by SAP > End User Content > Employee Self-Service.
Portal Content > Content Provided by SAP > line_manager > Manager Self-Service.
Make a copy of these Folders and paste it in a new location. Ensure to create a Copy and not a Deltalink.
Use ‘Multiple Property Replacement’ to add new value for the ‘Application Parameter’ properties of WebDynpro iviews. Following is the example of a possible value for ‘Application Parameter’ property. This value will change as per the JCo Destinations created in the system, for each client.
sap-wd-arfc-useSys=SAP_BPS:CL2&sap-wd-arfc-useSys=SAP_BPS_MetaData:CL2&sap-wd-arfc-useSys=SAP_cProjects:CL2&sap-wd-arfc-useSys=SAP_cProjects_MetaData:CL2&sap-wd-arfc-useSys=SAP_ECC_Financials:CL2&sap-wd-arfc-useSys=SAP_ECC_Financials_MetaData:CL2&sap-wd-arfc-useSys=SAP_R3_Financials:CL2&sap-wd-arfc-useSys=SAP_R3_Financials_MetaData:CL2&sap-wd-arfc-useSys=SAP_R3_HumanResources:CL2&sap-wd-arfc-useSys=SAP_R3_HumanResources_Metadata:CL2&sap-wd-arfc-useSys=SAP_R3_HumanResources_MetaData:CL2&sap-wd-arfc-useSys=SAP_ECC_HumanResources:CL2&sap-wd-arfc-useSys=SAP_R3_SelfServiceGenerics:CL2&sap-wd-arfc-useSys=SAP_R3_SelfServiceGenerics_MetaData:CL2&sap-wd-arfc-useSys=SAP_R3_SelfServiceGenericsFIN:CL2&sap-wd-arfc-useSys=SAP_R3_SelfServiceGenerics_MetaDataFIN:CL2&sap-wd-arfc-useSys=SAP_R3_Travel:CL2&sap-wd-arfc-useSys=SAP_R3_Travel_MetaData:CL2&sap-wd-arfc-useSys=WD_MODELDATA_DEST:CL2&sap-wd-arfc-useSys=WD_RFC_METADATA_DEST:CL2&sap-wd-arfc-useSys=WD_RSDAS_MODELDATA_DEST:CL2&sap-wd-arfc-useSys=WD_RSDAS_RFC_METADATA_DEST:CL2
5.2.1 ‘Application Parameters’ property for newly copied Business Package
If ‘Multiple Property Replacement’ was not used to provide Application Parameter for iviews, navigate to the iviews belonging to e.g. client 200 Business Package and provide the Application Parameters that point to the newly created JCo connections (client 200) manually. This value will change as per the JCo Destinations created in the system, for each client.

Here is an example of a complete Iview Application Parameter:
sap-wd-arfc-useSys=SAP_BPS:CL2&sap-wd-arfc-useSys=SAP_BPS_MetaData:CL2&sap-wd-arfc-useSys=SAP_cProjects:CL2&sap-wd-arfc-useSys=SAP_cProjects_MetaData:CL2&sap-wd-arfc-useSys=SAP_ECC_Financials:CL2&sap-wd-arfc-useSys=SAP_ECC_Financials_MetaData:CL2&sap-wd-arfc-useSys=SAP_R3_Financials:CL2&sap-wd-arfc-useSys=SAP_R3_Financials_MetaData:CL2&sap-wd-arfc-useSys=SAP_R3_HumanResources:CL2&sap-wd-arfc-useSys=SAP_R3_HumanResources_Metadata:CL2&sap-wd-arfc-useSys=SAP_R3_HumanResources_MetaData:CL2&sap-wd-arfc-useSys=SAP_ECC_HumanResources:CL2&sap-wd-arfc-useSys=SAP_R3_SelfServiceGenerics:CL2&sap-wd-arfc-useSys=SAP_R3_SelfServiceGenerics_MetaData:CL2&sap-wd-arfc-useSys=SAP_R3_SelfServiceGenericsFIN:CL2&sap-wd-arfc-useSys=SAP_R3_SelfServiceGenerics_MetaDataFIN:CL2&sap-wd-arfc-useSys=SAP_R3_Travel:CL2&sap-wd-arfc-useSys=SAP_R3_Travel_MetaData:CL2&sap-wd-arfc-useSys=WD_MODELDATA_DEST:CL2&sap-wd-arfc-useSys=WD_RFC_METADATA_DEST:CL2&sap-wd-arfc-useSys=WD_RSDAS_MODELDATA_DEST:CL2&sap-wd-arfc-useSys=WD_RSDAS_RFC_METADATA_DEST:CL2
5.3 Set up Systems / Aliases
Navigate to System Administration > Portal Content > and define a new system object that points to client 200. Please note that already a system object should be available for client 100. It is simple to make a copy of the same and point the new one to client 200. (as seen in below screenshot). Also change the name of the system object. (E.g: SAP_ECC_BP3_CL2).

Define the necessary System Alias for the system, pointing to Client 200:

5.4 UWL Configuration
Navigate to System Administration > Universal Worklist & Workflow > Universal Worklist – Administration. Here you can define connections to systems as item providers for the Universal Worklist. Add the newly created system alias here (as mentioned in the screenshot below).

Please note that ‘WebDynpro Launch System’ is the system alias of the system which contains the Web Dynpro ESS/MSS Business Packages. Usually it will be the same system as the Portal. So this system alias (as per above screenshot example: WebDynpro_XSS) refers to the Enterprise Portal system which contains the deployed Web Dynpro ESS/MSS applications.
In Order to restrict access to the corresponding Universal Worklist System, we need to register each system with a specific System Configuration Group, to make it easier we will use the name, ie SAP_WebDynpro_XSS for client 100, SAP_WebDynpro_XSS_CL2 for 200…
http://help.sap.com/saphelp_nw70/helpdata/EN/92/a88931f2dd4631b9e8d530697d89c9/frameset.htm

Then restrict the role to use the corresponding System Configuration Group:
Open the role ‘Manager Self Service’ and edit Overview->Work Overview->Work Overview page.


Select ‘Universal Worklist’ iView from the page and click on ‘Open’ button.

Set the value(SAP_WebDynpro_XSS) for the parameter ‘System Configuration Group’. Above screenshot is for client 100.
For Client 200, open the ‘Manager Self Service’ role from the below path and set the value (SAP_WebDynpro_XSS_CL2)

5.5 PCD Location Replication in SPRO
The PCD location of ESS/MSS client 200 iviews should be the same as the resource attribute ‘URL of PCD Page’ in SPRO. To make these two configurations point to the same URL, navigate to any iview belonging to the ESS/MSS client 200 Business Package. Open the iview object and copy the url from ‘PCD location’.
After copying the URL, open the backend system SPRO configurations for ESS from SAP logon and open the resource object that corresponds to the particular iview e.g:
EMPLOYEE_CHANGEOWNDATA_SERVICE05. Paste the url at ‘URL of PCD Page’ and save. (Refer to screenshot below):

5.6 XML Configuration upload for UWL
For the PCRs of different clients to work in Portal, we need to upload a custom xml file with Jco parameters specific to the client.
Navigate to System Administration > Universal Worklist & Workflow > Universal Worklist – Administration. Click on the link – ‘Click to Administrate Item Types and View Definitions’. Here, you can upload a new configuration xml with nodes pointing to specific tasks in swfvisu (backend table). In this configuration, we pass a <dynamicparameter> property with the value of Jco pointing to the desired client. An example is provided below.
| XML Configuration |
|---|
<?xml version="1.0" encoding="UTF-8"?> <!DOCTYPE UWLConfiguration PUBLIC '-//SAP//UWL1.0//EN' 'uwl_configuration.dtd'> <UWLConfiguration version="1.0"> <ItemTypes> <ItemType name="uwl.task.webflow.TS50000075.SAP_WebDynpro_XSS_CL2" connector="WebFlowConnector" defaultView="DefaultView" defaultAction="launchWebDynPro" executionMode="default"> <ItemTypeCriteria systemId="SAP_WebDynpro_XSS_CL2" externalType="TS50000075" connector="WebFlowConnector"/> <Actions> <Action name="launchWebDynPro" groupAction="" handler="SAPWebDynproLauncher" returnToDetailViewAllowed="yes" launchInNewWindow="yes" launchNewWindowFeatures="resizable=yes,scrollbars=yes,status=yes,toolbar=no,menubar=no,location=no,directories=no"> <Properties> <Property name="WebDynproApplication" value="IsrFormApprove"/> <Property name="WebDynproDeployableObject" value="sap.com/pcui_gp~isr"/> <Property name="newWindowFeatures" value="resizable=yes,scrollbars=yes,status=yes,toolbar=no,menubar=no,location=no,directories=no"/> <Property name="DynamicParameter" value="sap-wd-arfc-useSys=SAP_R3_SelfServiceGenerics:CL2"/> <Property name="openInNewWindow" value="yes"/> <Property name="display_order_priority" value="5"/> </Properties> <Descriptions default=""/> </Action> </Actions> </ItemType> |
5.7 ‘IView – Resource Key Mapping’ to change PCD Location
Below is the example of iview list with the corresponding service key in spro. The ‘PCD location’ parameter of these iviews and the related service keys should be the same.
ESS:
Benefits and Payment
Benefits and Payment EMPLOYEE_BENEFITPAY_ERP2005_PAG
Benefits Participation EMPLOYEE_BENPARTICIPATION_SERVICE05
Enrollment EMPLOYEE_GENERICENROLLMENT_SERVICE05
Paycheck Inquiry Service EMPLOYEE_PAYCHECK_SERVICE05
Print Enroll EMPLOYEE_GENERICENROLL_PRINT_SERVICE05
Total Compensation EMPLOYEE_TOTALCOMP_SERVICE05
Deferred Compensation (Country) EMPLOYEE_DEFERREDCOMP_SERVICE05
Net Calculation (Country) EMPLOYEE_NETCALCULATION_SERVICE05
Semiretirement (Country) EMPLOYEE_SEMIRETIREMENT_SERVICE05
Valueentitle (Country) EMPLOYEE_VALUEENTITLE_SERVICE05
Career and Job
Candidate Applications EMPLOYEE_CANDIDATE_APPLICATIONS_SRV05
Career and Job EMPLOYEE_CAREER_PAG
Career and Job Services EMPLOYEE_CAREER_ERP2005_PAG
Data Overview EMPLOYEE_CANDIDATE_DATA_OVERVIEW05
Direct Service EMPLOYEE_CANDIDATE_DIRECT_APPL_SERVICE05
Job Favorites EMPLOYEE_CANDIDATE_FAVORITES_SERVICE05
Personal Settings EMPLOYEE_CANDIDATE_PERSONAL_SETTINGS05
Profile Release EMPLOYEE_CANDIDATE_PROFILE_RELEASE0
Profile Service EMPLOYEE_CANDIDATE_PROFILE_SERVICE05
Search Jobs EMPLOYEE_CANDIDATE_SEARCH_JOBS_SERVICE05
Skills Profile EMPLOYEE_SKILLSPROFILE_SERVICE05
Corporate Information
Code of Conduct Application EMPLOYEE_CORPORATE_CONDUCT_SERVICE05
Corporate Information EMPLOYEE_CORPORATEINFO_ERP2005_PAG
Employee Search
Change Own Data EMPLOYEE_CHANGEOWNDATA_SERVICE05
Employee Search EMPLOYEE_SEARCH_ERP2005_PAG
OrgChart EMPLOYEE_ORGCHART_SERVICE05
Who Is Who EMPLOYEE_WHOISWHO_SERVICE05
Life and Work Events
Benefits (Country) EMPLOYEE_LIFEWORK_BENEFITS_SERV_US
Birth of Child (Country) EMPLOYEE_LIFEWORK_BIRTHCHILD_DE_SERVICE
Birth/Adoption (Country) EMPLOYEE_LIFEWORK_BIRTH_SERV_US
Change Employment Status EMPLOYEE_LIFEWORK_CHANGESTATUS_SERV_US
Divorce EMPLOYEE_LIFEWORK_DIVORCE_SERV_US
Life and Work Events EMPLOYEE_LIFEWORKEVENTS_ERP2005_PAG
Marriage EMPLOYEE_LIFEWORK_MARRIAGE_SERV_US
Maternity Leave EMPLOYEE_LIFEWORK_MATLEAVE_DE_SERVICE
My First Days EMPLOYEE_LIFEWORK_FIRSTDAYS_SERV_US
Terminate Employment EMPLOYEE_LIFEWORK_TERMINATEEMP_SERV_US
Termination EMPLOYEE_LIFEWORK_TERMINATION_DE_SERVICE
Personal Information
EIC Authentication EIC_AUTHENTICATION
EIC Request EIC_SERVICE_REQUEST
Personal Information EMPLOYEE_PERSINFO_ERP2005_PAG
Addresses (Country Specific) EMPLOYEE_ADDRESS_DE_SERVICE05
Bank Information (Country Specific) EMPLOYEE_BANK_DE_SERVICE05
Family Member/Dependants (Country) EMPLOYEE_FAMMEMBER_DE_SERVICE05
Personal Data (Country Specific) EMPLOYEE_PERSDATA_DE_SERVICE05
Purchasing
Purchasing EMPLOYEE_PURCHASING_ERP2005_PAG
Travel and Expenses
Cancel Trip EMPLOYEE_TRAVEL_CANCELTRIP_SRV05
Create Expense report EMPLOYEE_TRAVEL_EXPENSES_SRV05
Create Travel Plan EMPLOYEE_TRAVEL_PLANNING_SRV05
Create Travel Request EMPLOYEE_TRAVEL_REQUEST_SRV05
Delete Expense Report EMPLOYEE_TRAVEL_EXPENSES_DELETE_SRV05
Delete Travel Request EMPLOYEE_TRAVEL_REQUEST_DELETE_SRV05
Display Trip Form EMPLOYEE_TRAVEL_TRIPFORM_SRV05
My Alerts EMPLOYEE_TRAVEL_MYALERTS_SRV05
My Credit Card Receipts EMPLOYEE_TRAVEL_CCIMPORT_SRV05
My Travel Profile EMPLOYEE_TRAVEL_PROFILE_SRV05
My Trips and Expenses EMPLOYEE_TRAVEL_ALLMYTRIPS_SRV05
Personalize Data EMPLOYEE_TRAVEL_PERSONALIZATION_SRV05
Route Planning EMPLOYEE_TRAVEL_ROUTING_SRV05
Switch Personnel Number EMPLOYEE_TRAVEL_CHANGE_PERSNO_SRV05
Travel and Expenses EMPLOYEE_TRAVEL_ERP2005_PAG
Travel Information EMPLOYEE_TRAVEL_COMPANYTIP_SRV05
Unlock Personnel Number EMPLOYEE_TRAVEL_UNLOCK_PERSNO_SRV05
Work Environment
Equipment Monitor EMPLOYEE_EQUIPMENTCARD_SERVICE05
Work Environment EMPLOYEE_WORKENVIRONMENT_ERP2005_PAG
Working Time
Clock-In/Out Correction EMPLOYEE_TIMECORRECTION_SERVICE05
Leave Request EMPLOYEE_LEAVEREQUEST_SERVICE05
Leave Request: Approval EMPLOYEE_LEAVEREQUESTAPPROVER_SERVICE05
Record Working Time EMPLOYEE_RECORDWORKTIME_SERVICE05
Release Working Time EMPLOYEE_RELEASEWORKTIME_SERVICE05
Time Accounts EMPLOYEE_WORKTIME_EFFREPORTING_DISPLAY05
Time Statement EMPLOYEE_TIMESTATEMENT_SERVICE05
Time Statement, Periodic EMPLOYEE_TIMESTATEMENTPER_SERVICE05
Overview EMPLOYEE_WORKTIME_ERP2005_PAG
Certify Actual Effort (Country) EMPLOYEE_WORKTIME_EFFREPORTING_CERTIFY05
Change Effort plan (Country) EMPLOYEE_WORKTIME_EFFREPORTING_CHANGE05
Create Effort plan (Country) EMPLOYEE_WORKTIME_EFFREPORTING_CREATE05
Display Effort plan (Country) EMPLOYEE_WORKTIME_EFFREPORTING_DISPLAY05
MSS:
Record Working Time MSS_HCM_SERV_RELACTIVITY_ESS_CA
Clock-In / Out Corrections MSS_HCM_SERV_RELACTIVITY_ESS_WTCOR
Total Compensation Statement MSS_HCM_SERV_RELACTIVITY_ESS_TCS
Personal Data MSS_HCM_SERV_RELACTIVITY_ESS_PDATA_DE
Addresses MSS_HCM_SERV_RELACTIVITY_ESS_ADDR_DE
Bank Information MSS_HCM_SERV_RELACTIVITY_ESS_BANK_DE
Family Members / Dependents MSS_HCM_SERV_RELACTIVITY_ESS_FAM_DE
Skills Profile MSS_HCM_SERV_RELACTIVITY_ESS_SKL
Trips and Expenses MSS_HCM_SERV_RELACTIVITY_ESS_TRA_EXP
Credit Card Receipts MSS_HCM_SERV_RELACTIVITY_ESS_TRA_CRE
Create Travel Request MSS_HCM_SERV_RELACTIVITY_ESS_TRA_REQ
Create Travel Plan MSS_HCM_SERV_RELACTIVITY_ESS_TRA_PLAN
Travel Profile MSS_HCM_SERV_RELACTIVITY_ESS_TRA_PROF
Start Processes MSS_HCM_SERV_RELACTIVITY_START_PROCESSES
Search Processes MSS_HCM_SERV_RELACTIVITY_SEAR_PROCESSES
5.8 Leave Request specific setup Multi-client
Below is the process to setup the leave request approval process from the UWL in the new client.
Existing configuration for Client 100
- 1. SAP standard workflow for Leave Request is WS12300111 which is already configured for client 100.The task TS12300097 is the approver step in the workflow template WS12300111. This approver step is configured in the transaction SWFVISU in the backend in client 100 as follows.


New configuration for Client 200
- Copy workflow template WS12300111 and save a copy in client 200 say WS99900235. Copy is done using transaction PFTC.
- Copy the task TS12300097 for ex: TS99900140
- Now Replace the task TS12300097 from Workflow WS99900235 with the new task TS99900140
Create a new entry in transaction SWFVISU with the task id TS99900140 as shown below:


New configuration for Client 200 (required in Portal)


5.9 Provide Relevant Portal Roles for the new Client
Logon as Portal Administrator and provide relevant roles for a new user who requires access to client 200.

5.10. Multi-Client Configuration in R/3 (Backend)
5.10.1 ISR Server URL
The ISR Server URL is client specific. This needs to be changed/created in the new client. ISR Server URL is necessary to be maintained as this URL helps in displaying the created PCR form in the Action box of the HR Admin.
Here are the steps to maintain the URL:
1. Go to transaction SM30. Enter view name V_ISRSERVER

2. Maintain an entry in view V_ISRSERVER as follows:
Entry type in Web: “Entry Using Adobe PDF”
Server Call of ISR Forms: http://hostname:<port>/webdynpro/dispatcher/sap.com/pcui_gp~isr/
5.10.2 Maintain HR Admin for new client
HR Admin is needed as part of the PCR form approval process. The PCR form after the approval form the approving manager is sent to the HR Admin who updates the data from the form into the backend.
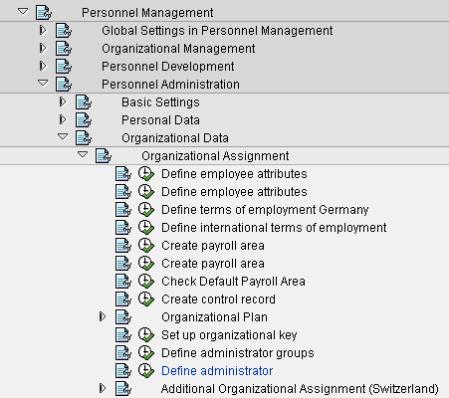
HR Admin is configured in the following path in SPRO:
Personnel Management Personnel Administration Organizational Data Organizational Assignment Define Administrator
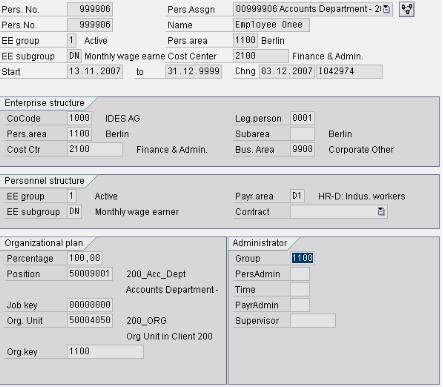
User-id of the HR Admin is maintained here under column “SAP name”.

Once the HR Admin is configured in the SPRO then this HR Admin is assigned to the employee in transaction PA30 infotype 0001 as shown in the below screen:
5.10.3 Pre-requisites
Ensure that the following forms are activated.
Time statement form activation:
ESS Path: ESSWorking timeTime Statement
When creating new client sometimes the smartforms used for “time statement” are inactive in the backend which needs to be activated. Here are the steps to activate the forms.
- Go to transaction HRFROMS in the backend
- Select form SAP_TIM_99_0002 and click “Change”.
- Activate the form using the “Activate” button.
Follow the same steps for activating the following forms if it is not activated:
SAP_TIM_99_0001 - Time Statement for a Chosen Period
Salary Statement:
ESS Path: ESS Benefits and Payments Salary Statement
To display the salary statement for an employee, the following infotypes need to be maintained in the backend transaction PA30 followed by executing a payroll report. Else system will not be able to display the salary statement in the portal.
Following info types need to be maintained:
0003
0012
0012
0008
Once all the infotypes are maintained, and then execute the following report.
SAP Easy Menu HR Payroll Europe Germany Start Payroll.
Head Count / Head Count (FTE):
BI Reports that needs to be activated under MSS:
MSS Path:
MSS Overview Team Head count
MSS Overview Team Head count ( FTE )

Part 2 of this blog can be found at ESS MSS Multi-Client Configuration - Part2
- SAP Managed Tags:
- SAP ERP,
- HCM (Human Capital Management),
- HCM Employee Self-Service
3 Comments
You must be a registered user to add a comment. If you've already registered, sign in. Otherwise, register and sign in.
Labels in this area
-
"mm02"
1 -
A_PurchaseOrderItem additional fields
1 -
ABAP
1 -
ABAP Extensibility
1 -
ACCOSTRATE
1 -
ACDOCP
1 -
Adding your country in SPRO - Project Administration
1 -
Advance Return Management
1 -
AI and RPA in SAP Upgrades
1 -
Approval Workflows
1 -
ARM
1 -
ASN
1 -
Asset Management
1 -
Associations in CDS Views
1 -
auditlog
1 -
Authorization
1 -
Availability date
1 -
Azure Center for SAP Solutions
1 -
AzureSentinel
2 -
Bank
1 -
BAPI_SALESORDER_CREATEFROMDAT2
1 -
BRF+
1 -
BRFPLUS
1 -
Bundled Cloud Services
1 -
business participation
1 -
Business Processes
1 -
CAPM
1 -
Carbon
1 -
Cental Finance
1 -
CFIN
1 -
CFIN Document Splitting
1 -
Cloud ALM
1 -
Cloud Integration
1 -
condition contract management
1 -
Connection - The default connection string cannot be used.
1 -
Custom Table Creation
1 -
Customer Screen in Production Order
1 -
Data Quality Management
1 -
Date required
1 -
Decisions
1 -
desafios4hana
1 -
Developing with SAP Integration Suite
1 -
Direct Outbound Delivery
1 -
DMOVE2S4
1 -
EAM
1 -
EDI
2 -
EDI 850
1 -
EDI 856
1 -
edocument
1 -
EHS Product Structure
1 -
Emergency Access Management
1 -
Energy
1 -
EPC
1 -
Financial Operations
1 -
Find
1 -
FINSSKF
1 -
Fiori
1 -
Flexible Workflow
1 -
Gas
1 -
Gen AI enabled SAP Upgrades
1 -
General
1 -
generate_xlsx_file
1 -
Getting Started
1 -
HomogeneousDMO
1 -
IDOC
2 -
Integration
1 -
Learning Content
2 -
LogicApps
2 -
low touchproject
1 -
Maintenance
1 -
management
1 -
Material creation
1 -
Material Management
1 -
MD04
1 -
MD61
1 -
methodology
1 -
Microsoft
2 -
MicrosoftSentinel
2 -
Migration
1 -
MRP
1 -
MS Teams
2 -
MT940
1 -
Newcomer
1 -
Notifications
1 -
Oil
1 -
open connectors
1 -
Order Change Log
1 -
ORDERS
2 -
OSS Note 390635
1 -
outbound delivery
1 -
outsourcing
1 -
PCE
1 -
Permit to Work
1 -
PIR Consumption Mode
1 -
PIR's
1 -
PIRs
1 -
PIRs Consumption
1 -
PIRs Reduction
1 -
Plan Independent Requirement
1 -
Premium Plus
1 -
pricing
1 -
Primavera P6
1 -
Process Excellence
1 -
Process Management
1 -
Process Order Change Log
1 -
Process purchase requisitions
1 -
Product Information
1 -
Production Order Change Log
1 -
Purchase requisition
1 -
Purchasing Lead Time
1 -
Redwood for SAP Job execution Setup
1 -
RISE with SAP
1 -
RisewithSAP
1 -
Rizing
1 -
S4 Cost Center Planning
1 -
S4 HANA
1 -
S4HANA
3 -
Sales and Distribution
1 -
Sales Commission
1 -
sales order
1 -
SAP
2 -
SAP Best Practices
1 -
SAP Build
1 -
SAP Build apps
1 -
SAP Cloud ALM
1 -
SAP Data Quality Management
1 -
SAP Maintenance resource scheduling
2 -
SAP Note 390635
1 -
SAP S4HANA
2 -
SAP S4HANA Cloud private edition
1 -
SAP Upgrade Automation
1 -
SAP WCM
1 -
SAP Work Clearance Management
1 -
Schedule Agreement
1 -
SDM
1 -
security
2 -
Settlement Management
1 -
soar
2 -
SSIS
1 -
SU01
1 -
SUM2.0SP17
1 -
SUMDMO
1 -
Teams
2 -
User Administration
1 -
User Participation
1 -
Utilities
1 -
va01
1 -
vendor
1 -
vl01n
1 -
vl02n
1 -
WCM
1 -
X12 850
1 -
xlsx_file_abap
1 -
YTD|MTD|QTD in CDs views using Date Function
1
- « Previous
- Next »
Related Content
- New Installation of SAP S/4HANA 2023 FPS1 – Part 4 – Rapid Activation for Fiori in Enterprise Resource Planning Blogs by SAP
- New Installation of SAP S/4HANA 2023 FPS1 – Part 3 – Best Practices Content Activation in Enterprise Resource Planning Blogs by SAP
- New Installation of SAP S/4HANA 2023 FPS1 – Part 2 – Installation in Enterprise Resource Planning Blogs by SAP
- Manual Accrual Engine Sep by step Configuration process in SAP S4 Hana-Part1 in Enterprise Resource Planning Q&A
- New Installation of SAP S/4HANA 2023 FPS0 – Part 4 – Rapid Activation for Fiori in Enterprise Resource Planning Blogs by SAP
Top kudoed authors
| User | Count |
|---|---|
| 2 | |
| 2 | |
| 2 | |
| 2 | |
| 2 | |
| 2 | |
| 1 | |
| 1 | |
| 1 |