
- SAP Community
- Products and Technology
- Enterprise Resource Planning
- ERP Blogs by Members
- LSMW migration with IDOC method and using IDOC as...
Enterprise Resource Planning Blogs by Members
Gain new perspectives and knowledge about enterprise resource planning in blog posts from community members. Share your own comments and ERP insights today!
Turn on suggestions
Auto-suggest helps you quickly narrow down your search results by suggesting possible matches as you type.
Showing results for
JL23
Active Contributor
Options
- Subscribe to RSS Feed
- Mark as New
- Mark as Read
- Bookmark
- Subscribe
- Printer Friendly Page
- Report Inappropriate Content
06-02-2013
5:48 PM
This is the second part of my blog about LSMW migration with IDOC method
The first part can be found here: LSMW migration with IDOC method and using IDOC as source Part1: Extract by ALE
The business case: Data migration with SAP as legacy system. Many companies use already SAP for several years. Companies buy other companies. Both run SAP. The decision is taken to consolidate many SAP systems into just one. Example case: vendor master data
Challenge: the legacy system has data for plants that were shut down, closed companies and abandoned purchasing and sales organisations.
I do not explain any single LSMW step in this blog in deep detail as I described it in in my other blogs:
LSMW Material master by BAPI method - Part 1
LSMW Material master by BAPI method - Part 2
So i am just focusing here on the difference to these other blogs and the specific setup of ALE distribution and IDOC import method
The homepage of LSMW can be found here in SCN at http://scn.sap.com/docs/DOC-26158
In that document you can find the links to the general documentation in help.sap.com too: SAP Library - Legacy System Migration Workbench
Step 1 - Maintain object attributes
As this blog has the focus on IDOC import method put the radio button to IDOC and enter the same message type and Basic type that you used for your extract via ALE (see first part of this blog), Message type CREMAS with Basic type CREMAS05
You may get a warning message telling you that you have to activate IDOC inbound processing. I explained this activation in
LSMW Material master by BAPI method - Part 1

Step 2 - Maintain source structure
This is the painful part of this IDOC to IDOC method, as SAP does not give any entry aid or option to copy.
First open a new session and execute WE30 - enter your Basic type CREMAS05 as object name and click display
SAP presents the structure of this IDOC:
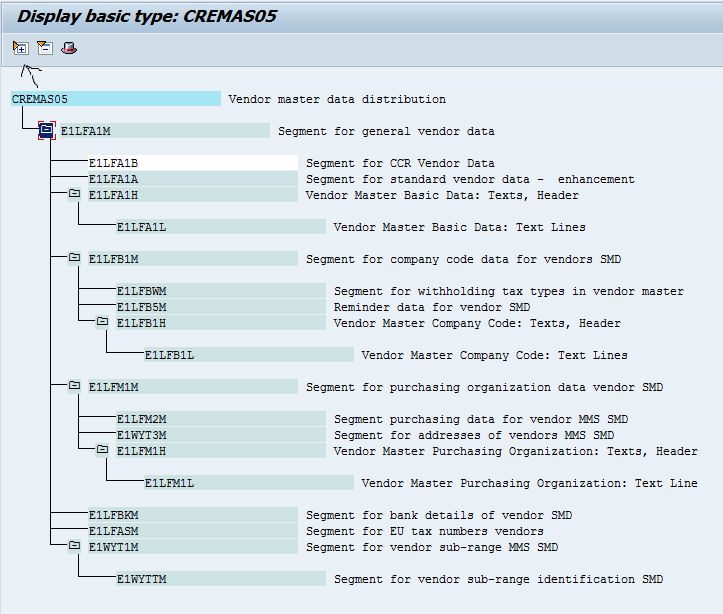
Now in LSMW step 2 click create icon and can copy and paste from this WE30 structure to your source structure definition. Just do not forget to add a Z in front of any segment name, to make the source name different from the target name.

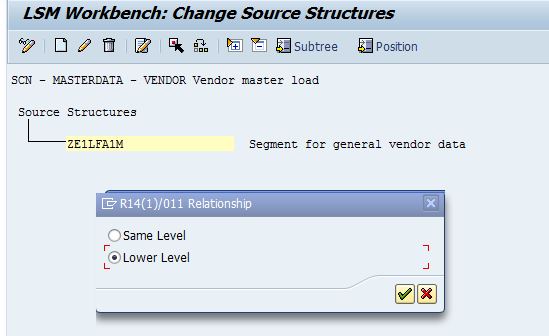
After the first segment is defined, put the cursor onto this segment and click again the NEW icon.
SAP answers with a pop-up asking you if the next segment is at the same level or lower level.
Make your choice and continue until the WE30 structure and your source structure look equal (except that your source structure has always a Z in the beginning of the name)
Step 3 - Maintain source fields
In this step SAP helps you a lot, you can copy the fields from the repository
Place the cursor on a structure, then click the copy icon.

Select Copy from Data Repository
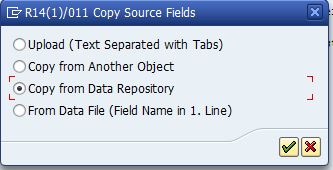
Enter the structure name (without Z) in the table name field and click continue

SAP copied all fields with their definition to your source structure

Now coming to the tricky part.
The IDOC has some overhead info in the beginning, before it comes to the fields MSGFN and LIFNR
Further, if you look at the IDOC, it is just a text file that looks chaotic, hence you have to tell your LSMW where it has to start to apply the mask.
Yes your read correctly, your field definition is nothing else than a mask that is laid over the data in your source file
I circled the structure names that I could identify in the IDOC.
The IDOC (your source) is an outbound IDOC, because of that the structure name is slightly different, the second character in the structure name defines whether it is inbound or outbound. The general data structure of a vendor master inbound is called E1LFA1M, while outbound is named E2LFA1M
This E2LFA1M name is a good starting point for your mask
But directly after E2LFA1M the content in the IDOC is neither MSGFN nor LIFNR.
The vendor number in this example is 520481, since the vendor number field is 10 long it is listed as 0000520481 in the file,
directly before LIFNR field is the MSGFN field (compare with your field definition above) this is the 005.
And all other data between E2LFA1M and 0050000520481 (marked yellow) is not needed for the migration.

But how can we omit this data?
And how do we tell SAP that it shall start reading at E2LFA1M?
For this we have to define 2 more fields at the beginning of our source fields in each source structure
Let us call the first field IDENT, short for identifier. And the second FILLER, as it used to fill the space between our identifier and the MSGFN field.
Go into table maintenance, position the cursor at the first field and click 2 times insert line icon.
enter in the first line field name IDENT type C lenght 7, because the word E2LFA1M has 7 characters
in the second line enter FILLER with type C and a length of 56, which are the number of characters starting from the first position after E2LFA1M until content 005 of field MSGFN begins.
If you have for example a segment name that is e.g. 11 characters long, then you define the IDENT field with 11 and the filler with only 52 characters.
Back on the overview of fields just double click the IDENT field to maintain further details, the "Identifying Field Content".
Here enter E2LFA1M, the segment name that could be found in the IDOC. SAP will read the content of the file until it finds the same word like maintained in "Identifying Field Content". Then SAP will apply the mask with fields and move the the content to the xxx.READ file when executing the read step later.

Now the field structure is like this one:

you have to do the same for each segment in your structure, of course with the specific segment name, here an example from company code data segment:

Step 4 - Maintain structure relations
Just a click step, assign all corresponding segments of your source structure to the target structure:
Place the cursor on the segment, then click Create Relationship icon. A pop-up displays your source structure, select the corresponding and continue.

Step 5 - Maintain field mapping and conversion rules
The next fun part, because your field names in source and target structure equal, hence you can automatically map those fields in seconds.
Select from menu Extras > Auto-field Mapping
On the pop-up select "Match Fields with the same name" , apply the rule "Transfer MOVE" and select "No confirmation" , then execute.

After that you can focus on the fields where you have to apply different rules and need to exchange values.
From my experience much easier to do this after having all fields mapped quickly, than doing it directly.
The challenging part (certainly not for Abapers) is to exclude the abandoned data and organisations from the migration. We could have done this already with filters in the ALE customizing. But I have seen to much scope changes in the past. Hence I try to avoid extra customizing in the source system and do all exclusion in my LSMW object in the target system....with a little coding in the field mapping.
Here an example for purchasing organisation
I have a subroutine called ZXXP04IDENT, it is just a name with some logic for myself, in which I read a mapping table.
If I do not find any entry in the mapping table, then it means that this purchasing organisation is not to be migrated.
In this case I process the SKIP_RECORD function, which will just forget what the program had just read and goes to the next record.
If a mapping was found, then I check if the existing vendor master has already data for the mapped purchasing organisation. (missed to mention that we extend vendors that are already present in the target system).
If the existing vendor has already purchasing data for this purchasing organisation, then again doing the SKIP_RECORD function. along with writing a message into the conversion log.
If the purchasing organisationdoes not yet exist in an existing vendor, then the field content is moved.

Similar checks are performed for company code and deletion indicator (we migrate only undeleted vendor masters)
In this content I don't want to miss to tell you that a IDOC overwrites existing data. If you extend an existing vendor master, then you need to care that the general data is not overwritten. But you cannot just skip the segment as this will cause a Syntax error,
In that case the vendor number field LIFNR holds the vendor number of the target vendor, and all other fields in that segment have to contain a "/" like in this example for NAME1 field:

Step 7 - Specify files
Special in this scenario is that our source file is located in the application server instead of your local drive.
Hence you select the entry Legacy data On the R/3 server and click New entry
Here you enter the file name (including the directory if it is not your personal directory - I have a dedicated directory in this example), unfortunately there is no F4 help to search for the file name. (it is possible if you have only one application server, and even then the application server name has to be entered in a table that is not accessible through LSWM or any customizing path - so not really worth to talk about)

Select "No Separator" , an IDOC does not have separators. The IDOC does not have any field names, hence leave the box for "Field Names at start of file" empty. As you defined the source fields from data repository, the field order matches with Source structure definition, so please activate this box. File type has a Record End Marker because it is a text file.
Set the Code page according to the code page that you have in the legacy system at the time you created the IDOCs by ALE.
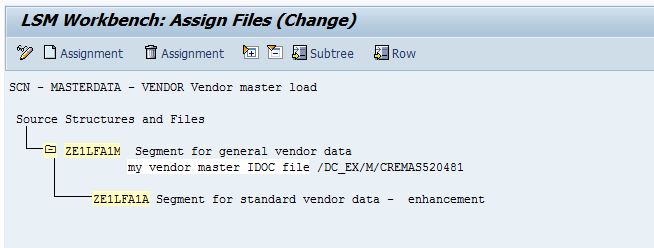
Step 8 - Assign files
Assign your source file to each segment in the source structure
Continue with Read data,
verify that the data is in the correct fields in step "display read data"
then convert the data,
check the converted data.
then start IDOC generation
and process the IDOCs
All those steps are explained in detail in my blog: LSMW Material master by BAPI method - Part 2
Nothing special for IDOC import method
- SAP Managed Tags:
- SAP ERP,
- MM (Materials Management)
30 Comments
You must be a registered user to add a comment. If you've already registered, sign in. Otherwise, register and sign in.
Labels in this area
-
"mm02"
1 -
A_PurchaseOrderItem additional fields
1 -
ABAP
1 -
ABAP Extensibility
1 -
ACCOSTRATE
1 -
ACDOCP
1 -
Adding your country in SPRO - Project Administration
1 -
Advance Return Management
1 -
AI and RPA in SAP Upgrades
1 -
Approval Workflows
1 -
ARM
1 -
ASN
1 -
Asset Management
1 -
Associations in CDS Views
1 -
auditlog
1 -
Authorization
1 -
Availability date
1 -
Azure Center for SAP Solutions
1 -
AzureSentinel
2 -
Bank
1 -
BAPI_SALESORDER_CREATEFROMDAT2
1 -
BRF+
1 -
BRFPLUS
1 -
Bundled Cloud Services
1 -
business participation
1 -
Business Processes
1 -
CAPM
1 -
Carbon
1 -
Cental Finance
1 -
CFIN
1 -
CFIN Document Splitting
1 -
Cloud ALM
1 -
Cloud Integration
1 -
condition contract management
1 -
Connection - The default connection string cannot be used.
1 -
Custom Table Creation
1 -
Customer Screen in Production Order
1 -
Data Quality Management
1 -
Date required
1 -
Decisions
1 -
desafios4hana
1 -
Developing with SAP Integration Suite
1 -
Direct Outbound Delivery
1 -
DMOVE2S4
1 -
EAM
1 -
EDI
2 -
EDI 850
1 -
EDI 856
1 -
EHS Product Structure
1 -
Emergency Access Management
1 -
Energy
1 -
EPC
1 -
Find
1 -
FINSSKF
1 -
Fiori
1 -
Flexible Workflow
1 -
Gas
1 -
Gen AI enabled SAP Upgrades
1 -
General
1 -
generate_xlsx_file
1 -
Getting Started
1 -
HomogeneousDMO
1 -
IDOC
2 -
Integration
1 -
Learning Content
2 -
LogicApps
2 -
low touchproject
1 -
Maintenance
1 -
management
1 -
Material creation
1 -
Material Management
1 -
MD04
1 -
MD61
1 -
methodology
1 -
Microsoft
2 -
MicrosoftSentinel
2 -
Migration
1 -
MRP
1 -
MS Teams
2 -
MT940
1 -
Newcomer
1 -
Notifications
1 -
Oil
1 -
open connectors
1 -
Order Change Log
1 -
ORDERS
2 -
OSS Note 390635
1 -
outbound delivery
1 -
outsourcing
1 -
PCE
1 -
Permit to Work
1 -
PIR Consumption Mode
1 -
PIR's
1 -
PIRs
1 -
PIRs Consumption
1 -
PIRs Reduction
1 -
Plan Independent Requirement
1 -
Premium Plus
1 -
pricing
1 -
Primavera P6
1 -
Process Excellence
1 -
Process Management
1 -
Process Order Change Log
1 -
Process purchase requisitions
1 -
Product Information
1 -
Production Order Change Log
1 -
Purchase requisition
1 -
Purchasing Lead Time
1 -
Redwood for SAP Job execution Setup
1 -
RISE with SAP
1 -
RisewithSAP
1 -
Rizing
1 -
S4 Cost Center Planning
1 -
S4 HANA
1 -
S4HANA
3 -
Sales and Distribution
1 -
Sales Commission
1 -
sales order
1 -
SAP
2 -
SAP Best Practices
1 -
SAP Build
1 -
SAP Build apps
1 -
SAP Cloud ALM
1 -
SAP Data Quality Management
1 -
SAP Maintenance resource scheduling
2 -
SAP Note 390635
1 -
SAP S4HANA
2 -
SAP S4HANA Cloud private edition
1 -
SAP Upgrade Automation
1 -
SAP WCM
1 -
SAP Work Clearance Management
1 -
Schedule Agreement
1 -
SDM
1 -
security
2 -
Settlement Management
1 -
soar
2 -
SSIS
1 -
SU01
1 -
SUM2.0SP17
1 -
SUMDMO
1 -
Teams
2 -
User Administration
1 -
User Participation
1 -
Utilities
1 -
va01
1 -
vendor
1 -
vl01n
1 -
vl02n
1 -
WCM
1 -
X12 850
1 -
xlsx_file_abap
1 -
YTD|MTD|QTD in CDs views using Date Function
1
- « Previous
- Next »
Related Content
- FAQ on Upgrading SAP S/4HANA Cloud Public Edition in Enterprise Resource Planning Blogs by SAP
- How to design sales prices in SAP S/4HANA and be ready for future innovations in Enterprise Resource Planning Blogs by SAP
- The Substitute of MM50 in SAP S/4HANA Cloud Public Edition in Enterprise Resource Planning Blogs by SAP
- The Substitute of MM50 in SAP S/4HANA Cloud Public Edition in Enterprise Resource Planning Blogs by SAP
- How to design sales prices in SAP S/4HANA and be ready for future innovations in Enterprise Resource Planning Blogs by SAP
Top kudoed authors
| User | Count |
|---|---|
| 2 | |
| 2 | |
| 2 | |
| 2 | |
| 2 | |
| 1 | |
| 1 | |
| 1 | |
| 1 | |
| 1 |