
- SAP Community
- Products and Technology
- Enterprise Resource Planning
- ERP Blogs by Members
- Custom Screen in Vendor Master
Enterprise Resource Planning Blogs by Members
Gain new perspectives and knowledge about enterprise resource planning in blog posts from community members. Share your own comments and ERP insights today!
Turn on suggestions
Auto-suggest helps you quickly narrow down your search results by suggesting possible matches as you type.
Showing results for
Product and Topic Expert
Options
- Subscribe to RSS Feed
- Mark as New
- Mark as Read
- Bookmark
- Subscribe
- Printer Friendly Page
- Report Inappropriate Content
05-28-2013
9:00 AM
Vendor Master is a basic transaction for processing Pusrchasing and Accounts Payable. Vendor Master has a variety of data that is categorized into three screens:general data, company data and purchasing data.
The standard vendor master screen contain many fields, which allow most of the business transactions to be processed. However, at times, there are scenarios, where the existing vendor master information is not sufficient to incorporate all business partners information. In order to incorporate such specific requirements, it is necessary to enhance the existing vendor master with additional fields to incorporate the business transactions.
There are dedicated enhancement spots, that enable enhancing the existing vendor master without making a modification in standard. The new subscreens are added in existing standard transactions. The IMG path for the same is as under:

The first step in the same is creating a screen group
Execute the customizing point “Prepare Modification-Free Enhancement in Vendor Master Record”

Enter a screen group name and description
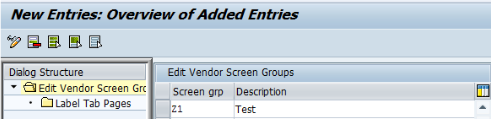
Each screen can contain several tab pages. In order to add a new tab, select the created screen group and double-click on “Label Tab Pages". Provide each tab page with a function code and a description.

Implement the enhancement spots to integrate the screens into standard transaction codes. Use enhancement sport VENDOR_ADD_DATA to activate the enhancement. Go to transaction SE18 and enter spot name “VENDOR_ADD_DATA”. (There is also a BADI available with the same name)

Display enhancement spot details and click on button “Implement enhancement spot” ![]() or F6 to create a new enhancement implementation.
or F6 to create a new enhancement implementation.

In the Pop Up enter the implementation name and implementation description

Enter the Implementation Class Name as well in the next pop up

The enhancement implementation is created and the below screen appears

Double-click on “Implementing class” to display class details.

Click on Class Name to get the Class Editor (You can also navigate through SE24)

Implement method CHECK_ADD_ON_ACTIVE

The next step is to specify the subscreen location. One of the enhancement spot for the same is VENDOR_ADD_DATA_CS. A Badi with the same name is also available. Scroll to T Code SE18 and enter spot name as VENDOR_ADD_DATA_CS. Than create a new enhancement implementation using Implement enhancement or pressing F6. Select Filter value. Than create a new combination by clicking on button 
A combination is added. Now double click on it. Under “Value 1” choose the screen group you have created and “=” under “Comparator 1”.

Now activiate the enhancement implementation. Double click on implementating class and than on class name.

Now execute transaction code SE24 and toggle to class editor. Implement method IF_EX_VENDOR_ADD_DATA_CS~GET_TAXI_SCREEN.

Now we need to create a Z Program that will contain the new sub screen and add the additional field(s) to it. Suppose the fields are to be added at Company Code Level (Table LFB1 impacted). Execute T Code SE11 for table LFB1 and click on append structure and than click on Create button


Enter the Structure Name and than add the additional field to the structure


In SE38, create a module pool ZTEST_ENHANCEMENT with a subscreen 9000.


Now the new code will be displayed in all the T Code which manage vendor master.
- SAP Managed Tags:
- SAP ERP,
- MM (Materials Management)
7 Comments
You must be a registered user to add a comment. If you've already registered, sign in. Otherwise, register and sign in.
Labels in this area
-
"mm02"
1 -
A_PurchaseOrderItem additional fields
1 -
ABAP
1 -
ABAP Extensibility
1 -
ACCOSTRATE
1 -
ACDOCP
1 -
Adding your country in SPRO - Project Administration
1 -
Advance Return Management
1 -
AI and RPA in SAP Upgrades
1 -
Approval Workflows
1 -
ARM
1 -
ASN
1 -
Asset Management
1 -
Associations in CDS Views
1 -
auditlog
1 -
Authorization
1 -
Availability date
1 -
Azure Center for SAP Solutions
1 -
AzureSentinel
2 -
Bank
1 -
BAPI_SALESORDER_CREATEFROMDAT2
1 -
BRF+
1 -
BRFPLUS
1 -
Bundled Cloud Services
1 -
business participation
1 -
Business Processes
1 -
CAPM
1 -
Carbon
1 -
Cental Finance
1 -
CFIN
1 -
CFIN Document Splitting
1 -
Cloud ALM
1 -
Cloud Integration
1 -
condition contract management
1 -
Connection - The default connection string cannot be used.
1 -
Custom Table Creation
1 -
Customer Screen in Production Order
1 -
Data Quality Management
1 -
Date required
1 -
Decisions
1 -
desafios4hana
1 -
Developing with SAP Integration Suite
1 -
Direct Outbound Delivery
1 -
DMOVE2S4
1 -
EAM
1 -
EDI
2 -
EDI 850
1 -
EDI 856
1 -
edocument
1 -
EHS Product Structure
1 -
Emergency Access Management
1 -
Energy
1 -
EPC
1 -
Financial Operations
1 -
Find
1 -
FINSSKF
1 -
Fiori
1 -
Flexible Workflow
1 -
Gas
1 -
Gen AI enabled SAP Upgrades
1 -
General
1 -
generate_xlsx_file
1 -
Getting Started
1 -
HomogeneousDMO
1 -
IDOC
2 -
Integration
1 -
Learning Content
2 -
LogicApps
2 -
low touchproject
1 -
Maintenance
1 -
management
1 -
Material creation
1 -
Material Management
1 -
MD04
1 -
MD61
1 -
methodology
1 -
Microsoft
2 -
MicrosoftSentinel
2 -
Migration
1 -
MRP
1 -
MS Teams
2 -
MT940
1 -
Newcomer
1 -
Notifications
1 -
Oil
1 -
open connectors
1 -
Order Change Log
1 -
ORDERS
2 -
OSS Note 390635
1 -
outbound delivery
1 -
outsourcing
1 -
PCE
1 -
Permit to Work
1 -
PIR Consumption Mode
1 -
PIR's
1 -
PIRs
1 -
PIRs Consumption
1 -
PIRs Reduction
1 -
Plan Independent Requirement
1 -
Premium Plus
1 -
pricing
1 -
Primavera P6
1 -
Process Excellence
1 -
Process Management
1 -
Process Order Change Log
1 -
Process purchase requisitions
1 -
Product Information
1 -
Production Order Change Log
1 -
Purchase requisition
1 -
Purchasing Lead Time
1 -
Redwood for SAP Job execution Setup
1 -
RISE with SAP
1 -
RisewithSAP
1 -
Rizing
1 -
S4 Cost Center Planning
1 -
S4 HANA
1 -
S4HANA
3 -
Sales and Distribution
1 -
Sales Commission
1 -
sales order
1 -
SAP
2 -
SAP Best Practices
1 -
SAP Build
1 -
SAP Build apps
1 -
SAP Cloud ALM
1 -
SAP Data Quality Management
1 -
SAP Maintenance resource scheduling
2 -
SAP Note 390635
1 -
SAP S4HANA
2 -
SAP S4HANA Cloud private edition
1 -
SAP Upgrade Automation
1 -
SAP WCM
1 -
SAP Work Clearance Management
1 -
Schedule Agreement
1 -
SDM
1 -
security
2 -
Settlement Management
1 -
soar
2 -
SSIS
1 -
SU01
1 -
SUM2.0SP17
1 -
SUMDMO
1 -
Teams
2 -
User Administration
1 -
User Participation
1 -
Utilities
1 -
va01
1 -
vendor
1 -
vl01n
1 -
vl02n
1 -
WCM
1 -
X12 850
1 -
xlsx_file_abap
1 -
YTD|MTD|QTD in CDs views using Date Function
1
- « Previous
- Next »
Related Content
- Grouping Key not found in BP vendor company view (S4) in Enterprise Resource Planning Q&A
- Advance Return Management complete configuration(SAP ARM) in Enterprise Resource Planning Blogs by Members
- User defined fields displaying differently for my coworkers in Enterprise Resource Planning Q&A
- Debugging transaction MD04 in SAP S/4HANA in Enterprise Resource Planning Blogs by SAP
- Employee synch to Business Partner in Enterprise Resource Planning Q&A
Top kudoed authors
| User | Count |
|---|---|
| 5 | |
| 2 | |
| 2 | |
| 2 | |
| 2 | |
| 2 | |
| 2 | |
| 1 | |
| 1 |