
- SAP Community
- Products and Technology
- Enterprise Resource Planning
- ERP Blogs by Members
- HR Renewal 1.0: HCM P&F – Creating a Basic FPM For...
Enterprise Resource Planning Blogs by Members
Gain new perspectives and knowledge about enterprise resource planning in blog posts from community members. Share your own comments and ERP insights today!
Turn on suggestions
Auto-suggest helps you quickly narrow down your search results by suggesting possible matches as you type.
Showing results for
Former Member
Options
- Subscribe to RSS Feed
- Mark as New
- Mark as Read
- Bookmark
- Subscribe
- Printer Friendly Page
- Report Inappropriate Content
05-07-2013
4:50 PM
HCM Processes and Forms have gotten some major new improvements in the much promoted HR Renewal 1.0 Add-On. After huge demand from customers, SAP has finally released a whole new Web Dynpro UI for HCM P&F using Floorplan Manager (FPM). This provides an alternative to costly Adobe licenses and skills. For more information on HR Renewal you can check out this FAQ.
Having recently been involved in a pilot project using this exciting new technology, I thought it would be a great opportunity to take a peek under the hood at how easy it is to set up a basic form with the new FPM UI.
Although editing is done in FPM you don't have to be a FPM guru to create a form and the interface is quite intuitive. So don't be alarmed if this sounds way too technical! The FPM editor is much easier and faster to develop in than Adobe Lifecycle Designer, but the trade-off is that it is a lot more restrictive in terms of layout and scripting.
For this example we’ll create a form which changes the address of an employee.
Design Time Configuration
Configuration is done in the Design Time (Transaction HRASR_DT) to utilize the SAP PA service fields for Infotype 6 – assuming you already know the basics of the HCM P&F Framework.

In order to create the FPM Layout one has to navigate to the Form Node in the HCM P&F Form Scenario Design time. A form can consist of multiple FPM configurations and these are stored in a table within the node. The order in the table is the order in which they will be displayed. A dropdown allows users to choose the type of user-interface building blocks (UIBBs) for the FPM configuration.
Currently there are four different types: Form (basic layout), List (used for Infotype repeat fields eg. Infotype 8), List Complex (multiple records on an infotype) and Composite (UIBB grouping).

Since this is an introduction to basic form layouts we’ll be using the Form FPM Configuration type and exploring the other options at a later stage.
Floorplan Manager (FPM) Configuration – Form Layout
Adding Fields to the Layout
The FPM Form Layout editor displays all the Form Scenario fields and buttons within the Repositories area. Buttons are analogous to HCM P&F Events which include the standard User Event Intialize and User Event Check.
In addition to the fields from the Form Scenario three decorative element fields are available in the editor: Formatted Text View, Text View and Explanation.

The Preview area is arranged as a grid of columns and rows and the Layout Type dropdown allows one to divide the Preview area grid. In order to add a field to the Form one simply has to drag and drop it from the Repositories panel to the Preview area or alternatively add it directly from the Form UIBB Schema Area.

In the UIBB Schema the option exists to add Fields to a Group, and it is important to take note that if all Fields in a Group are invisible then the Group will disappear from the layout which allows for the heading of the Group to appear dynamically. This helps you out a bit if you’re used to being able to script text visibilities in Adobe forms with other dependancies.
Formatting Fields and Layout
Once a field has been added to the Preview area it can be moved around using drag and drop or reordered using the Form UIBB Schema table.
Preview area:

UIBB Schema:

Clicking on a Field allows the user to fine-tune the Field attributes, labels and output format. If you've selected the Attributes button then you'll see this at the bottom panel of the editor.

The Display Type allows you to change the field to a dropdown, checkbox, etc. Other important settings to note, is the ability to calibrate the exact starting Rows and Columns of the field on the Preview grid area instead of dragging and dropping. Rows and Columns may span multiples which is useful for text box areas such as your Previous and Current Comments.
Developers who are using the Adobe editor may be wondering, “Where do you set the field visibility and mandatory settings?” Well the good news is that these settings are now fully integrated with the Design Time configuration settings on a Field Attribute and will display appropriately even if you select step dependence - something Adobe forms didn’t quite manage to leverage from the framework.

If you’re used to controlling the Field Attributes dynamically with scripting in Adobe Forms depending on user events there is a new parameter which has been added to the Generic Service BAdI method DO_OPERATION and INITIALIZE to try and compensate for this. This is only available from HR Renewal Feature Pack 2 onwards.
Adding headings, guidance texts and decorative elements is simple to do by dragging a Formatted Text View onto the Preview area. This element can be formatted by using traditional Web Dynpro for ABAP Text View tags or, as of Feature Pack 2, the mini editor in the Attributes of the element.

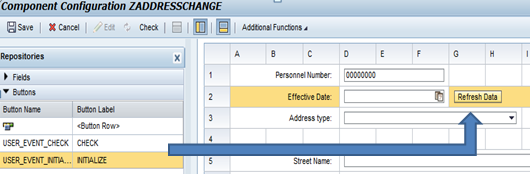
User Events and Buttons
Adding a button to the form is accomplished by dragging and dropping a Button from the Repositories area onto the Preview. In this example it would allow the users of the form to refresh the default address data based on the Effective Date entered.
An alternative for this exists by directly linking a Design Time configured event or standard check / intialize event to the field on the attributes. This event will then trigger when the user hits Enter on the field. Although not as robust as the Adobe scriptingevents which allows for mouse focusing or exiting events, this is still a useful option to keep in mind.

The End Result
Once you’ve done all your customization and layout settings this would be what a very elementary address change form would look like. Not bad for fifteen minutes!

Of course live forms will always be more complicated than this example, but the intention is to showcase how effortless it is to create a form using the Flexible User Interface Designer (FLUID) editor in FPM.
Stay tuned for more blogs on this exciting new HCM P&F functionality which I plan to cover. Don’t be shy to add your comments!
- SAP Managed Tags:
- HCM (Human Capital Management)
23 Comments
You must be a registered user to add a comment. If you've already registered, sign in. Otherwise, register and sign in.
Labels in this area
-
"mm02"
1 -
A_PurchaseOrderItem additional fields
1 -
ABAP
1 -
ABAP Extensibility
1 -
ACCOSTRATE
1 -
ACDOCP
1 -
Adding your country in SPRO - Project Administration
1 -
Advance Return Management
1 -
AI and RPA in SAP Upgrades
1 -
Approval Workflows
1 -
ARM
1 -
ASN
1 -
Asset Management
1 -
Associations in CDS Views
1 -
auditlog
1 -
Authorization
1 -
Availability date
1 -
Azure Center for SAP Solutions
1 -
AzureSentinel
2 -
Bank
1 -
BAPI_SALESORDER_CREATEFROMDAT2
1 -
BRF+
1 -
BRFPLUS
1 -
Bundled Cloud Services
1 -
business participation
1 -
Business Processes
1 -
CAPM
1 -
Carbon
1 -
Cental Finance
1 -
CFIN
1 -
CFIN Document Splitting
1 -
Cloud ALM
1 -
Cloud Integration
1 -
condition contract management
1 -
Connection - The default connection string cannot be used.
1 -
Custom Table Creation
1 -
Customer Screen in Production Order
1 -
Data Quality Management
1 -
Date required
1 -
Decisions
1 -
desafios4hana
1 -
Developing with SAP Integration Suite
1 -
Direct Outbound Delivery
1 -
DMOVE2S4
1 -
EAM
1 -
EDI
2 -
EDI 850
1 -
EDI 856
1 -
edocument
1 -
EHS Product Structure
1 -
Emergency Access Management
1 -
Energy
1 -
EPC
1 -
Financial Operations
1 -
Find
1 -
FINSSKF
1 -
Fiori
1 -
Flexible Workflow
1 -
Gas
1 -
Gen AI enabled SAP Upgrades
1 -
General
1 -
generate_xlsx_file
1 -
Getting Started
1 -
HomogeneousDMO
1 -
IDOC
2 -
Integration
1 -
learning content
2 -
LogicApps
2 -
low touchproject
1 -
Maintenance
1 -
management
1 -
Material creation
1 -
Material Management
1 -
MD04
1 -
MD61
1 -
methodology
1 -
Microsoft
2 -
MicrosoftSentinel
2 -
Migration
1 -
MRP
1 -
MS Teams
2 -
MT940
1 -
Newcomer
1 -
Notifications
1 -
Oil
1 -
open connectors
1 -
Order Change Log
1 -
ORDERS
2 -
OSS Note 390635
1 -
outbound delivery
1 -
outsourcing
1 -
PCE
1 -
Permit to Work
1 -
PIR Consumption Mode
1 -
PIR's
1 -
PIRs
1 -
PIRs Consumption
1 -
PIRs Reduction
1 -
Plan Independent Requirement
1 -
Premium Plus
1 -
pricing
1 -
Primavera P6
1 -
Process Excellence
1 -
Process Management
1 -
Process Order Change Log
1 -
Process purchase requisitions
1 -
Product Information
1 -
Production Order Change Log
1 -
Purchase requisition
1 -
Purchasing Lead Time
1 -
Redwood for SAP Job execution Setup
1 -
RISE with SAP
1 -
RisewithSAP
1 -
Rizing
1 -
S4 Cost Center Planning
1 -
S4 HANA
1 -
S4HANA
3 -
Sales and Distribution
1 -
Sales Commission
1 -
sales order
1 -
SAP
2 -
SAP Best Practices
1 -
SAP Build
1 -
SAP Build apps
1 -
SAP Cloud ALM
1 -
SAP Data Quality Management
1 -
SAP Maintenance resource scheduling
2 -
SAP Note 390635
1 -
SAP S4HANA
2 -
SAP S4HANA Cloud private edition
1 -
SAP Upgrade Automation
1 -
SAP WCM
1 -
SAP Work Clearance Management
1 -
Schedule Agreement
1 -
SDM
1 -
security
2 -
Settlement Management
1 -
soar
2 -
SSIS
1 -
SU01
1 -
SUM2.0SP17
1 -
SUMDMO
1 -
Teams
2 -
User Administration
1 -
User Participation
1 -
Utilities
1 -
va01
1 -
vendor
1 -
vl01n
1 -
vl02n
1 -
WCM
1 -
X12 850
1 -
xlsx_file_abap
1 -
YTD|MTD|QTD in CDs views using Date Function
1
- « Previous
- Next »
Related Content
- SAP ERP Functionality for EDI Processing: UoMs Determination for Inbound Orders in Enterprise Resource Planning Blogs by Members
- SAP S/4HANA Cloud Extensions with SAP Build Best Practices: An Expert Roundtable in Enterprise Resource Planning Blogs by SAP
- Enhance Integration of SAP S/4HANA Cloud for Projects, Resource Management and SAP S/4HANA Cloud in Enterprise Resource Planning Blogs by SAP
- MM-SD SCHEDULE AGREEMENT INTEGRATION in Enterprise Resource Planning Blogs by Members
- Review and Adapt Business Roles after a Major Upgrade in the SAP S/4HANA Cloud Public Edition in Enterprise Resource Planning Blogs by SAP
Top kudoed authors
| User | Count |
|---|---|
| 2 | |
| 2 | |
| 2 | |
| 2 | |
| 2 | |
| 2 | |
| 2 | |
| 2 | |
| 1 | |
| 1 |