
- SAP Community
- Products and Technology
- Additional Blogs by Members
- How to install Windows 8 into a Virtual Harddrive ...
Additional Blogs by Members
Turn on suggestions
Auto-suggest helps you quickly narrow down your search results by suggesting possible matches as you type.
Showing results for
Former Member
Options
- Subscribe to RSS Feed
- Mark as New
- Mark as Read
- Bookmark
- Subscribe
- Printer Friendly Page
- Report Inappropriate Content
05-07-2013
2:12 PM
Hi all,
after my first blog on how you can create a Windows-to-Go Boot Stick with Windows 8 on it,
here are now similar instructions that explains how you install Windows 8 onto a computer that is running on Windows 7
without interfering with this installed OS.
The instructions below will help you to install Windows 8 in parallel to your existing Windows 7 installation on your physical computer.
Using the build in Windows boot manager you can select the OS you want to work with.
Do not get confused with the term "VHD". This is not an instruction on how you install Windows 8 into a Virtual Machine.
We are just using the concept of a virtual hard disk that will be created as one file on a physical hard drive,
We will then install Windows 8 into this virtual hard disk (.VHD file) and boot it from there. The benefit of such an option is that you are running Windows 8 physically on your computer and with the VHD disk you get a kind of container that is separated from your existing OS and that can easily be removed later on.
Disclaimer: This guidance is by far not complete, this guide just explains how you can build a simple Windows 8 installation on a VHD for testing purpose (and for various events, that SAP and Microsoft are offering together). We are not considering any Enterprise requirement, like
Managebility and/or Security in this guide If you are interested in this as well or if you even want to use it on your Corporate Network, then please find more Information on Microsoft TechNet http://technet.microsoft.com . Please also make sure that you have a valid copy of your computer's harddisk in the case that something is going wrong. I'm not taking any responsibility for damages that may happen.
Step by Step Guidance
Follow the steps below to install Windows 8 into a virtual Harddisk (VHD)
Prerequisites:
- Your computer is running Windows 7
- Your computer has a decent amount of RAM (Min 2GB).
- Your computer has a DVD Drive or can boot from an USB stick (check your computer manual)
- If you want to boot the Windows 8 Installation from a USB, then you need a USB stick with min 4GB size
Get a valid Windows 8 ISO image
- Download a Windows 8 64-bit ISO Image from your MSDN Subscription Download site
OR - Just try the Windows 8 Enterprise90 Day trial image http://msdn.microsoft.com/en-en/evalcenter/jj554510.aspx?wt.mc_id=MEC_132_1_4http://msdn.microsoft.com/en-en/evalcenter/jj554510.aspx?wt.mc_id=MEC_132_1_4
- Store this ISO-file on your harddisk
Create a bootable DVD or a USB Stick from the above ISO image
- Download and open the Windows 7 USB/DVD Download tool installation file.
- When you are prompted to either save the file to disk or run it, choose Run.
- Follow the steps in the setup dialogs.
You'll have the option to specify where to install the Windows 7 USB/DVD Download Tool.- NOTE:
- You need to be an administrator on the computer you are installing the Windows 7
USB/DVD Download tool on. - The tool requires the Microsoft .NET Framework version 2.0 or higher.
- Ideal System requirements
- Windows 7 (32-bit or 64-bit)
- 50MB of free space on your hard drive
- DVD-R drive or 4GB removable USB flash drive
- You need to be an administrator on the computer you are installing the Windows 7
- NOTE:
- Let’s create a bootable DVD or USB stick from the above Windows 8 ISO file:
- Run the program WINDOWS 7 USB/DVD DOWNLOAD TOO
- In the SOURCE FILE box, type the name an path of your Windows 8 ISO file, or click BROWSE and select the file from the
OPEN dialog box. Click NEXT - In order to create a USB boot stick just select USB DEVICE to create a copy on a USB flash drive or select DVD disk to create a copy on a DVD disk
- If you are copying the file to a USB flash drive, select your USB device in the drop-down list and click BEGIN COPYING. If
you are copying the file up to a DVD, click BEGIN BURNING.
Note: Select the right USB disk, otherwise your other removable disk might be formated!
Now you are ready for the installation from this new media
The Windows 8 Installation procedure
- Boot your computer from the newly created Windows 8 Installation Media (if you boot from an USB stick, then please consult your computer manual for instructions)
- Confirm the Setup Language screen and press <Next>

- On the next screen do not select „Install Now“. Instead of this please press (Shift)+(F10), and you land in a command prompt
- Type diskpart and press <Return>.
- Within this diskpart tool we are now creating on your computer’s physical disk a new virtual hard disk , a so called VHD-file.
We will select later this VHD file for installing Windows 8 onto it. So you see your OS installation will not be touched at all! - Type in list disk and as a next command list volume to find your actual Data partition, in our case the partition with drive letter E:
- Create the virtual harddrive with the command create vdisk file="E:\win8.vhd" type=expandable maximum=30000. And press <Enter>.
Ýou now have a Virtual Harddisk with a maximum size of 32GB. So if you create the disk it is quite small, but it will grow to this maximum when needed.
- Now select this disk with the command select vdisk file="e:\win8.vhd" . Press <Enter> .
- Attach the disk with the command attach vdisk . Press <Enter>.This will attach the VHD-file to the remaining installation process.
- Leave diskpart with the command exit and close the command prompt again with the command exit

- Continue with your Windows-8-Installation by pressing “Install Now” in the remaining installation screen.
- You need to accept the Licenses agreements and then you select on the next screen the Installation Option “Custom: Install Windows only (advanced) “
- On the next page you see all available disks including your new virtual hard disk. Select this disk to install Windows 8 on it and just ignore the error “Windows can't be installed on to this drive"
Note: Please select the right disk, aka the newly created VHD file (size about 30GB) !

- Now press Next to start the installation of Windows 8.
- The installation will install directly into this VHD file.
- At the end of this installation step there is a reboot needed; please remove the USB Stick while your computer is rebooting.
- Now your computer is booting into the newly installed Windows 8 OS and is getting this ready for the first use.

- Please refer to the standard installation instructions from Microsoft to finalize and personalize your Windows 8 installation
Link: http://windows.microsoft.com/en-us/windows-8/set-up
The Windows-8-Boot-Manager
If you are installing Windows 8 in parallel to your Windows 7 system (and this is happening here) then the installation is replacing the
Windows 7 Boot-Manager with the Windows 8 boot manager, but it is including the Windows 7 Boot option within the new boot manager.
At your computer's startup you have 30 seconds to select the OS you want to use in the Bootmanager Menu.

If you want have Windows 7 as your default OS on every computer startup then
- Please boot into "Windows 7"
- From a command prompt start the program msconfig.
- Goto there to the Boot Menu and select your Windows 7 as standard by pressing the button “Set as default”

- Restart your system. Now Windows 7 is again your preferred OS at every system start
- Booting into Windows 8 is still possible by selecting Windows 8 in the boot menu.
How to restore the Windows-7-Boot-Manager and delete Windows 8
In order to get rid of your Windows 8 Installation follow these steps:
- boot into Windows 7 and just delete the VHD-file, that you have created.before

- Start the program msconfig
- Goto there to the Boot Menu and select your Windows 7 as standard by pressing the button “Set as default”
- Here you can also delete the boot entry for Windows 8 from this menu.
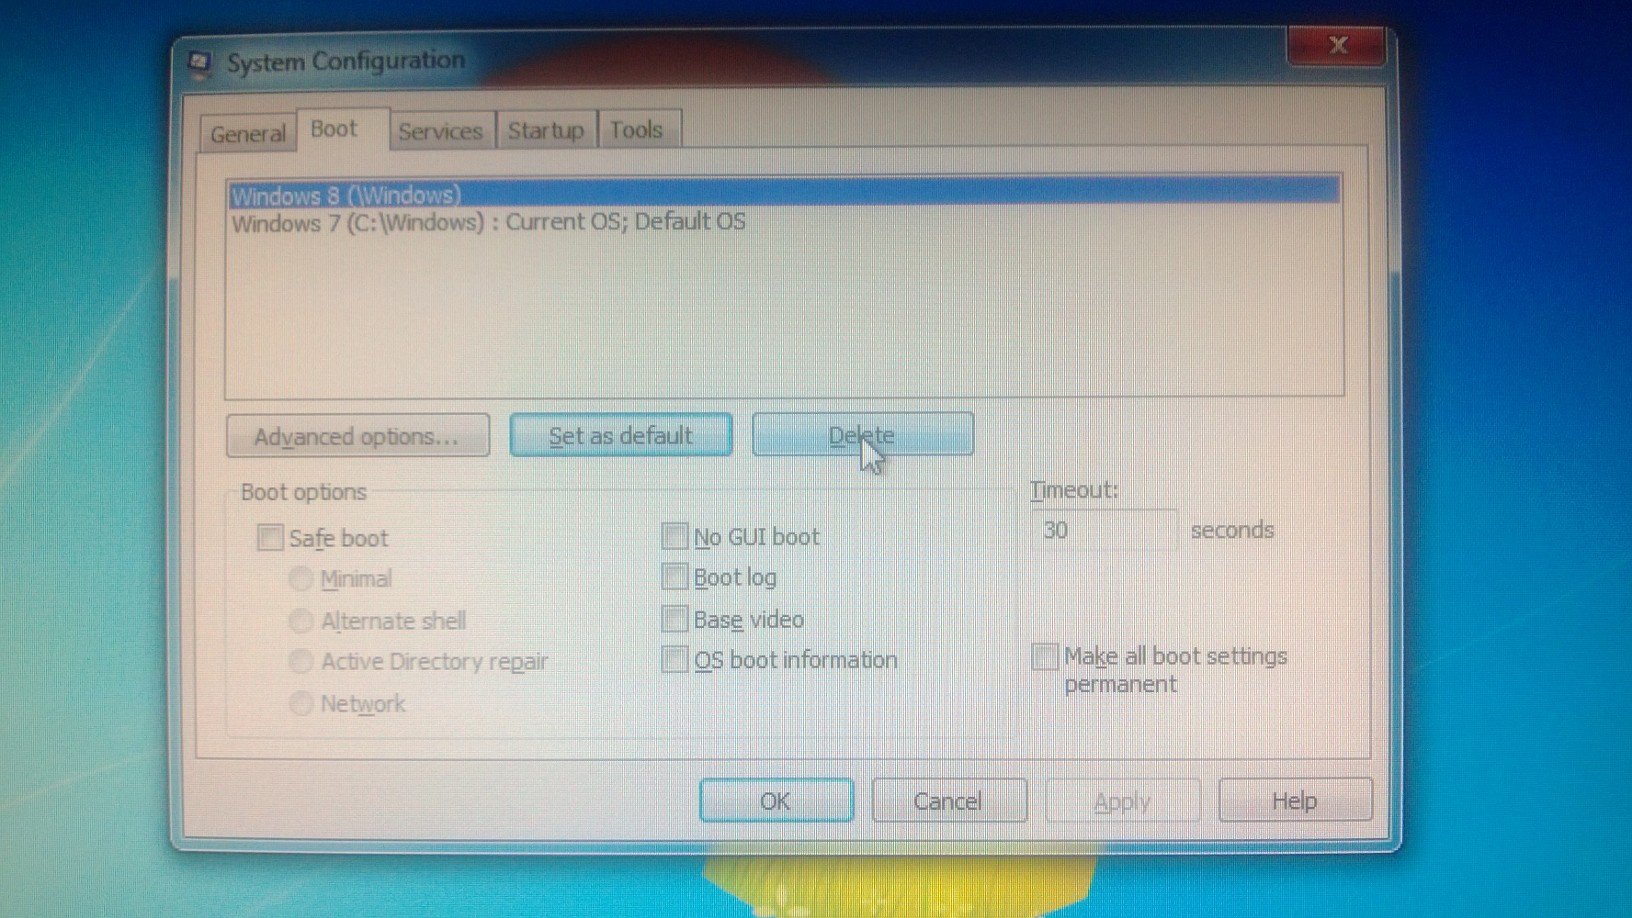
- Restart your Windows System and you are back to normal.
More information on WIndows 8 can be found on our Global site http://windows.microsoft.com/en-us/windows/home
Have fun with Windows 8 !
Jürgen Grebe
Partner Manager
Global SAP Alliance
Microsoft Corp.
- SAP Managed Tags:
- SAP InnoJam
2 Comments
Related Content
- It has never been easier to print from SAP with Microsoft Universal Print in Technology Blogs by Members
- Explore Business Continuity Options for SAP workload using AWS Elastic DisasterRecoveryService (DRS) in Technology Blogs by Members
- FAQ on Upgrading SAP S/4HANA Cloud Public Edition in Enterprise Resource Planning Blogs by SAP
- Exciting updates from TTA Cloud in Technology Blogs by Members
- SAP S/4HANAとSAP Datasphereのデータ連携 : Cloud Connectorの設定 in Technology Blogs by SAP