
- SAP Community
- Groups
- Interest Groups
- Application Development
- Blog Posts
- Edit mode for SE16N using ABAP Debugger Scripting
Application Development Blog Posts
Learn and share on deeper, cross technology development topics such as integration and connectivity, automation, cloud extensibility, developing at scale, and security.
Turn on suggestions
Auto-suggest helps you quickly narrow down your search results by suggesting possible matches as you type.
Showing results for
former_member18
Explorer
Options
- Subscribe to RSS Feed
- Mark as New
- Mark as Read
- Bookmark
- Subscribe
- Printer Friendly Page
- Report Inappropriate Content
04-10-2013
12:09 PM
1. OVERVIEW
As it happened to me probably many of you surprised when okcode "&SAP_EDIT" was deactivated by SAP to edit content of a table via SE16N transaction, (see NOTE 1420281).
It's true that with DEBUG authorizations you can debug SE16N, set variable GD-EDIT = 'X' and access in edit mode to the content of table.
But in this document I want to show you how can enter in edit mode with SE16N using ABAP Debugger Scripting.
We must know that use this functionality has risks as we can create data inconsistencies so it's our responsibility use this capability in a proper manner.
As SAP NOTE 1420281 explains "....security breaches have been detected in the customer authorization concepts.". SAP decided to eliminate the "&SAP_EDIT" but of course they know that still possible to "skip" in debug... What has been done is save any change done in any table using SE16N so any change you do in edit mode in SE16N is stored and can be traced. I'll explain at the end how to find this information. See section 4.
2. TECHNICAL SPECIFICATIONS
The SAP System I've used to generate this document:
SAP GUI: SAP Logon 720 (7200.3.11.1074)
SAP System: SAP ECC 6.0
3. STEPS
- Create Script
Execute SAS transaction and click on label
By default you should see a Script Template called: RSTPDA_SCRIPT_TEMPLATE

Place the cursor inside METHOD script. Click on  then choose the option shown in following picture:

This action will introduce this code in Script Method:
*************************************************
* debugger commands (p_command):
* Step into(F5) -> CL_TPDA_SCRIPT_DEBUGGER_CTRL=>DEBUG_STEP_INTO
* Execute(F6) -> CL_TPDA_SCRIPT_DEBUGGER_CTRL=>DEBUG_STEP_OVER
* Return(F7) -> CL_TPDA_SCRIPT_DEBUGGER_CTRL=>DEBUG_STEP_OUT
* Continue(F8) -> CL_TPDA_SCRIPT_DEBUGGER_CTRL=>DEBUG_CONTINUE
*************************************************
****************************************************************
*Interface (CLASS = CL_TPDA_SCRIPT_DEBUGGER_CTRL / METHOD = DEBUG_STEP )
*Importing
* REFERENCE( P_COMMAND ) TYPE I
****************************************************************
*TRY.
CALL METHOD DEBUGGER_CONTROLLER->DEBUG_STEP
EXPORTING
P_COMMAND =
.
* CATCH cx_tpda_scr_rtctrl_status .
* CATCH cx_tpda_scr_rtctrl .
*ENDTRY.
I write now how to complete this code:
*************************************************
* debugger commands (p_command):
* Step into(F5) -> CL_TPDA_SCRIPT_DEBUGGER_CTRL=>DEBUG_STEP_INTO
* Execute(F6) -> CL_TPDA_SCRIPT_DEBUGGER_CTRL=>DEBUG_STEP_OVER
* Return(F7) -> CL_TPDA_SCRIPT_DEBUGGER_CTRL=>DEBUG_STEP_OUT
* Continue(F8) -> CL_TPDA_SCRIPT_DEBUGGER_CTRL=>DEBUG_CONTINUE
*************************************************
****************************************************************
*Interface (CLASS = CL_TPDA_SCRIPT_DEBUGGER_CTRL / METHOD = DEBUG_STEP )
*Importing
* REFERENCE( P_COMMAND ) TYPE I
****************************************************************
TRY.
CALL METHOD debugger_controller->debug_step
EXPORTING
p_command = cl_tpda_script_debugger_ctrl=>debug_step_over.
CATCH cx_tpda_scr_rtctrl_status .
CATCH cx_tpda_scr_rtctrl .
ENDTRY.
Now place the cursor in a new line after our new code and press again  this time choose:

The code introduced after the action will be:
****************************************************************
*Interface (CLASS = CL_TPDA_SCRIPT_DATA_DESCR / METHOD = CHANGE_VALUE )
*Importing
* REFERENCE( P_NEW_VALUE ) TYPE STRING
* REFERENCE( P_OFFSET ) TYPE I
* REFERENCE( P_LENGTH ) TYPE I
* REFERENCE( P_VARNAME ) TYPE STRING
****************************************************************
*TRY.
CALL METHOD CL_TPDA_SCRIPT_DATA_DESCR=>CHANGE_VALUE
EXPORTING
P_NEW_VALUE =
* p_offset = -1
* p_length = -1
P_VARNAME =
.
* CATCH cx_tpda_varname .
* CATCH cx_tpda_scr_auth .
*ENDTRY.
Again, I write down how the code must be completed:
****************************************************************
*Interface (CLASS = CL_TPDA_SCRIPT_DATA_DESCR / METHOD = CHANGE_VALUE )
*Importing
* REFERENCE( P_NEW_VALUE ) TYPE STRING
* REFERENCE( P_OFFSET ) TYPE I
* REFERENCE( P_LENGTH ) TYPE I
* REFERENCE( P_VARNAME ) TYPE STRING
****************************************************************
TRY.
CALL METHOD cl_tpda_script_data_descr=>change_value
EXPORTING
p_new_value = 'X'
* p_offset = -1
* p_length = -1
p_varname = 'gd-edit'.
CATCH cx_tpda_varname .
CATCH cx_tpda_scr_auth .
ENDTRY.
You'll have this line in METHOD script:
me->break( ).
It's better to comment it, this way we go straight forward and code flow doesn't stop when Break-point is reached.
After this you can  and check the code
  . It shouldn't be any problem.
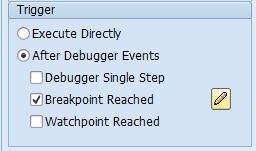
We've almost finished with the Script, now we need to set the condition for the Break-point.
Change the Trigger options as shown:
Then press  and create a new Break-point (
 ) using label "Srce Code", see the condition in next picture:
Program: SAPLSE16N
Include: LSE16NO01
Row: 57
(*Click on picture for more detail)

Set the Break-point and save your Script with button 
Name your Script with "Z" as first letter...

Ok, our Script ZALF_SE16N is ready to be used.
- Use Script in Transaction SE16N
In a new SAP session switch debugging on by /h command.
Then execute SE16N transaction... the debugger will come up... now click on Script label

Load our Script with button  and the execute it with
  ,
,
just after this action SE16N screen will appear but you can notice that checkbox "Maintain entries" is flagged. So you can enter any table and edit the content.

4. SE16N Change Documents
As I mentioned at the beginning of this document all changes done with SE16N in any table are recorded. To see this information you can run program: RKSE16N_CD_DISPLAY.
5. References
- SAP Managed Tags:
- ABAP Development,
- Security
13 Comments
You must be a registered user to add a comment. If you've already registered, sign in. Otherwise, register and sign in.
Labels in this area
-
A Dynamic Memory Allocation Tool
1 -
ABAP
8 -
abap cds
1 -
ABAP CDS Views
14 -
ABAP class
1 -
ABAP Cloud
1 -
ABAP Development
4 -
ABAP in Eclipse
1 -
ABAP Keyword Documentation
2 -
ABAP OOABAP
2 -
ABAP Programming
1 -
abap technical
1 -
ABAP test cockpit
7 -
ABAP test cokpit
1 -
ADT
1 -
Advanced Event Mesh
1 -
AEM
1 -
AI
1 -
API and Integration
1 -
APIs
8 -
APIs ABAP
1 -
App Dev and Integration
1 -
Application Development
2 -
application job
1 -
archivelinks
1 -
Automation
4 -
BTP
1 -
CAP
1 -
CAPM
1 -
Career Development
3 -
CL_GUI_FRONTEND_SERVICES
1 -
CL_SALV_TABLE
1 -
Cloud Extensibility
8 -
Cloud Native
7 -
Cloud Platform Integration
1 -
CloudEvents
2 -
CMIS
1 -
Connection
1 -
container
1 -
Debugging
2 -
Developer extensibility
1 -
Developing at Scale
4 -
DMS
1 -
dynamic logpoints
1 -
Eclipse ADT ABAP Development Tools
1 -
EDA
1 -
Event Mesh
1 -
Expert
1 -
Field Symbols in ABAP
1 -
Fiori
1 -
Fiori App Extension
1 -
Forms & Templates
1 -
General
1 -
Getting Started
1 -
IBM watsonx
1 -
Integration & Connectivity
10 -
Introduction
1 -
JavaScripts used by Adobe Forms
1 -
joule
1 -
NodeJS
1 -
ODATA
3 -
OOABAP
3 -
Outbound queue
1 -
Product Updates
1 -
Programming Models
13 -
Restful webservices Using POST MAN
1 -
RFC
1 -
RFFOEDI1
1 -
SAP BAS
1 -
SAP BTP
1 -
SAP Build
1 -
SAP Build apps
1 -
SAP Build CodeJam
1 -
SAP CodeTalk
1 -
SAP Odata
1 -
SAP UI5
1 -
SAP UI5 Custom Library
1 -
SAPEnhancements
1 -
SapMachine
1 -
security
3 -
text editor
1 -
Tools
17 -
User Experience
5
Top kudoed authors
| User | Count |
|---|---|
| 5 | |
| 2 | |
| 2 | |
| 2 | |
| 2 | |
| 2 | |
| 2 | |
| 1 | |
| 1 | |
| 1 |