
- SAP Community
- Products and Technology
- Enterprise Resource Planning
- ERP Blogs by Members
- Redesigning of the MB51 Standard SAP report 1\3
Enterprise Resource Planning Blogs by Members
Gain new perspectives and knowledge about enterprise resource planning in blog posts from community members. Share your own comments and ERP insights today!
Turn on suggestions
Auto-suggest helps you quickly narrow down your search results by suggesting possible matches as you type.
Showing results for
former_member18
Active Contributor
Options
- Subscribe to RSS Feed
- Mark as New
- Mark as Read
- Bookmark
- Subscribe
- Printer Friendly Page
- Report Inappropriate Content
02-06-2013
4:24 PM
There is lot of threads regarding slow performance of RM07DOCS and MB51/MB5B during data fetching from MSEG and MKPF table. As we know that the MSEG and MKPF is the biggest table of database and have millions of record. I have also received number of complaints regarding slow performance when Users want to fetch the data from MSEG and MKPF tables. I find out the document and think that I have to impalement it step-by-step with screenshot, So that SNC users can implement it smoothly with the help of this document.
You can implement this activity with help of SAP technical Team (BASIS, ABAP).
The below document is the Extension of the MSEG from MKPF fields whilst performing Redesigning of the MB51 Standard SAP report.

For the movement of the MKPF fields to MSEG, refer below the Redesign overview SAP Standard Notes that needs to be implemented in sequential order.

Refer the Action plan below for the detailed Analysis and step by step guide for the movement of fields from MKPF to MSEG and MB51 Redesigning.

STEP 1:
It has been said in the Step 1 of SAP Note 1516684 that we need to add the following below mentioned fields within Standard SAP table MSEG along with their Data Elements. We will now guide you through the procedure of adding such fields to MSEG SAP Standard table.
Most Importantly, Do not set the INIT Indicator adjacent to KEY field Checkbox within the DB table.

Access transaction SE11 for SAP ABAP Dictionary to access the SAP Standard and Customized DB Tables.
Enter MSEG in the Database table input field and Press ‘Change’
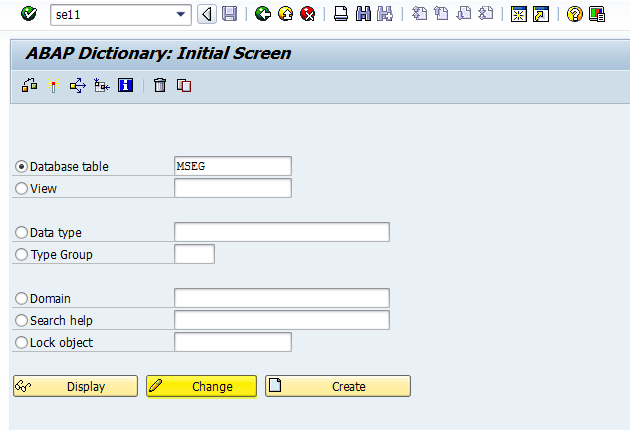
The System will prompt for the Access Key or SSCR key which would mean that you will have to register this Standard SAP object and on successful registration, an access key would be generated.
Select ‘Maintain in logon language’ option.

You are all set to go to add your fields. But most importantly, as mentioned in the Standard SAP Note that you have to add fields before the Append Structures. Locate the position within the MSEG table where the first append structure had been appended. It would most probably be in the last.
Place the fields in the middle of the last table field and the very first Appended structure. Refer the below snapshot for the exact location. That might be different for others.

Place the fields and their respective DE within the MSEG table on the said location and save it within a change request later transporting it to subsequent systems.

Save the changes.

Activate the SAP Standard table MSEG by pressing the Activation Button on the Application toolbar and select the ok button from the popup asking for the objects to be activated. MSEG table object would be selected by default.

Since it’s a Standard SAP table it would take time to activate and apply the changes. It would be successfully activated with an information message “Active object generated”. The SAP standard table would now contain fields from standard SAP note 1516684.

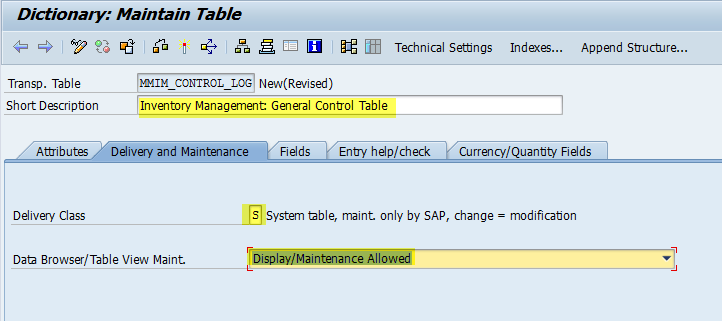
As the fields have been successfully added in the MSEG table, now create a DB table within the SAP Namespace with the name MMIM_CONTROL_LOG in the package MB along with the Technical attributes. Whole characteristics of DB table have been mentioned in the SAP Note 1516684. Refer the below mentioned snapshot.

Follow the same steps from the ABAP dictionary to create the said table. Access SE11 and enter the name in the DB table field name and press Create. Information message would be displayed, Select Ok.

Since we are creating the table within SAP Namespace, so again we would need to register the object and request for the SAP SSCR Key. Enter the Key within the Access key Input field and press Continue

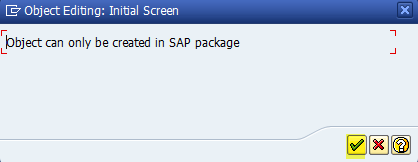
Since it would be an SAP standard DB table and can only be created in SAP Namespace. An information message would be displayed, Press OK.
Enter the Short Description, Delivery Class and Data Browser/Table View Maint. Options exactly as mentioned in the SAP Note 1516684 . Do not change them according to your needs since we are dealing with SAP Namespace.
Access technical settings of the table. System will prompt for the changes made to be saved and go for the action performed. Save the Changes and Apply Package MB as already mentioned with in the SAP Note 1516684 .

Package MB Entered. Click Save Icon.

Warning message prompting/confirming the SAP Namespace. Press Ok Button.

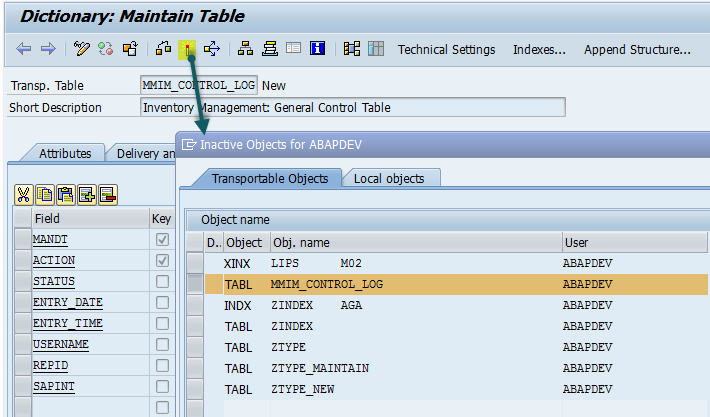
Assigning the Changes to a Change request later transporting it to the Subsequent Systems.

Access the technical settings and give Data Class and Size Category. Press Save.

Mention MANDT and ACTION fields as the Key fields by checking the Key checkbox followed by the fields

Save and Activate the Table.
View the warning message by pressing YES.

Do not worry about the warning messages.

The Object has been successfully activated.

Now we need to implement the corrections mentioned in the SAP Note 1516684 .

Use SNOTE TCode for the auto implementation of the correction instructions.

Download it in your system and implement it to your SAP system.
for more information, please have a look at below link
Redesigning of the MB51 Standard SAP report 2\3
- SAP Managed Tags:
- SAP ERP
7 Comments
You must be a registered user to add a comment. If you've already registered, sign in. Otherwise, register and sign in.
Labels in this area
-
"mm02"
1 -
A_PurchaseOrderItem additional fields
1 -
ABAP
1 -
ABAP Extensibility
1 -
ACCOSTRATE
1 -
ACDOCP
1 -
Adding your country in SPRO - Project Administration
1 -
Advance Return Management
1 -
AI and RPA in SAP Upgrades
1 -
Approval Workflows
1 -
ARM
1 -
ASN
1 -
Asset Management
1 -
Associations in CDS Views
1 -
auditlog
1 -
Authorization
1 -
Availability date
1 -
Azure Center for SAP Solutions
1 -
AzureSentinel
2 -
Bank
1 -
BAPI_SALESORDER_CREATEFROMDAT2
1 -
BRF+
1 -
BRFPLUS
1 -
Bundled Cloud Services
1 -
business participation
1 -
Business Processes
1 -
CAPM
1 -
Carbon
1 -
Cental Finance
1 -
CFIN
1 -
CFIN Document Splitting
1 -
Cloud ALM
1 -
Cloud Integration
1 -
condition contract management
1 -
Connection - The default connection string cannot be used.
1 -
Custom Table Creation
1 -
Customer Screen in Production Order
1 -
Data Quality Management
1 -
Date required
1 -
Decisions
1 -
desafios4hana
1 -
Developing with SAP Integration Suite
1 -
Direct Outbound Delivery
1 -
DMOVE2S4
1 -
EAM
1 -
EDI
2 -
EDI 850
1 -
EDI 856
1 -
EHS Product Structure
1 -
Emergency Access Management
1 -
Energy
1 -
EPC
1 -
Find
1 -
FINSSKF
1 -
Fiori
1 -
Flexible Workflow
1 -
Gas
1 -
Gen AI enabled SAP Upgrades
1 -
General
1 -
generate_xlsx_file
1 -
Getting Started
1 -
HomogeneousDMO
1 -
IDOC
2 -
Integration
1 -
Learning Content
2 -
LogicApps
2 -
low touchproject
1 -
Maintenance
1 -
management
1 -
Material creation
1 -
Material Management
1 -
MD04
1 -
MD61
1 -
methodology
1 -
Microsoft
2 -
MicrosoftSentinel
2 -
Migration
1 -
MRP
1 -
MS Teams
2 -
MT940
1 -
Newcomer
1 -
Notifications
1 -
Oil
1 -
open connectors
1 -
Order Change Log
1 -
ORDERS
2 -
OSS Note 390635
1 -
outbound delivery
1 -
outsourcing
1 -
PCE
1 -
Permit to Work
1 -
PIR Consumption Mode
1 -
PIR's
1 -
PIRs
1 -
PIRs Consumption
1 -
PIRs Reduction
1 -
Plan Independent Requirement
1 -
Premium Plus
1 -
pricing
1 -
Primavera P6
1 -
Process Excellence
1 -
Process Management
1 -
Process Order Change Log
1 -
Process purchase requisitions
1 -
Product Information
1 -
Production Order Change Log
1 -
Purchase requisition
1 -
Purchasing Lead Time
1 -
Redwood for SAP Job execution Setup
1 -
RISE with SAP
1 -
RisewithSAP
1 -
Rizing
1 -
S4 Cost Center Planning
1 -
S4 HANA
1 -
S4HANA
3 -
Sales and Distribution
1 -
Sales Commission
1 -
sales order
1 -
SAP
2 -
SAP Best Practices
1 -
SAP Build
1 -
SAP Build apps
1 -
SAP Cloud ALM
1 -
SAP Data Quality Management
1 -
SAP Maintenance resource scheduling
2 -
SAP Note 390635
1 -
SAP S4HANA
2 -
SAP S4HANA Cloud private edition
1 -
SAP Upgrade Automation
1 -
SAP WCM
1 -
SAP Work Clearance Management
1 -
Schedule Agreement
1 -
SDM
1 -
security
2 -
Settlement Management
1 -
soar
2 -
SSIS
1 -
SU01
1 -
SUM2.0SP17
1 -
SUMDMO
1 -
Teams
2 -
User Administration
1 -
User Participation
1 -
Utilities
1 -
va01
1 -
vendor
1 -
vl01n
1 -
vl02n
1 -
WCM
1 -
X12 850
1 -
xlsx_file_abap
1 -
YTD|MTD|QTD in CDs views using Date Function
1
- « Previous
- Next »
Related Content
- Integration of SAP Service and Asset Manager(SSAM) with SAP FSM to support S/4HANA Service Processes in Enterprise Resource Planning Blogs by SAP
- Question about report for Sales in SAP S/4HANA Public Cloud Edition - Out of the box reports or CDS in Enterprise Resource Planning Q&A
- Quick Start guide for PLM system integration 3.0 Implementation/Installation in Enterprise Resource Planning Blogs by SAP
- Consolidating BP Sales Invoices in Enterprise Resource Planning Q&A
- FAQ on Upgrading SAP S/4HANA Cloud Public Edition in Enterprise Resource Planning Blogs by SAP
Top kudoed authors
| User | Count |
|---|---|
| 2 | |
| 2 | |
| 2 | |
| 2 | |
| 2 | |
| 1 | |
| 1 | |
| 1 | |
| 1 | |
| 1 |