
- SAP Community
- Products and Technology
- Enterprise Resource Planning
- ERP Blogs by Members
- Special Topics in Product Costing Config- Planning...
Enterprise Resource Planning Blogs by Members
Gain new perspectives and knowledge about enterprise resource planning in blog posts from community members. Share your own comments and ERP insights today!
Turn on suggestions
Auto-suggest helps you quickly narrow down your search results by suggesting possible matches as you type.
Showing results for
Former Member
Options
- Subscribe to RSS Feed
- Mark as New
- Mark as Read
- Bookmark
- Subscribe
- Printer Friendly Page
- Report Inappropriate Content
01-24-2013
3:05 AM
Product Costing, part of the Controlling module, is used to value the internal cost of materials and production for profitability and management accounting. Product Costing is a niche skill. Due to costing's high integration with other modules, many people avoid it due to the complexity. In my last blog series, I simplified Product Costing into 5 parts. I think an important follow up to that blog series is diving in to some of the configuration that support product costing.
In my blog on Cost Center Accounting, I discussed that you need to enter plan total dollars and quantities in each Cost Center in a Plant.
- Cost Center dollars are planned by Activity Type and Cost Element in Transaction KP06. Variable and fixed dollar amounts can be entered.
- Cost Center activity quantities are planned in by Activity Type in Transaction KP26. You can also manually enter an activity rate based on last year's actual values.
- Statistical Key Figures are planned by Cost Center in Transaction KP46. SKF's can be used in cost allocations.
When planning Cost Center dollars, activity quantities or rates, or SKF's it's important to ensure that your planning profile and layout are suitable for your requirements. For example, the default layout uses the Controlling Area currency. If your Company Code currency is not the same as the Controlling Area currency it will be confusing for users to convert currencies for planning purposes. You may also choose change your layout to make mass cost center planning possible rather than one sheet per cost center.
Below is the step by step process to create Planning Profiles and Layouts including best practices and tips.
1. KP34 Define User-Defined Planner Profiles
If you need to make changes to planning layouts, you will need to edit the Planner Profile. It is a best practice to create a new Planner Profile if changes need to be made instead of editing a SAP Planner Profile. You can use one Planner Profile with multiple Planning Layouts, or separate layouts into different Planner Profiles. To create: Click New Entries, enter the Profile, Description, and save.

2. Select the Planning Profile and click General Controlling. Drop down on Planning Areas and select the relevant planning that should be included in this Planning Profile. You can enter multiple Planning Areas in the same Planner Profile. Once entered, save. We will come back later to add more details.

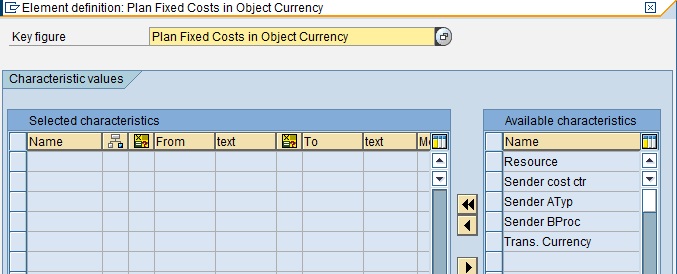
3. KP65 Create Planning Layouts for Cost Element Planning
Enter the Planning Layout and description. You can also copy from an existing layout. It is best practice to copy from and create a new Layout if necessary. Click Create. The Report Painter screen shows the Planning Layouts for Cost Element Planning and the Planning Layout just created. Double click on any header field to change the column field or column description. Make any necessary changes to the fields in the layout and save.

Double click on any header field to change the column field or column description. Make any necessary changes to the fields in the layout and save.
4. KP34 Define User-Defined Planner Profiles
Select your previously created Planner Profile and click General Controlling. Select the Planning Area previously created and click Layouts for Controlling. Select the layout you created. Click the Overview and Integrated Planning check boxes. The overview option allows users to write over the default parameters on the selection screen. This usually makes sense to select. The Integrated Planning option allows the user to plan in an Excel sheet in SAP, or save an Excel file into SAP. We can deselect this later, but we need it to get our file description. Enter and save.

5. Select the layout and click Default Settings. You will be taken to the selection screen where Cost Element Planning is done. You can enter default parameters for any of the fields. For now, you must enter a Version, From Period, To Period, Fiscal Year, Cost Center and Cost Element. You can change defaults later.

6. Click the Overview button (F5). A popup will say 'File description 0X_XPX_XXXX_XXXX has been generated'. Click enter. An excel upload template will appear. Copy and paste text to an excel file to save for users to upload. Click Save file description. If you click Save file layout, the layout on screen will appear for users when they enter planning. Some users may prefer this view. I find that users prefer the more structured standard layout versus the excel layout.


7. Green arrow back to the Default Parameters screen. Correct any default parameters and save. Green arrow back to the Layouts for Controlling screen. Deselect the Integrated Planning check box if desired. Notice that the File Description is now populated. Save.
8. Repeat steps 2 - 7 for any other Planning Layouts:
KP75 Create Planning Layouts for Activity Type Planning
KP85 Create Planning Layouts for Statistical Key Figure Planning
9. Now that this configuration is in place, users can upload an excel file or file directory instead of manually typing planning in SAP.
Go to KP06, KP26, or KP46. Extras-> Excel Planning-> Upload. Select Import single file or file directory. Enter the file path on your desktop. Enter the file description from configuration. Select the proper decimal notation and separator. Execute. The excel upload function is very finicky, but when it works, it can save a lot of time for users.
- SAP Managed Tags:
- SAP ERP,
- FIN (Finance),
- FIN Controlling
7 Comments
You must be a registered user to add a comment. If you've already registered, sign in. Otherwise, register and sign in.
Labels in this area
-
"mm02"
1 -
A_PurchaseOrderItem additional fields
1 -
ABAP
1 -
ABAP Extensibility
1 -
ACCOSTRATE
1 -
ACDOCP
1 -
Adding your country in SPRO - Project Administration
1 -
Advance Return Management
1 -
AI and RPA in SAP Upgrades
1 -
Approval Workflows
1 -
ARM
1 -
ASN
1 -
Asset Management
1 -
Associations in CDS Views
1 -
auditlog
1 -
Authorization
1 -
Availability date
1 -
Azure Center for SAP Solutions
1 -
AzureSentinel
2 -
Bank
1 -
BAPI_SALESORDER_CREATEFROMDAT2
1 -
BRF+
1 -
BRFPLUS
1 -
Bundled Cloud Services
1 -
business participation
1 -
Business Processes
1 -
CAPM
1 -
Carbon
1 -
Cental Finance
1 -
CFIN
1 -
CFIN Document Splitting
1 -
Cloud ALM
1 -
Cloud Integration
1 -
condition contract management
1 -
Connection - The default connection string cannot be used.
1 -
Custom Table Creation
1 -
Customer Screen in Production Order
1 -
Data Quality Management
1 -
Date required
1 -
Decisions
1 -
desafios4hana
1 -
Developing with SAP Integration Suite
1 -
Direct Outbound Delivery
1 -
DMOVE2S4
1 -
EAM
1 -
EDI
2 -
EDI 850
1 -
EDI 856
1 -
edocument
1 -
EHS Product Structure
1 -
Emergency Access Management
1 -
Energy
1 -
EPC
1 -
Financial Operations
1 -
Find
1 -
FINSSKF
1 -
Fiori
1 -
Flexible Workflow
1 -
Gas
1 -
Gen AI enabled SAP Upgrades
1 -
General
1 -
generate_xlsx_file
1 -
Getting Started
1 -
HomogeneousDMO
1 -
IDOC
2 -
Integration
1 -
learning content
2 -
LogicApps
2 -
low touchproject
1 -
Maintenance
1 -
management
1 -
Material creation
1 -
Material Management
1 -
MD04
1 -
MD61
1 -
methodology
1 -
Microsoft
2 -
MicrosoftSentinel
2 -
Migration
1 -
MRP
1 -
MS Teams
2 -
MT940
1 -
Newcomer
1 -
Notifications
1 -
Oil
1 -
open connectors
1 -
Order Change Log
1 -
ORDERS
2 -
OSS Note 390635
1 -
outbound delivery
1 -
outsourcing
1 -
PCE
1 -
Permit to Work
1 -
PIR Consumption Mode
1 -
PIR's
1 -
PIRs
1 -
PIRs Consumption
1 -
PIRs Reduction
1 -
Plan Independent Requirement
1 -
Premium Plus
1 -
pricing
1 -
Primavera P6
1 -
Process Excellence
1 -
Process Management
1 -
Process Order Change Log
1 -
Process purchase requisitions
1 -
Product Information
1 -
Production Order Change Log
1 -
Purchase requisition
1 -
Purchasing Lead Time
1 -
Redwood for SAP Job execution Setup
1 -
RISE with SAP
1 -
RisewithSAP
1 -
Rizing
1 -
S4 Cost Center Planning
1 -
S4 HANA
1 -
S4HANA
3 -
Sales and Distribution
1 -
Sales Commission
1 -
sales order
1 -
SAP
2 -
SAP Best Practices
1 -
SAP Build
1 -
SAP Build apps
1 -
SAP Cloud ALM
1 -
SAP Data Quality Management
1 -
SAP Maintenance resource scheduling
2 -
SAP Note 390635
1 -
SAP S4HANA
2 -
SAP S4HANA Cloud private edition
1 -
SAP Upgrade Automation
1 -
SAP WCM
1 -
SAP Work Clearance Management
1 -
Schedule Agreement
1 -
SDM
1 -
security
2 -
Settlement Management
1 -
soar
2 -
SSIS
1 -
SU01
1 -
SUM2.0SP17
1 -
SUMDMO
1 -
Teams
2 -
User Administration
1 -
User Participation
1 -
Utilities
1 -
va01
1 -
vendor
1 -
vl01n
1 -
vl02n
1 -
WCM
1 -
X12 850
1 -
xlsx_file_abap
1 -
YTD|MTD|QTD in CDs views using Date Function
1
- « Previous
- Next »
Related Content
- Kanban with production orders: Scheduling of orders in Enterprise Resource Planning Q&A
- MRP live: Purchasing schedule Lines are not updated by plant run but by materialwise run in Enterprise Resource Planning Q&A
- Service with Advanced Execution and Resource-related Billing in Enterprise Resource Planning Blogs by SAP
- Service Order with Resource-related Intercompany Billing in Enterprise Resource Planning Blogs by SAP
- SAP Fiori for SAP S/4HANA - Technical Catalog Migration – How the migration process works in Enterprise Resource Planning Blogs by SAP
Top kudoed authors
| User | Count |
|---|---|
| 3 | |
| 2 | |
| 2 | |
| 2 | |
| 2 | |
| 2 | |
| 2 | |
| 1 | |
| 1 |