Modifying an already existing screen involves copying an existing the screen element, and making changes to the copied ones. Though SAP delivered screen sequences, screens etc. may fulfill the business requirements of most of the clients, it is necessary sometimes to change the components of screen sequences according to the business needs.
To modify an already existing BDT component, the idea is to copy the already existing screen element and make changes to the customized one and attach the customized BDT component.
For e.g. we want to add a field group to the already existing screen sequence, modifying that screen sequence will be necessary. You will need to create a custom view that will hold
the new field groups that you have created and then a new section to hold the custom view that you created. Once a new section is created, a new screen that houses the new section and finally a new screen sequence to hold the screen. The only thing that doesn’t change is the screen sequence category.
The last step is to add the screen sequence in the screen sequence category in the configuration Settings to include the new screen sequence.
To Remove an element entry from the screen There is always a requirement to remove an entry from the screen which is not needed in a screen. BDT is a very simple toolset to do this. The following steps describe the step by step procedure to remove an entry from the screen.
In this example we will modify a view ICLJ03 because it contains a field group that we don’t want.
Step 1 Go to transaction ICLWM and select Screen Layout -> Views

Step 2 Locate View ICLJ03 and click copy button.

Step 3
a. Rename the view ICLJ03 to ZCLJ03 to keep the name as original, however changing it to a ‘Z’ view ( i.e. customize the view ) b. Select copy all c. A message will be displayed saying all dependent entries have been copied, the implication of which is that all the field groups that belongs to the view has also been copied.

Step 4
If you don’t want one of the copied field groups, select the view that was just created and go to change mode for the field groups that belongs to the view. Delete the field group that is not required.

Step 5
a. You will get a message that your selected entries have been deleted. Make sure to save to ensure the process is completed b. Finally go back to ICLWM and select Screen Layout -> Sections. Select Section ICLJ03 and copy it. Rename the new section ZCLJ03. Follow previous step to copy all dependent views to the new section c. This time however you will be prompted to change the item number for each section.

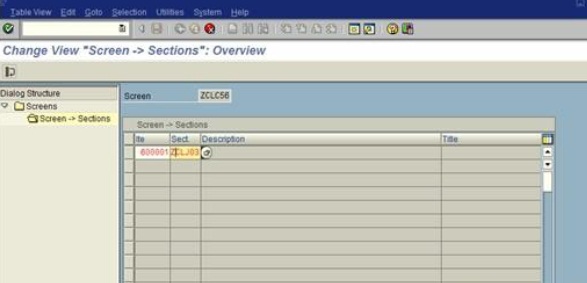
Step 6 a. Now we need to create a new screen to hold the section. So, go to Transaction ICLWM again and select Screen Layout -> Screen b. Select ICLC56 and copy it. Follow steps to copy the screen but replace section ICLJ03 with
the new custom section ZCLJ03.
Step 7
We have changed the screen now we need to modify the screen sequence CL56. Rename the screen ICLC56 to ZCLC56. This will call the custom screen and all associated views, sections, and field groups inside.

Step 8
Add the custom Screen sequence in the screens sequence category

Step 9
a. Last step is to change the screen sequence for the internal claim type
b. Depending upon whether the changes affects Expert Mode, Notification mode, Quick claim mode or all, that will determine where you need to do the configuration
c. If the changes affect Expert Mode, go to Claims Management -> Claim -> Process Control (Internal Claim type) -> internal claim type: Specify Claim handler group + screen sequences. Then select the internal claim type and claim level that the screens sequence you are changing affects.
d. If the change affects the notification mode or quick claim mode, go to claims management -> Claim -> Process Control (Internal Claim type) -> internal claim type: Specify CH group screens sequence for other proc. modes.
e. Then select your internal claim type and the mode you are modifying (Notification for notification mode, over view for quick claim mode). Select node category after you have selected the internal claim type and the mode you want to modify.
