Introduction: Data Management Packages
Following are the different data management packages are available in the Data Manager tab of EPM 10 . These data management packages allow us to perform general data management tasks, like Append, Move, Clear, Load etc .
This document entails each one of these, explaining their use in data export and import .

These data management tasks trigger a process chains in the backend (SAP BI) .
Important key words:
- Transformation File: Allows administrators to set up the rules for reading data from an external source and putting it in the proper form for your BPC database . This file can further be used for sending data to upstream applications.
Example:

- *OPTIONS: This section provides different options available for the et up of transformation .
- *MAPPING: This section defines the mapping between transfaromation to BPC .
*CONVERSION : This part of the transformation file identifies the conversion sheet to be used with a particular dimension .
Data Management Packages
1. Append
Append is used when the value for measure is to be added for the existing set of values of dimensions . It works in a similar fashion as summation in an infocube .
Select the Append package and click on ‘Run’ .
![]()
Select the flat file to be used .

In this case :

Following steps:


Click ‘Finish’ .
![]()
The following message will appear . Click on ‘OK’ and then ‘View Status’ .

The status will appear as successful . And detailed log will tell us the number of records appended .

Further, the data in the BI cube can be verified:
Create a report in EPM tab and check the data, as explained below .
Now, follow the steps below and create a report to verify the data .
Go to New report

Select Dimensions into rows and MEASURES into Column

Now, apply filter on ACCOUNT , INTERCO, TIME and PRODUCT
![]()


Proceed and see the output .

Now, modify the file and load APPEND package again following the same steps, to check if data gets appended .

Now, refresh the report and check if the output becomes 600 for the same set of filters .


2. Clear
The "Clear" package clears the data in the table by importing negative values for the existing positive values and vice versa . It does not delete the records .
Select Clear and click on ‘Run’ .

Select member criteria for Clear .
![]()
![]()
Follow further steps and ‘Finish’ . The status can then be checked for number of records cleared successfully .
Check Status .

Verification :
Records before executing the data package:

Check BI cube for records added with negative values as per the selection criteria .
Records after executing the data package:

3. Copy
The "Copy" package copies data from source to destination between dimensions within the Planning and Consolidation application .
In this case we want to copy the below mentioned records for Product C and from Brazil (BR) to France (FR) .

Select the required method for copy and proceed .

Specify the copy conditions:
![]()
Click on finish .
Verification: Records have been copied .

4. Export Master Data to file
The "Export Master Data" package exports transaction data from an application to a flat file
Master data can be exported either to a file, can be placed on an application server and can also be extracted to BADI .
Select package and hit ‘Run’ .

Select the dimension to be used and proceed with the wizard, by creating a new flat file where the master data will be stored .
If no transformation rules need to be required then a blank tranformation file can be used and Finish .
Run Package and check status .
![]()
Data Preview option can be used to view the file .
![]()

This output can further be download to a local file for further sharing .
5. Export Transaction Data to file
Transaction data can also be exported either to a file , can be placed on an application server and can also be extracted to BADI .
Select package and hit ‘Run’ .

Specify the parameters for the desired range of output .
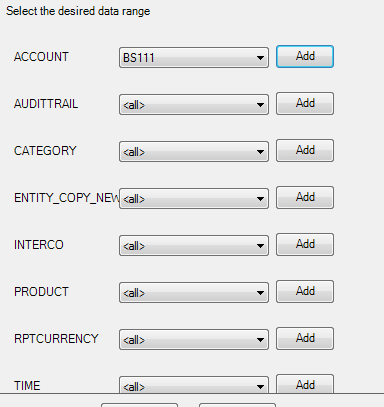
Specify the measures to be exported . In this scenario, only the SIGNEDDATA values will be taken further into the file .
By this way we can customize the output .
![]()
Follow the steps of the wizard and check the file through Data Preview as explained earlier .
![]()
6. Import Description
Imports description of a dimension from flat file .
Prepare the flat file and follow the wizard .
![]()
![]()
Transformation file:

Specify Dimension name and ‘Finish’ .
![]()
Check status:
![]()
Verify the dimension:
![]()
![]()
7. Import Master data Attribute/Hierarchy from flat file
Create Transformation file:
![]()
Create Flat File:
![]()
Specify the file name:
![]()
Select the transformation file:

Specify Dimension:

Maintain write mode :

The above two modes give us an option to overwrite the existing hierarchy with the new changes or to use the existing hierarchy with modifications .
Run

View Status:

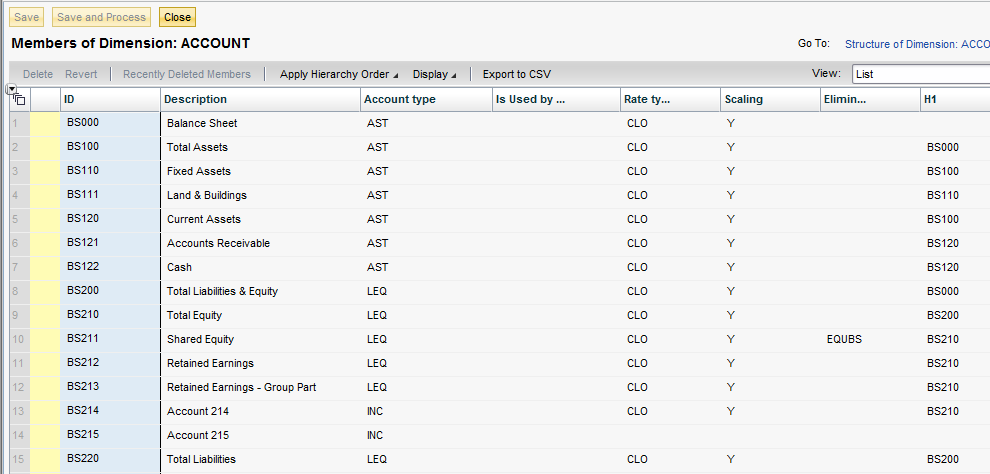
Check Account Master Data
8. Import Transaction data, aggregate overwrite mode
This mode is used to import transaction from a flat file using the aggregate overwrite mode
Create a CSV flat file
Create transformation file if required.
Go to Run Package and follow the wizard.


View Status

New report


Final report

9. Import Transaction data from NetWeaver BW InfoProvider
Identify Source Info provider
Source data:

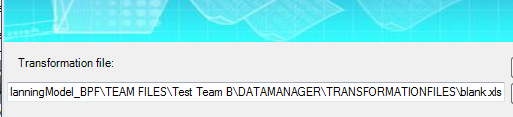
Transformation file:


Specify the transformation file

Select the desired mode.

Follow the steps further and finish.
Check status of the load.
Data should now be loaded in the BI cube.


10. Import Transaction data from NetWeaver BW InfoProvider(UI)
Works in almost similar fashion as Import Transaction data from Net Weaver BW InfoProvider. The only difference beingthe “Set Selection” option available for loading the data.

Thus, we can define the selection parameters for which we want to load data. Example a date range can be given or a particular account. We can even put selections on Request ID and Change run ID.
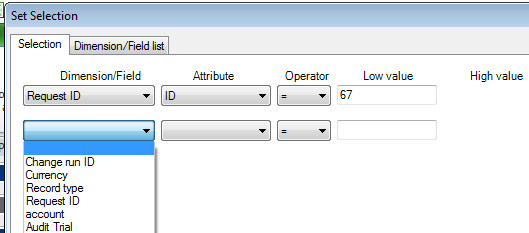
In this scenario , I will load data for a particular account.


Source data:

Transformation file:

Verification:

11. Move
The "Move" package lets you move any selection of data within an application. You are prompted to input source and destination data selections for all dimensions.
There are two options available to us while trying to use the data package MOVE.
![/wp-content/uploads/2012/10/1_273208.png]()
Let us consider both scenarios one by one.
- Merge data values.
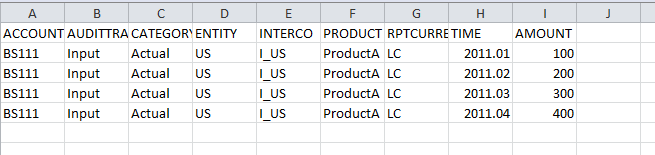
Following are two unique records from the source data.

By maintaining the following selections, I want to copy the same amount for Product B, from account BS111 to PL010.

Following the steps, we get the following output.

In this scenario, we can observe that 4 new records are generated . 2 which nullify the vales for account BS111 and 2 new records for account PL010.
II. Replace and clear
Selecting this option, for the same source data,we get the following output in the cube.
Verification:

Thus, we see that in this scenario, 8 new records have been generated. 2 are unique for PL010 and 6 are generated to clear the existing records in the
source data.
