Table of Content
1. Introduction: .......................................................................................................................... 2
2. Step by Step Process: ........................................................................................................... 2
2.1. Creating Info Object Catalog and Info Object (Characteristics): ................................... 2
2.2. Creation of Master Data/Text: ........................................................................................... 6
2.3. Creation of an Attribute: ................................................................................................... 8
2.4. Table Generation: ..............................................................................................................10
2.5. Creation of a Flat File: ...................................................................................................... 11
2.6. Creation of Data Source: ................................................................................................. 11
1. Introduction:
This Article describes about the techniques to be followed for uploading a .CSV or MS EXCEL file (Fl at File). The criteria’s that has to be new features in master data loading with the help of the screen shots.
2. Step by Step Process:
2.1. Creating Info Object Catalog and Info Object (Characteristics):
·Select RSA1 transaction for data modeling.
·First you have to create Info area which can hold all your info objects.
·For that, initially you have to select info objects from the left side. This window pane opens. Right click on Info objects and select - Create Info Area.

·In the context menu of your Info Area, choose create Info Object Catalog.

·On the next screen, enter a technical name and a description.
·Select Char. as Info Object Type.
·Choose Create.
·You go to the screen for Info Object catalog editing.

·Activate the Info Object catalog.
·The Info Object catalog is displayed in your Info Area.
·Right click on the created Info Object Catalog and select Create Info Object.

·Enter the Characteristics name and their Description.

·Click on Continue.
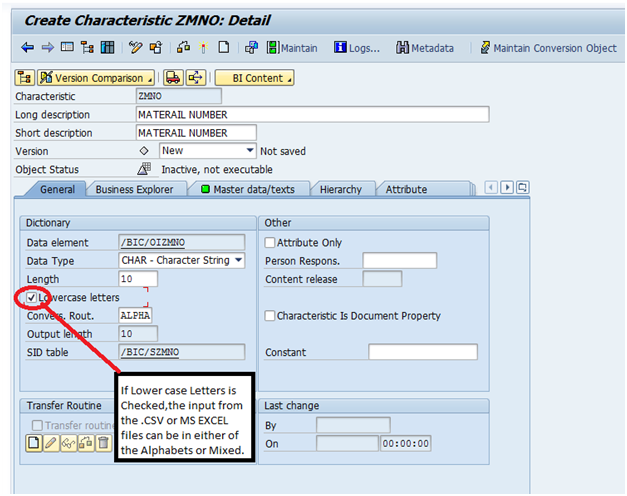
·If you have given a Standard object then the data type, Length and Output Length come automatically; else manipulate the data type length etc as required.
·Lowercase letters are checked in the general tab, and then the data from the Flat file can be taken in both the formats (Small and Capital). If not hen the Default value should in the Capital fonts from the Input Flat File.
2.2. Creation of Master Data/Text:
·Next Click on the Master Data/Text Tab

·By Default in the Master Data/Texts Tab a checkbox is selected for With Master Data/Text and with Text. If it’s not checked the Attribute for the Particular Info object cannot be created.

·BW 7.3 allows for real-time master data acquisition.
·Object, master data transferred to an Info Object becomes available for BI reporting immediately.
·This means that you can transfer delta records to Info Object attributes and texts.

In General for loading a data to the Master data/Text can be attained by only through the Attributes.
Next tick the check box and click on the Attribute Tab.
2.3 Creation of an Attribute:

·Enter the Attribute name, double click on the name or click the create button in the screen.

·A screen appears corresponding to that attribute and fill the Necessary Details.
·Likewise create the Necessary attributes with the same steps..


2.4 Table Generation:
Again click on the Master Data Text, Where you can see the automatically created Master Data attribute and text Tables.

The Corresponding Master Tables are created as /BIC/MZMNO, /BIC/TZMNO etc...
Note: The Tables that are automatically created are starts with /BIC.
Table Generation:
In general depending upon the Attributes entered the Following Tables will be generated.
M – Master Data Tables Contains all the Attributes.
P – Time Independent
Q – Time Dependent
X – Time Independent and Navigation Attributes
Y – Time Dependent and Navigation Attribute.
In our Example P and T Tables are generated. M Table is Mandatory where all the Attributes will be displayed.
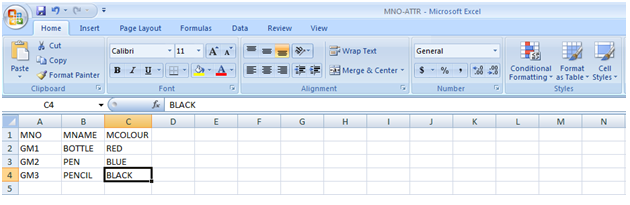
2.5Creation of a Flat File:
Now Create a Flat File Data in Excel and save it has .CSV OR MSEXCEL Format (We can load the data directly from MS Excel no need to save in .CSV)
2.6 Creation of Data Source:
Loading of Data through Data Source
·Click on the Data Source Tab in the Modeling Window.
·Create an Application component by right clicking on the Data Source File Desk
·Right Click on that Particular Component and click Create Data Source.
·Enter the Data Source name and Select the Data Type Data source as Master Data Attributes.


·Click Continue.
·Enter the General Information for the Particular Data Source to be Created where the short description etc...
·Click on the Extraction Tab.
·Expand adapter and choose “Microsoft Excel File (XLS) From Local work Station”

·Enter the Flat File Path name from which the Data has to be uploaded in the XLS Format.
·Select “SHEET TO BE EXTRACTED” we can select which sheet you want to upload

· ·Maintain the Adapter and data Format Settings as follows in the Screen.

·Now Click on the Proposal Tab.
·Select the Load Example Data push Button.

·Example Data is uploaded from the flat file.
·Click on the Fields Tab in which you can see the Total number of Fields is to be loaded.
·Activate and the click on the Read Preview data in which you can see the Data as Below.

·Now Create an Info Package by right clicking on the Created Data Source. Then check the data in the data selection, extraction, Processing, Update and schedule.
·Finally in schedule click the Start / Execute Button for the Data Request. Once the data is stored in PSA (Persistent Storage Area) successfully, and then continue of creating with the Transformation.
