With SAP GUI 7.30 SAP has enhanced the SAP GUI and provided various new features. We will start configuring these new features one by one.
One of the features which come with SAP GUI 7.3 is “Using Branding”. What is mean by using branding in the SAP GUI?
Using Branding in SAP GUI means you can add & customize your company logo in the title bar of SAP GUI, so every user once log’s into the any of the ABAP system by default the company logo will be visible on the Title Bar.
With SAP GUI 7.30 by default SAP provides various themes and colors, the branding feature is mainly enabled for Signature Design & Corbu theme.
As mentioned above, you can integrate a company logo in the title bar of any SAP session. Once you start configuring your SAP GUI using the SAP GUI Configuration the branding feature is disabled and you can only see it in the read only mode for the Branding.
Please check below screen shots for further details,
Launch the SAP GUI Configuration tool, as you can see by default the “SAP Signature Theme” is shown in the SAP GUI Options.
Navigate to the Visual Design > Branding – Here the initial settings are read only as shown below.
To enable the branding and customize it as per the company
requirement, there are some prerequisite which needs to meet before we start
enabling the branding for SAP GUI.
Pre-requisite:
- SAP GUI branding can only be configured for SAP Signature theme and for the Corbu theme. No other theme can be configured for the branding.
- The size of the logo should be 27pixel : 160pixel (Height: Width)
Let’s enable now the branding, follow the below steps to configure & customize SAP GUI branding as per company requirement.
In the below configuration, I am using a custom logo created for this configuration,
Procedure:
- To enable the branding settings, we need to edit the registry settings and create two new entries as shown below,
Type “regedit” under the Start >Search and hit enter
A registry editor screen will open as shown below,
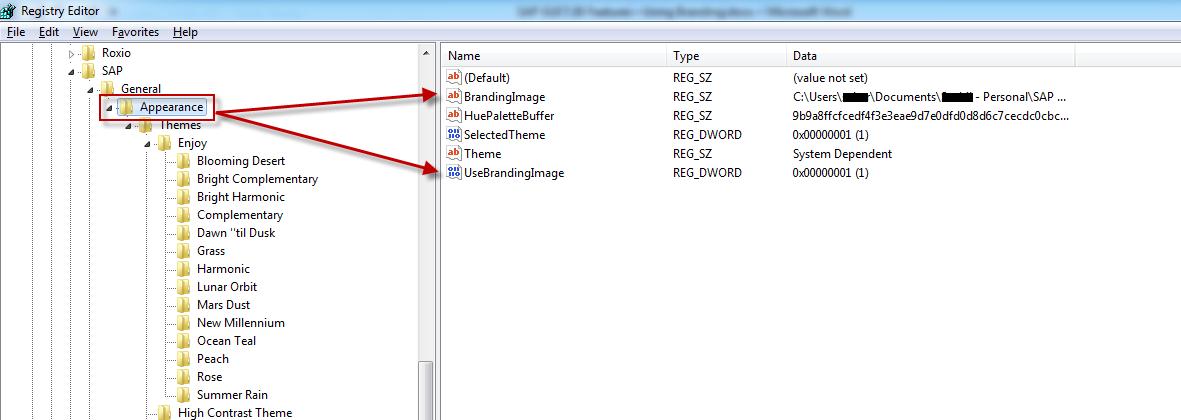
Navigate to, HKEY_LOCAL_MACHINE\SOFTWARE\Wow6432Node\SAP\General\Appearance
And create two entries as below,
A] UseBrandingImage – This registry key activates the display for logo in SAP GUI title bar.
B] BrandingImage – This is the actual path to the image.
| Name | Type | Value |
|---|
| UseBrandingImage | DWORD (32-bit) value | 1 |
| BrandingImage | REG_SZ | <Path to Image> |
For
UseBrandingImage,

By default the value will be (0), you need to modify the value by right clicking on the “UseBrandingImage” key and change the value to (1)
For BrandingImage,
By default the value will be null, you need to modify the value by right clicking on the “BrandingImage” key and change the value to the path for the image.
Finally the Registry edit screen will have two new entries as shown below,
This completes the branding customization in SAP GUI 7.30.
Output:
Open the SAPGUI Configuration wizard and navigate to, Visual Design > Branding
Now you can see the custom logo which we uploaded is shown under the Branding.
Now open SAP GUI and login to any one of the server. Here you can see the custom logo which we uploaded.
There is an option for user to select the logo image and activate/deactivate. To enable that feature we need to modify the Registry settings as shown below,
| Name | Type | Value/Data |
|---|
| UseBrandingImage_ReadOnly | DWORD (32-bit) value | 0 |
| BrandingImage_ReadOnly | DWORD (32-bit) value | 0 |
Change the value as shown above in the table and user will be able to modify the settings at runtime.

Output:

If a user changes the settings, the SAP GUI Options writes these values under HKEY_CURRENT_USER\Software\SAP\General\Appearance
“UseBrandingImage” (REG_DWORD)
“BrandingImage” (REG_SZ)
The HKEY_CURRENT_USER values have a higher priority than values under HKEY_LOCAL_MACHINE.


