
- SAP Community
- Products and Technology
- Additional Blogs by SAP
- Frequently Asked Questions in the SAP Support Port...
Additional Blogs by SAP
Turn on suggestions
Auto-suggest helps you quickly narrow down your search results by suggesting possible matches as you type.
Showing results for
Advisor
Options
- Subscribe to RSS Feed
- Mark as New
- Mark as Read
- Bookmark
- Subscribe
- Printer Friendly Page
- Report Inappropriate Content
06-22-2012
8:58 PM
It’s time for part 3 in the series of FAQ’s in the SAP Support Portal. As mentioned in my previous post, this blog will focus on the message creation process. Think of this as a step by step blog that covers some of the typical questions we hear about in support. So let the games begin!
It is important to note that in order to create a support message, you need to have the proper authorizations assigned to your S-user ID. If you find you don’t have the proper authorizations to log a support message, you will need to contact your companies super-administrator to request those authorizations be added to your profile. You can find out who your companies super-administrators are here.
The unique URL to access the message wizard is http://service.sap.com/message or you can get there by clicking Help & Support in the header, then the link Report a Product Error.
The first step in the message creation process is to select the installation and system (product landscape) that you have a query about. The installation generally refers to the main product brand classification, but can be adjusted and renamed to fit a project or specific deployment area. The system reflects your current product landscape including details such as product name, version, system type, operating system, and licenses deployed. For documentation on maintaining installation and system details, check out this guide.
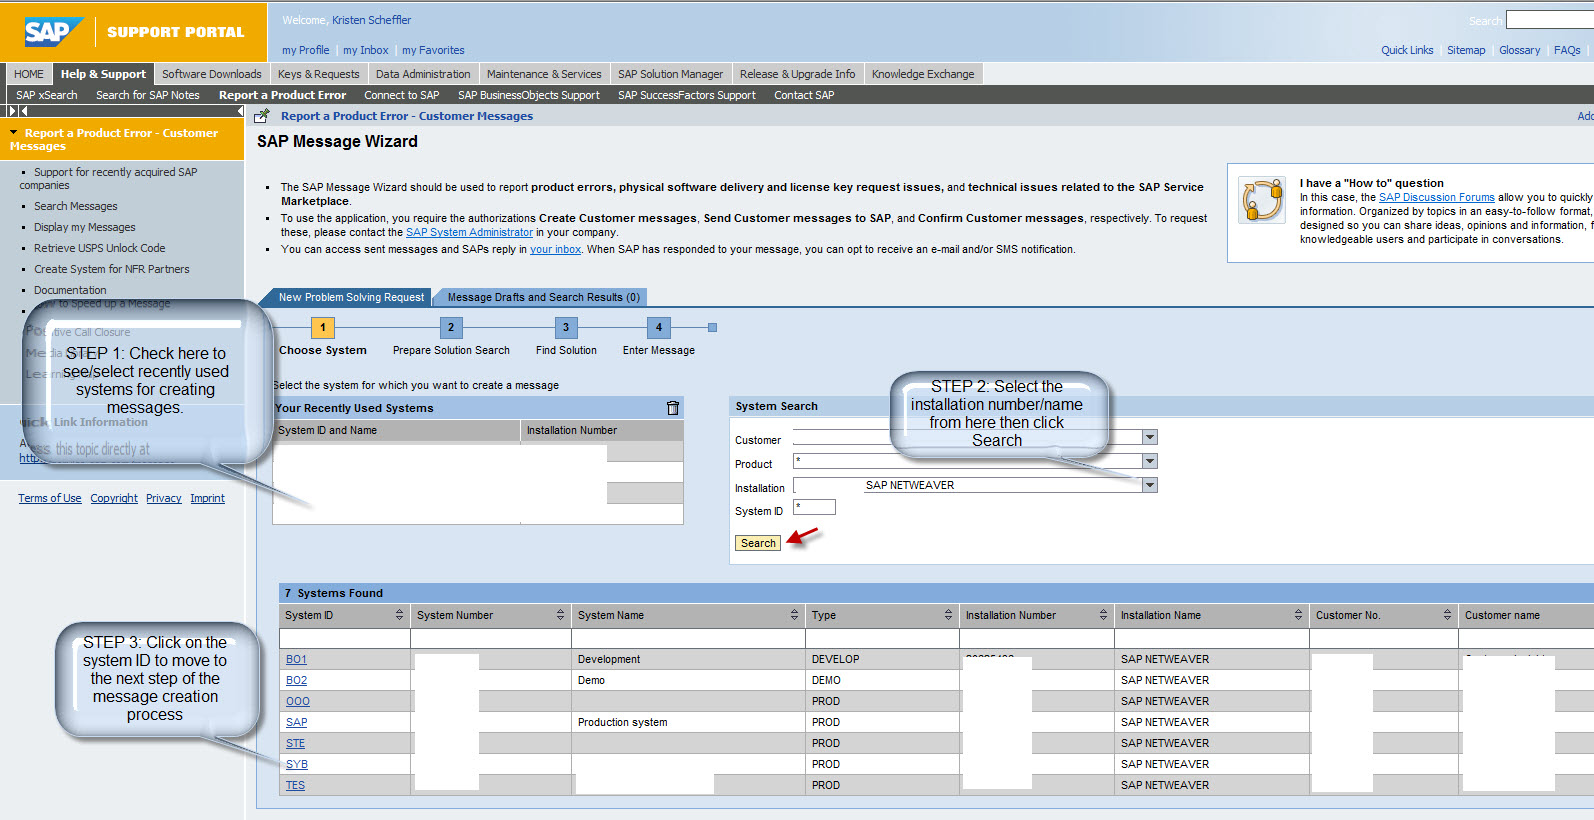
Good to note: Maintaining system data is important. By keeping your system data up to date, this allows for a quicker response in case of a product issue since all of your product landscape details are stored along with the message. Special authorizations are needed to be associated to your S-user ID. In case you are missing the necessary authorization, contact your companies super-administrator(s).
The next step to in the message creation process is to go through a search to see if there is a known solution to the issue. This is beneficial in a couple of ways. If there is a solution all ready documented, you can follow the steps in the note or Knowledge Base Article (KBA) to resolve the issue on your own. It also saves you time because if you can find the solution, you won’t have to log a support ticket.

Enter the search terms such as keywords, transaction you are calling, or the program name. You can specify the search against a specific component (support queue) as well. If you would like the search to come back with some of the words you have typed, change the Search Method under the Extended Search Options. Then click Continue. If you get too many results, you can modify your search criteria on the next screen. If you don’t find a solution, you can then click Create Message.

In the message creation screen, there are some mandatory selections. The first of which is choosing the component. The component is the support queue that your message is routed to. It is important to select the right component to allow your message to be handled in an expedited manner.

In the component window, you can select from the various components, or use the search field to enter the product name.

Choose the component by clicking it directly.
The component you choose will populate to the main message creation screen. The priority of the message defaults to medium, but you can change the priority.
GOOD TO KNOW: If you change the priority to high, you need to fill in the business impact section. If you change the priority to very high, business impact needs to be maintained AND you need to have an English speaking contact person available 24/7 to work with support.

The next two mandatory areas that you need to fill in are short and long text.
- The short text is a brief description of the issue.
- The long text allows you to specify the details of the issue, such as when the issue started, what root cause analysis took place, and potential changes that were made previous to the issue beginning.
The Steps to Reproduce section is not mandatory, but it does allow you to provide support with step-by-step instructions on how to reproduce the issue.
You can attach files to the support message. Click the browse button to search for the file on your computer, select it, then click Upload. You will want to enter a name for the file in the section that says Enter unique file description.
GOOD TO KNOW: There is a 4 MB file size limit on attachments. If you have a file larger than this, make note of that in the long text section, and the support consultant will provide you with an alternative.

If you have used any SAP notes to try and resolve the issue, you can enter the note numbers and select if it is still implemented or not.
The final section of the message creation process is the Contacts & Notifications area. The reporter refers to you. It is prefilled with your profile information that is stored within the SAP Support Portal. It is important to check and make sure the contact details are correct, as this is what support uses to get in touch with you to work on the issue. You can choose to be notified by email when the support message changes status.
GOOD TO KNOW: You can update your contact details at http://service.sap.com/myprofile
Once you have entered all of the information and you are ready to submit your message to support, click the Send Message button. This will send the message to support. If you click the Save Message, this will save the message as a draft in your inbox. You can then go in later to send it through, or delete it.
You can check on the status of your support messages by going to My Inbox located at the top of the page.

There are three tabs here.
- Inbox shows messages sent back to you by support. You will have received an email if you chose to receive notifications when the status of the message changed.
- Sent Items shows messages you have sent to support.
- Drafts show messages you have saved, but NOT sent to support.
For those of you who like the visuals, we do have a how-to video on creating a support message here:
I hope you found this useful! As always, please let me know your thoughts by leaving a comment below.
What should part 4 of the series focus on? Let me know!
Don't forget to follow my team on twitter @SAPSupportCE where we are always available to help answer your SAP Support questions.
Related Content
- SAP S4HANA Cloud Public Edition Logistics FAQ in Enterprise Resource Planning Blogs by SAP
- SAP Business Network for Logistics 2404 Release – What’s New? in Supply Chain Management Blogs by SAP
- Extend Your Crystal Reports Solutions in the DHTML Viewer With a Free Function Library in Technology Blogs by Members
- Consuming SAP with SAP Build Apps - Mobile Apps for iOS and Android in Technology Blogs by SAP
- How to use Digital Manufacturing MDOs within PPD Example: Where-Used Report with Follow-up Actions in Product Lifecycle Management Blogs by SAP