
- SAP Community
- Products and Technology
- Enterprise Resource Planning
- ERP Blogs by Members
- EPIC TUTORIAL (Part 2) - Mass load data to extensi...
Enterprise Resource Planning Blogs by Members
Gain new perspectives and knowledge about enterprise resource planning in blog posts from community members. Share your own comments and ERP insights today!
Turn on suggestions
Auto-suggest helps you quickly narrow down your search results by suggesting possible matches as you type.
Showing results for
Former Member
Options
- Subscribe to RSS Feed
- Mark as New
- Mark as Read
- Bookmark
- Subscribe
- Printer Friendly Page
- Report Inappropriate Content
05-27-2012
6:14 PM
This is a continuation of Part 1, here.
So far we have:
- Created a Global Solution in the FP3.5 Studio
- Enabled Key User
- Created an extension to the Customer BO and added some extension fields
- Created a new BO with Customer ID, and the extension fields to serve as a staging table
- Added an AfterModify script to the staging BO that will move the staged data to the Customer BO
- Created a XML File Upload Service Integration to load data to the staging BO, activated it, and downloaded the .xsd file that is generated upon activation
Let's finish this thing up!
Open up Excel and in your Developer tab click Source and add that .xsd file.

Now that you have the XML structure in place, you must, and I mean MUST, do two things.
The first is to drag the CreationDateTime element to the top of the Excel file as you see below. I don’t know why, but you’ve got to populate the date to look like this: 2012-05-25T12:00:00.000Z. Weird!

The second thing you MUST do is drag the entire List of your BO’s elements into the Excel sheet. Don’t ask me why. JUST DO IT, OK?

Now you can delete the columns no one cares about. (BTW, the default value for actionCode is Save, so that’s why you don’t need it in this case)

Now populate your spreadsheet with the stuff you intended to migrate during your implementation, but sadly forgot to.

In the Developer tab, export the XML to somewhere.

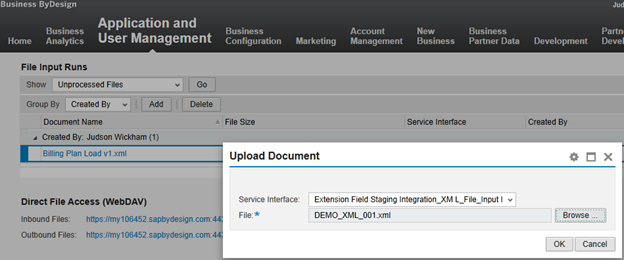
Then go to Application and User Management, and choose the File Input view. Select Unprocessed Files in the OWL. Upload that XML document and specify the Service Interface we tossed together earlier.
Next, create a Run for this Service Interface in the Active Runs OWL. Save it. Activate it. Close it. Schedule it to run immediately. Monitor the process and notice that it has completed successfully. Love it when that happens.

After all that, you need to enhance the Customer screen to show your extension fields.

Choose the item checked below. It's the standard ByD Account screen. Trust me on this one.

Select the Details pane, then add the extension fields!

Save and activate the UI. We’re almost done! After that, go into Account Management and select Edit > General for any of our staged customer.

WHOA! Look at the details pane! It’s got our fields, populated with the data we entered!

This is just one example of a post-implementation mass data load. There are possibilities for many more.
In order to see the results in reports, you would need to create a new Data Source on the Customer BO extension, then go into Business Analytics and join it to an Account Data Source. I may cover this in a follow-up post, but for now, rest assured your extension fields contain data.
Imagine creating extension fields as a Key User, then having to manually enter data into thousands of screens. I'm pretty sure the solution here is far superior.
Should you have questions or need help with with a similar situation, leave comments, email me at jwickham@bramasol.com and/or follow me on twitter @JudsonOnDemand.
Have a great long weekend!
- SAP Managed Tags:
- SAP Business ByDesign
13 Comments
You must be a registered user to add a comment. If you've already registered, sign in. Otherwise, register and sign in.
Labels in this area
-
"mm02"
1 -
A_PurchaseOrderItem additional fields
1 -
ABAP
1 -
ABAP Extensibility
1 -
ACCOSTRATE
1 -
ACDOCP
1 -
Adding your country in SPRO - Project Administration
1 -
Advance Return Management
1 -
AI and RPA in SAP Upgrades
1 -
Approval Workflows
1 -
ARM
1 -
ASN
1 -
Asset Management
1 -
Associations in CDS Views
1 -
auditlog
1 -
Authorization
1 -
Availability date
1 -
Azure Center for SAP Solutions
1 -
AzureSentinel
2 -
Bank
1 -
BAPI_SALESORDER_CREATEFROMDAT2
1 -
BRF+
1 -
BRFPLUS
1 -
Bundled Cloud Services
1 -
business participation
1 -
Business Processes
1 -
CAPM
1 -
Carbon
1 -
Cental Finance
1 -
CFIN
1 -
CFIN Document Splitting
1 -
Cloud ALM
1 -
Cloud Integration
1 -
condition contract management
1 -
Connection - The default connection string cannot be used.
1 -
Custom Table Creation
1 -
Customer Screen in Production Order
1 -
Data Quality Management
1 -
Date required
1 -
Decisions
1 -
desafios4hana
1 -
Developing with SAP Integration Suite
1 -
Direct Outbound Delivery
1 -
DMOVE2S4
1 -
EAM
1 -
EDI
2 -
EDI 850
1 -
EDI 856
1 -
EHS Product Structure
1 -
Emergency Access Management
1 -
Energy
1 -
EPC
1 -
Find
1 -
FINSSKF
1 -
Fiori
1 -
Flexible Workflow
1 -
Gas
1 -
Gen AI enabled SAP Upgrades
1 -
General
1 -
generate_xlsx_file
1 -
Getting Started
1 -
HomogeneousDMO
1 -
IDOC
2 -
Integration
1 -
Learning Content
2 -
LogicApps
2 -
low touchproject
1 -
Maintenance
1 -
management
1 -
Material creation
1 -
Material Management
1 -
MD04
1 -
MD61
1 -
methodology
1 -
Microsoft
2 -
MicrosoftSentinel
2 -
Migration
1 -
MRP
1 -
MS Teams
2 -
MT940
1 -
Newcomer
1 -
Notifications
1 -
Oil
1 -
open connectors
1 -
Order Change Log
1 -
ORDERS
2 -
OSS Note 390635
1 -
outbound delivery
1 -
outsourcing
1 -
PCE
1 -
Permit to Work
1 -
PIR Consumption Mode
1 -
PIR's
1 -
PIRs
1 -
PIRs Consumption
1 -
PIRs Reduction
1 -
Plan Independent Requirement
1 -
Premium Plus
1 -
pricing
1 -
Primavera P6
1 -
Process Excellence
1 -
Process Management
1 -
Process Order Change Log
1 -
Process purchase requisitions
1 -
Product Information
1 -
Production Order Change Log
1 -
Purchase requisition
1 -
Purchasing Lead Time
1 -
Redwood for SAP Job execution Setup
1 -
RISE with SAP
1 -
RisewithSAP
1 -
Rizing
1 -
S4 Cost Center Planning
1 -
S4 HANA
1 -
S4HANA
3 -
Sales and Distribution
1 -
Sales Commission
1 -
sales order
1 -
SAP
2 -
SAP Best Practices
1 -
SAP Build
1 -
SAP Build apps
1 -
SAP Cloud ALM
1 -
SAP Data Quality Management
1 -
SAP Maintenance resource scheduling
2 -
SAP Note 390635
1 -
SAP S4HANA
2 -
SAP S4HANA Cloud private edition
1 -
SAP Upgrade Automation
1 -
SAP WCM
1 -
SAP Work Clearance Management
1 -
Schedule Agreement
1 -
SDM
1 -
security
2 -
Settlement Management
1 -
soar
2 -
SSIS
1 -
SU01
1 -
SUM2.0SP17
1 -
SUMDMO
1 -
Teams
2 -
User Administration
1 -
User Participation
1 -
Utilities
1 -
va01
1 -
vendor
1 -
vl01n
1 -
vl02n
1 -
WCM
1 -
X12 850
1 -
xlsx_file_abap
1 -
YTD|MTD|QTD in CDs views using Date Function
1
- « Previous
- Next »
Related Content
- Building Low Code Extensions with Key User Extensibility in SAP S/4HANA and SAP Build in Enterprise Resource Planning Blogs by SAP
- Natural language queries to SAP S/4HANA - Generative AI extension on SAP BTP in Enterprise Resource Planning Blogs by SAP
- Creating my own S4HANA ABAP Cloud Environment (Eclipse) for sandbox and for sap.learning courses in Enterprise Resource Planning Q&A
- ABAP Platform for SAP S/4HANA 2023 in Enterprise Resource Planning Blogs by SAP
- Using extension fields in migration objects (Customer Open Items) in SAP S/4HANA On premise in Enterprise Resource Planning Blogs by Members
Top kudoed authors
| User | Count |
|---|---|
| 2 | |
| 2 | |
| 2 | |
| 2 | |
| 2 | |
| 1 | |
| 1 | |
| 1 | |
| 1 | |
| 1 |