
- SAP Community
- Groups
- Interest Groups
- Application Development
- Blog Posts
- Web Services in Adobeforms
Application Development Blog Posts
Learn and share on deeper, cross technology development topics such as integration and connectivity, automation, cloud extensibility, developing at scale, and security.
Turn on suggestions
Auto-suggest helps you quickly narrow down your search results by suggesting possible matches as you type.
Showing results for
Former Member
Options
- Subscribe to RSS Feed
- Mark as New
- Mark as Read
- Bookmark
- Subscribe
- Printer Friendly Page
- Report Inappropriate Content
04-30-2012
9:38 AM
Web Services
Web Services are standalone, executable entities that can be published and called across a network. Web Services are based on open, generally accepted standards. Using Web services enables you to combine functions implemented on different software components into a single process. The Web service can be used across the Internet through standard protocols and can easily be integrated in any development framework.
Web Services communicate with Adobe document services via Simple Object Access Protocol (or SOAP, an XML standard), using the http protocol. A web service has a list of methods and procedures that can be used by any of the applications irrespective of the programming languages, Operating System, and hardware architecture. The functionality provided by the web service can be accessed by any type of applications and such functionality is called Web Methods or Web APIs. Once the web service is deployed on the Internet it can be used by any of the clients using HTTP and XML. Thus the web service allows the communication via internet standards XML and HTTP.
Scenario for using Web Services in Adobe Forms: Get details of an employee on giving the personal no:
Consider an interactive scenario where the user requires some information regarding an employee whose Personal No: is known. For this we use the Web Services to fetch the details.
In order to create Web Services for the above requirement, we need a Remote Enabled Function Module which does the fetching process.
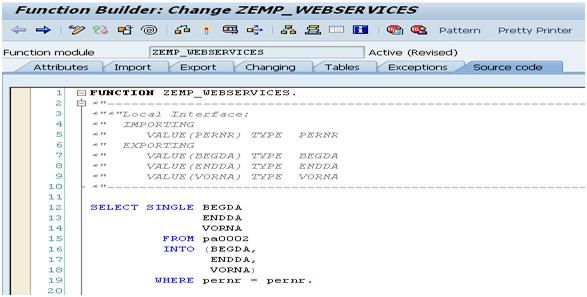
Step1 : Create the Function Module to fetch the required data.
The below shown fig is the screen shot of the said function module with remote enabled:

Step (a): Give the Import parameter ‘PERNR’

Step(b) : Provide the required export parameters

Step(c): The code to fetch the required data corresponding to the input.
Step 2 : Create Web Services for the above Function Module.
In order to create the Web Services from the Function Module, navigate through Utilities -> More Utilities -> Create Web Services -> From the Function Module or From the Function Group (as can be seen in the below picture). If the Web Services are created using From Function Group, the function group must contain at least one RFC-enabled function module.

Step 1 : Object type
As seen in the screen-shot, provide the name and short description for the Web Services and choose the end-point type. The End-point types are listed below:
· BAPI
· Function Group
· Function Module
· Message Interface

Step 2 : Choose End Point
If the checkbox Mapping der Namen (Name Mapping) is marked, the wizard accepts the existing descriptions for the end point elements. Initial letters are in uppercase and underscores are removed. If this is not required, create the service definition using the names in the end point.

Step 3 : Choose Operations
For BAPIs and function groups, choose the operations for which the Web service is to be created.
Step 4 : Configure Service
The features that can be assigned here to the Web service relate to questions of security of data transfer and the type of communication.
Choose a predefined feature set from the profiles available.

Step 4 : Enter package/Request

Step 5 : End
The service definition is created.

Thus the service definition has been created and released for the SOAP runtime.
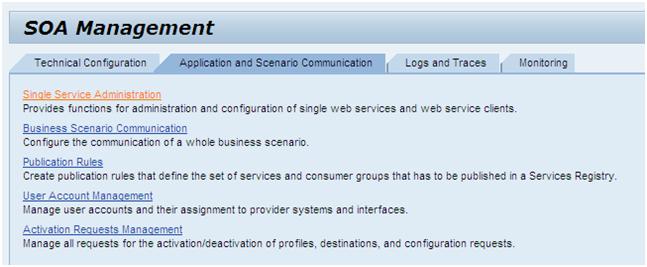
SOA Management
SOA management allows configuring groups of Web service clients, deployed on the local client system. You can configure the Web service clients in composite applications by editing the Service Groups in these composite applications.
Now, on executing the transaction code SOAMANAGER, you will be directed to a web browser which is as shown below.

Step 1 : In the tab Application and Scenario Communication , select the option(Single Service Administration) to configure single web service. The screen is as shown below:
Single Service Administration
Single Service Administration allows to configure individual Web services and Web service clients by applying runtime settings to them. You can also view the available Web services and Web service clients, as well as review the log and trace information for calls to or from Web service clients.
Step 2 : A window will be opened with the option to search by Service, the Web service name. Provide our web service name (i.e) in the field for Search Pattern and the following result relating to the web service is displayed. After selecting our Web Service, Click on the button Apply Selection.

Step 3 : A new area in the window is displayed with the details of Service Definition of the Web Service. Under the tab Overview, Select the link (Open WSDL document for selected binding).

Step 4 : On clicking the said link a new window opens which has the generated WSDL. Copy the URL of this new window.

Step 5 : Create an empty interface for the Adobe Form and activate it.
Step 6 : Create an Adobe Form and Select the option ‘New Data Connection’ (Layout -> Edit -> New Data Connection)(as Shown below)

Step 7: A new window pop-up appears like shown below: Give the Connection Name and select the option WSDL File to include our WSDL link we created during the configuration of Web Services using SOA Management.

Step 8: In the next screen, system gives an option to enter WSDL file. Either the URL or the WSDL file saved on the system. Since we have the URL, we shall give the URL directly in the field provided for WSDL File.

Step 9 : Next screen list out the Operation to be performed. In the right part of the below screen is the details of web services we created. It indicates the URL we submitted is correct. Otherwise , the user gets the message like ‘No SOAP binding is found ’ etc……

After finishing this data connection addition, under the Data View tab(as shown below), we can see the Data Connection details like
- ZempWebservices Request
- ZempWebservices Response
- ZempWebservicesBtn
This means the web service is added to the form.

Step 10 : In layout to create a new button and rename it and change its control type to Execute


Step 11: Add the fields ‘Pernr’ , ‘Begda’, ‘Endda’ and ‘Vorna to the layout

Step 12 : Rename the field names

Step 13 : Save and Activate the form.
Step 14 : Create a print program for the form.
DATA: ie_outputparams
TYPE sfpoutputparams.
DATA: i_name TYPE fpname,
i_funcname TYPE funcname.
DATA: fp_docparams TYPE sfpdocparams.
DATA: fp_formoutput TYPE fpformoutput.
DATA: data_tab TYPE solix_tab.
DATA: filename TYPE string,
path TYPE string,
fullpath TYPE string,
d_extn TYPE string VALUE 'PDF'. " Extn of the filename
ie_outputparams-getpdf = 'X'.
ie_outputparams-nodialog = 'X'. " suppress dialog popup
CALL FUNCTION 'FP_JOB_OPEN'
CHANGING
ie_outputparams = ie_outputparams.
TRY.
i_name = 'ZEMP_ADOBEFORMS'. " Form Name
CALL FUNCTION 'FP_FUNCTION_MODULE_NAME'
EXPORTING
i_name = i_name
IMPORTING
e_funcname = i_funcname.
CATCH cx_fp_api_repository.
CATCH cx_fp_api_usage.
CATCH cx_fp_api_internal.ENDTRY.
fp_docparams-langu = 'E'.
fp_docparams-country = 'US'.
fp_docparams-fillable = 'X'.
CALL FUNCTION i_funcname
EXPORTING
/1bcdwb/docparams = fp_docparams
IMPORTING
/1bcdwb/formoutput = fp_formoutput
EXCEPTIONS
usage_error = 1
system_error = 2
internal_error = 3.
CALL FUNCTION 'FP_JOB_CLOSE'
EXCEPTIONS
usage_error = 1
system_error = 2
internal_error = 3
OTHERS = 4.
CALL METHOD cl_gui_frontend_services=>file_save_dialog
EXPORTING
* window_title =
default_extension = d_extn
* default_file_name =
* with_encoding =
* file_filter =
* initial_directory =
* prompt_on_overwrite = 'X'
CHANGING
filename = filename
path = path
fullpath = fullpath
* user_action =
* file_encoding =
* EXCEPTIONS
* cntl_error = 1
* error_no_gui = 2
* not_supported_by_gui = 3
* others = 4
.
IF sy-subrc <> 0.
* MESSAGE ID SY-MSGID TYPE SY-MSGTY NUMBER SY-MSGNO*
WITH SY-MSGV1 SY-MSGV2 SY-MSGV3 SY-MSGV4.ENDIF.
CHECK fullpath IS NOT INITIAL.
CALL FUNCTION 'SCMS_XSTRING_TO_BINARY'
EXPORTING
buffer = fp_formoutput-pdf
TABLES
binary_tab = data_tab.
CALL METHOD cl_gui_frontend_services=>gui_download
EXPORTING* bin_filesize =
filename = filename
filetype = 'BIN'* IMPORTING* filelength =
changing
data_tab = data_tab.
CALL METHOD cl_gui_frontend_services=>execute
EXPORTING
document = filename
.
Run the print program and then save the pdf form in any drive or desktop, then open the form using the Adobe Reader (7.0 or above).
And it will look like this:

Give the employee id and Press ‘Details’ button. It will ask for the user id password details of the server to access the data to be fetched. Provide the server User id , password and it will give the output result as shown below:

Thus the Web Services in Adobe forms
- SAP Managed Tags:
- ABAP Development
You must be a registered user to add a comment. If you've already registered, sign in. Otherwise, register and sign in.
Labels in this area
-
A Dynamic Memory Allocation Tool
1 -
ABAP
8 -
abap cds
1 -
ABAP CDS Views
14 -
ABAP class
1 -
ABAP Cloud
1 -
ABAP Development
4 -
ABAP in Eclipse
1 -
ABAP Keyword Documentation
2 -
ABAP OOABAP
2 -
ABAP Programming
1 -
abap technical
1 -
ABAP test cockpit
7 -
ABAP test cokpit
1 -
ADT
1 -
Advanced Event Mesh
1 -
AEM
1 -
AI
1 -
API and Integration
1 -
APIs
8 -
APIs ABAP
1 -
App Dev and Integration
1 -
Application Development
2 -
application job
1 -
archivelinks
1 -
Automation
4 -
BTP
1 -
CAP
1 -
CAPM
1 -
Career Development
3 -
CL_GUI_FRONTEND_SERVICES
1 -
CL_SALV_TABLE
1 -
Cloud Extensibility
8 -
Cloud Native
7 -
Cloud Platform Integration
1 -
CloudEvents
2 -
CMIS
1 -
Connection
1 -
container
1 -
Debugging
2 -
Developer extensibility
1 -
Developing at Scale
4 -
DMS
1 -
dynamic logpoints
1 -
Eclipse ADT ABAP Development Tools
1 -
EDA
1 -
Event Mesh
1 -
Expert
1 -
Field Symbols in ABAP
1 -
Fiori
1 -
Fiori App Extension
1 -
Forms & Templates
1 -
General
1 -
Getting Started
1 -
IBM watsonx
1 -
Integration & Connectivity
10 -
Introduction
1 -
JavaScripts used by Adobe Forms
1 -
joule
1 -
NodeJS
1 -
ODATA
3 -
OOABAP
3 -
Outbound queue
1 -
Product Updates
1 -
Programming Models
13 -
Restful webservices Using POST MAN
1 -
RFC
1 -
RFFOEDI1
1 -
SAP BAS
1 -
SAP BTP
1 -
SAP Build
1 -
SAP Build apps
1 -
SAP Build CodeJam
1 -
SAP CodeTalk
1 -
SAP Odata
1 -
SAP UI5
1 -
SAP UI5 Custom Library
1 -
SAPEnhancements
1 -
SapMachine
1 -
security
3 -
text editor
1 -
Tools
17 -
User Experience
5
Top kudoed authors
| User | Count |
|---|---|
| 5 | |
| 3 | |
| 2 | |
| 2 | |
| 2 | |
| 2 | |
| 2 | |
| 1 | |
| 1 |