Summary
This article explains how we can make use of MS Excel Inplace functionality in the SAP ALV toolbar with macro recording to avoid repetitive tasks such as adding custom calculation field in the standard /Custom/ Query reports (e.g. Order Qty- Delivery Qty, Pivot Table chart etc)
Introduction
It is quite often that we have downloaded the standard/custom SAP ALV report as Excel document to the front-end computer and added some calculation fields, converting to pivot table etc. These repetitive tasks in Excel can be recorded as an Excel macro and we can upload this excel layout containing macro to SAP as a new ALV layout, so that, when you run the report/selecting the layout, immediately the output will be displayed as Excel with the repetitive task automatically executed. With this we can avoid building of Custom fields (derived fields) in standard / Custom / Query report and save lot of time.
General Settings to enable macro in Excel 2007
When we run the Excel in place functionality in the SAP ALV, by default, the data will not get automatically transferred to Excel. For that we have to do some macro security settings. Following screen shots explains how to enable a macro in excel 2007. After activating this we have to close Excel and run Excel in place functionality once again. Then the data can be seen in Excel. Excel In place will also work in MSExcel 2010 and MSExcel 2003 with Latest GUI (7.20 advisable) + patches installed at frond end computer
Step 1: Select Excel options
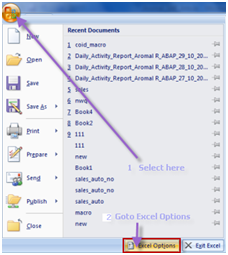
Step 2: Go to Trust center settings

Step3: Go to Macro Settings and select details as per following screen shot.

Addition of a custom field in ALV report using Excel Inplace and Macro
E.g. Adding Rejection% column in standard report (E.g. t-code COID)
In the standard report transaction COID we want to add a Rejection % column. Either we can do it by ABAP code or download the report to excel and do a formula calculation. But there is an easier method than writing code in Enhancement spot/Exits/download to achieve this. Following screen shots explain step by step methods to run a macro along Excel in place functionality.
Step 1: Select Excel in place functionality in the ALV.

Normally in standard /custom report we can also see Excel Inplace functionality like this.

Step 2: After seeing the data in Excel go to RawData tab

Step 3: Now go to view tab and select Record Macro.

Step 4: Give the name for the macro and assign a shortcut key (Ctrl + Shift + L)

Step 5: Write the formula in the cell as shown. Also leave one cell for heading. (It is better to put the Heading after the formula calculation otherwise we have to re-adjust the macro code)
. Eg (ROUND(h2/e2*100,2) which will give you rejection percentage rounded upto 2 decimal place
![]()
Step 6: Double click/drag outside cell selection, so that this makes the formula applicable for the entire column.

Step 7: After formula, enter the heading for the column (eg. Rejection %)

Step 8: Apply borders for the column if needed and do necessary formatting

Step 9: Stop recording the macro as shown below. Now the tasks that we have done from step 5 to step 8 has been recorded as macro named RejectionPer (see Step 4).

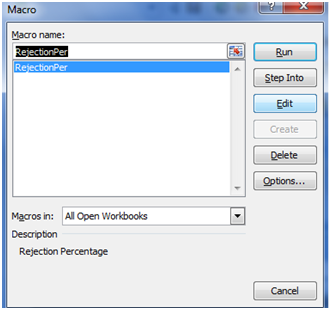
Step 10: Now you can see the recorded macro in View Macros.

Step 11: Save the Excel in the front end computer


Step 12: Now select change layout to upload the excel macro (alv_macro_eample.xls) in front end machine to SAP .

Step 13: Now go to the view tab and select Microsoft Excel and use Upload to BDS option

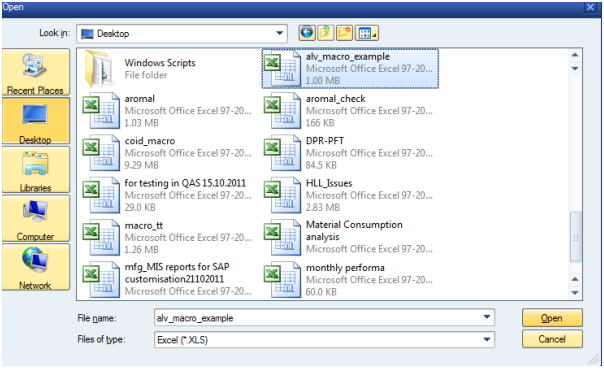
Step 14: Select the excel file we saved in the desktop and upload
Step 15: Save this layout by selecting the template we have just uploaded.


Step 16. Now go out of the report and run the report and select the layout we have saved.


Step 17: You can run the macro by pressing the shortcut Ctrl+Shift+L(we assigned it in Step 4) or go to view tab and run the macro manually.


Step 18: We can see the output now as below

We can automatically run the macro when we select the Raw Data tab in the Excel .For this, Edit the macro and put below piece of code in ThisWorkbook ->Workbook->SheetActivate method (as shown below).
If Sh.Name = "RawData" Then
Module1.RejectionPer
End If


Summary
All the above tasks we can easily do within couple of minutes. If we consider enhancing the standard report and transporting it through the landscapes to PRD or downloading it to excel and do the activities, this functionality saves a lot of time for the consultants/Users.
Try to record some Pivot table with charts and start exploring.
