
- SAP Community
- Products and Technology
- Additional Blogs by Members
- SAP PI/XI: Archiving solution for target files acr...
Additional Blogs by Members
Turn on suggestions
Auto-suggest helps you quickly narrow down your search results by suggesting possible matches as you type.
Showing results for
Former Member
Options
- Subscribe to RSS Feed
- Mark as New
- Mark as Read
- Bookmark
- Subscribe
- Printer Friendly Page
- Report Inappropriate Content
04-20-2012
2:36 AM
Introduction
File adapter is one of the most commonly used adapters in SAP PI. There are often real business scenarios where SAP PI is used to integrate different legacy systems which can support only file as an integration medium. The files which are meant to be sent to the 3rd party legacy system are generated by the standard built in file adapter.
The Requirement
However in such scenarios as explained above, there is often a requirement to archive these files which are generated by SAP PI. This could be because of various reasons e.g. SAP systems need to retain a copy of data (files) which are being sent to other systems for audit reasons etc.
The challenges in doing so are the following,
- The standard file receiver adapter doesn’t have any feature of archiving the generated target files.
- As a temporary solution this requirement is often met by developing operating system specific scripts e.g. shell scripts– But there is never a generic solution. Moreover finding such rare skills like writing scripts for operating system like OS400 is a challenge on its own.
The Solution
One of the solutions to solve this problem would be to create generic solution which can work across multiple platforms. The salient features of the solution are as follows,
- Java based solution – So the single solution can work across all OS platforms where SAP PI runs.
- Configurable – This solution is highly parameterized so that it is flexible enough to cater to different kind of requirements.
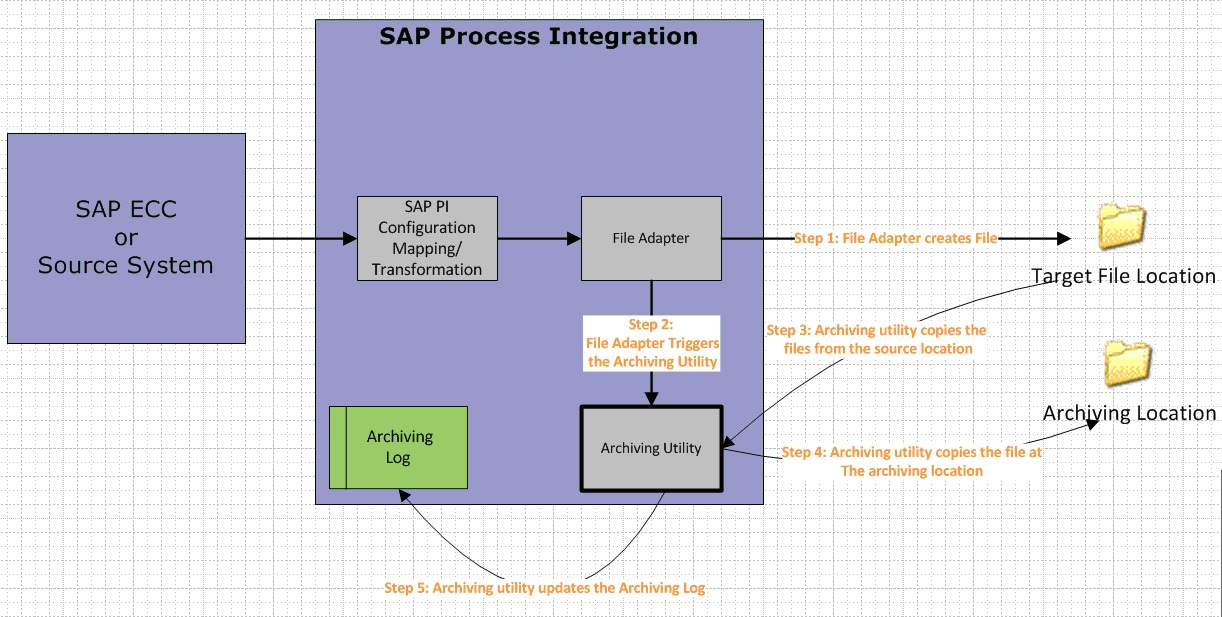
The solution works as follows,
- The standard file adapter writes the file to the “Target folder”.
- The file adapter simultaneously triggers the “Archiving Utility”.
- The Archiving utility reads the file from “Target folder”.
- The Archiving utility then copies the files into the corresponding “Archive directory” instantaneously by adding the timestamp.
- The Archiving utility also updates the archiving log. All the operations which the utility does can be traced from this log.
Implementation Guide:
The Archiving utility is used by the receiver file adapter. This would make sure that a copy of the file is created in the Archive Folder.
In order to use the archiving utility, the following are the steps you need to follow.
Before we start:
As highlighted we would be dealing with two folder or directories.
Target Directory: This is the directory where the file is created by the standard file receiver adapter.
Archive Directory: This is the directory location where the file would be copied by the “Archiving Utility”.
Example:
Target Directory: /usr/sap/PX6/Interfaces/outbound/OBGL/Target
Archive Directory: /usr/sap/PX6/Interfaces/outbound/OBGL/Archive
Configuration Steps
Step 1
Go to the Receiver File Communication Channel for the scenario where you want to use the Archiving Utility.

Step 2
Fill in the following details,
- Target Directory: The folder/directory where the output file is generated by the standard SAP PI file receiver channel.
- File Name Scheme: The file name is entered as required. Archiving is not dependent on this.
In our example:
Target Directory: /usr/sap/PX6/Interfaces/outbound/OBGL/Target
File Name Scheme: OutputFile.csv
Step 3
Fill in the following details,

Run Operating System Command after message processing
Command Line:
/usr/sap/PX6/DVEBMGS30/exe/sapjvm_5/bin/java
-classpath /usr/sap/PX6/Interfaces/JavaArchiveUtitlity
-jar /usr/sap/PX6/Interfaces/JavaArchiveUtitlity/StandAloneArchiving.jar
%F %ArchiveFileLocation
Timeout (secs): 100
Explanation of the Command Line Argument
The above configuration is to run the “Archiving Utility” from the command line. The command to trigger any java jar application is as follows,
$> java - classpath [ class path ] – jar [ location of the java executable jar] [argument 1] [argument 2]
So using this understanding let’s analyze the above argument,
Location of the Java = /usr/sap/PX6/DVEBMGS30/exe/sapjvm_5/bin/java
[ class path ] = /usr/sap/PX6/Interfaces/JavaArchiveUtitlity
[ location of the java executable jar] =
/usr/sap/PX6/Interfaces/JavaArchiveUtitlity/StandAloneArchiving.jar
[argument 1] = %F
‘%F’ refers to the folder location where the file is being written by the file adapter
( Reference : See the Run Operating System Command Before/After Message Processing section)
[argument 2] = %ArchiveFileLocation
Variable substitution parameter refering to folder where the file needs to be archived. This can be filled dynamically.
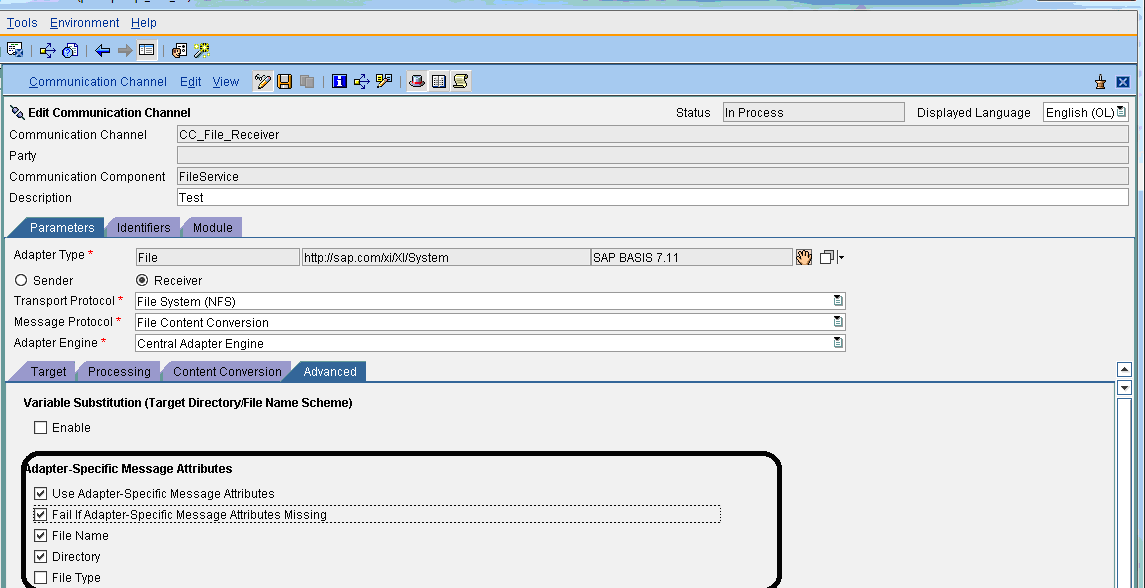
Step 4
Also enable the following parameters in the “Advanced” section,
- Use Adapter-Specific Message Attributes
- Fail If Adapter-Specific Message Attributes Missing
- Directory
Archiving Utility Log
In order to see the log created by the Archiving Utility, you have to go to the path:
Directory: /usr/sap/PX6/Interfaces/JavaArchiveUtitlity
Name: ArchivingTraceFile.trc
The same file can also be seen through AL11 when mapped. The file contain the details about
- Time stamp when the file is copied
- Status of the operation
- Source file name
- Archived file name(with timestamp)

Source Code:
How the archiving tool logic works? It’s simple.
- - The archiving tool takes two argument,
- Target folder location(source) where the file is created by the file adapter
- The archiving folder location(target)
- - The tool reads into the source directory and reads all the files.
- - Then its copies the file into the target archive directory.
The source code to archive the files is as follows,
package com.sap.sudip.archiving;
import java.io.BufferedWriter;
import java.io.File;
import java.io.FileWriter;
import java.io.IOException;
import java.text.DateFormat;
import java.text.SimpleDateFormat;
import java.util.Date;
public class ArchivingTool
{
static FileWriter fstream;
static BufferedWriter out;
static
{
try
{
fstream = new FileWriter("ArchivingTraceFile.trc", true);
out = new BufferedWriter(fstream);
}
catch (IOException e) {
e.printStackTrace();
}
}
public static void main(String[] args)
{
String strSourceDirectory = args[0];
String strAchiveDirectory = args[1];
File dir = new File(strSourceDirectory);
String[] children = dir.list();
try {
out.write("Source Directory" + children.length);
}
catch (IOException e1) {
e1.printStackTrace();
}
if (children != null)
{
for (int i = 0; i < children.length; i++)
{
String strFilename = children[i];
String[] filenameparts = strFilename.split("\\.");
String strArchiveFileName = null;
String strDateTime = getDateTime();
String strTimeStamp = getTimeStampFromDate(strDateTime);
if (filenameparts.length > 1)
strArchiveFileName = filenameparts[0] + strTimeStamp +
"." + filenameparts[1];
else {
strArchiveFileName = strFilename + strTimeStamp;
}
if (CopyFile.copyfile(strSourceDirectory + "//" + strFilename,
strReadyDirectory + "//" + strFilename, false)) {
try
{
out.write(strDateTime + " : SUCCESS : File copied :" +
strReadyDirectory + "//" +
strFilename + " from " +
strSourceDirectory + "//" + strFilename +
"\n");
}
catch (IOException e) {
e.printStackTrace();
}
}
if (!CopyFile.copyfile(strSourceDirectory + "//" + strFilename,
strAchiveDirectory + "//" + strArchiveFileName, true))
continue;
try {
out.write(strDateTime + " : SUCCESS : File copied :" +
strAchiveDirectory + "//" +
strArchiveFileName + " from " +
strSourceDirectory + "//" + strFilename +
"\n");
}
catch (IOException e) {
e.printStackTrace();
}
}
}
try
{
out.close();
} catch (IOException e) {
e.printStackTrace();
}
}
private static String getDateTime()
{
DateFormat dateFormat = new SimpleDateFormat("yyyy/MM/dd HH:mm:ss");
Date date = new Date();
return dateFormat.format(date);
}
private static String getTimeStampFromDate(String strDate) {
strDate = strDate.replace(":", "");
strDate = strDate.replace("/", "");
strDate = strDate.replace(" ", "");
return strDate;
}
}
2 Comments
Related Content
- IoT - Ultimate Data Cyber Security - with Enterprise Blockchain and SAP BTP 🚀 in Technology Blogs by Members
- “Mind the Gap” – Improves ROI, Cost & Margin by Merging Planning Processes in Supply Chain Management Blogs by SAP
- Introducing the market standard of electronic invoicing for the United States in Enterprise Resource Planning Blogs by SAP
- Solution for Rubik’s Cube of E-Invoicing in SAP Document and Reporting Compliance in Technology Blogs by Members
- New Installation of SAP S/4HANA 2023 FPS1 – Part 2 – Installation in Enterprise Resource Planning Blogs by SAP