- SAP Community
- Groups
- Interest Groups
- Application Development
- Blog Posts
- Configuring Customized Material Master - Adding su...
- Subscribe to RSS Feed
- Mark as New
- Mark as Read
- Bookmark
- Subscribe
- Printer Friendly Page
- Report Inappropriate Content
Recently, I have done some development by adding custom screen in material master along with table control in order to create the document data along with the option to create classification data. The standard functionality is already available in ‘Document’ tab in ‘Additional Data’ section. But the requirement is, in the custom screen we should provide the standard functionality along with classification data. Here there will be an option to enter the classification data in the input field of table control and avoid going to the classification data screen for each entry.
There were no screen exists or BADI to achieve the above functionality. I was able to achieve the same requirement from configuration SPRO (Configuring Customized Material Master).
I would like to share the steps needs to be done to add the custom sub screen to the material master.
The below are the steps needs to implement in SPRO to add the additional TAB in Additional Data in MM01. And also by following the below steps, we can add the tab with sub screen in MM01 as view.
- Go to below path from SPRO
SAP Customizing implementation guide -> logistics general -> material master ->
Configuring the material master -> Create program for customized sub screens

Enter the Z function group and click on ‘Save’.

2. Now go to below path to define the structure:
SAP Customizing implementation guide -> logistics general -> material master ->
Configuring the material master -> Define structure of data screens for each screen sequence.

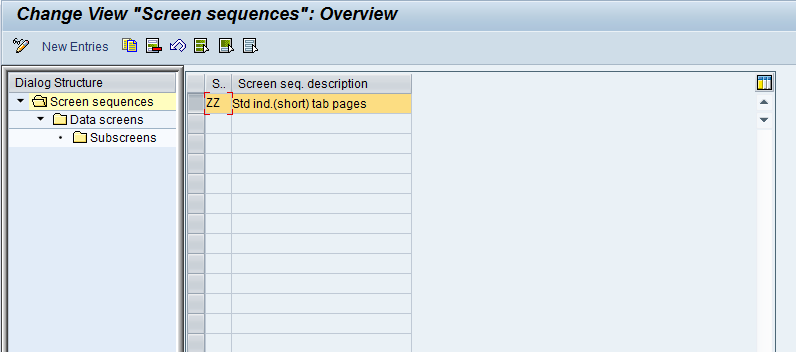
Create the ‘ZZ’ sequence by copying ’21’ standard sequence and click on Save.


Now select the Z sequence, click on ‘Data Screens’ and here add the
new data screen information. Here we will have the list of standard views
and will add the new data screen at last.


Now click on ‘Sub screens’ and give the Z program name of created function
group along with screen number.

3. Now go to below path to assign the secondary screens
SAP Customizing implementation guide -> logistics general -> material master ->
Configuring the material master -> Assign secondary screens

Select the created screen and click on additional to mention that the screen should
be displayed in Additional Data. Here if we don’t create ‘Additional Data’ then the
TAB will be added as main view in material master.


4. Now go to below path to maintain the order of screen sequences:
SAP Customizing implementation guide -> logistics general -> material master ->
Configuring the material master -> Maintain order of Main and Additional Screens

Select the Z sequence and double click:

If needed, we can change the screen sequences:

5. Now go to below path to assign the screen sequences:
SAP Customizing implementation guide -> logistics general -> material master ->
Configuring the material master ->
Assign screen sequences to User/Material Type /Transaction/Industry Sector.
Here assign the created Z sequence by replacing ‘21’ sequence.

Now go to MM01/MM02/MM03 and Click on 'Additional Data'.
We can see the new TAB created.

Now in order to add the table control or any other screen elements,
we can go to the created function group and do the required changes.
- SAP Managed Tags:
- ABAP Development
You must be a registered user to add a comment. If you've already registered, sign in. Otherwise, register and sign in.
-
A Dynamic Memory Allocation Tool
1 -
ABAP
8 -
abap cds
1 -
ABAP CDS Views
14 -
ABAP class
1 -
ABAP Cloud
1 -
ABAP Development
4 -
ABAP in Eclipse
1 -
ABAP Keyword Documentation
2 -
ABAP OOABAP
2 -
ABAP Programming
1 -
abap technical
1 -
ABAP test cockpit
7 -
ABAP test cokpit
1 -
ADT
1 -
Advanced Event Mesh
1 -
AEM
1 -
AI
1 -
API and Integration
1 -
APIs
8 -
APIs ABAP
1 -
App Dev and Integration
1 -
Application Development
2 -
application job
1 -
archivelinks
1 -
Automation
4 -
BTP
1 -
CAP
1 -
CAPM
1 -
Career Development
3 -
CL_GUI_FRONTEND_SERVICES
1 -
CL_SALV_TABLE
1 -
Cloud Extensibility
8 -
Cloud Native
7 -
Cloud Platform Integration
1 -
CloudEvents
2 -
CMIS
1 -
Connection
1 -
container
1 -
Debugging
2 -
Developer extensibility
1 -
Developing at Scale
4 -
DMS
1 -
dynamic logpoints
1 -
Eclipse ADT ABAP Development Tools
1 -
EDA
1 -
Event Mesh
1 -
Expert
1 -
Field Symbols in ABAP
1 -
Fiori
1 -
Fiori App Extension
1 -
Forms & Templates
1 -
General
1 -
Getting Started
1 -
IBM watsonx
1 -
Integration & Connectivity
10 -
Introduction
1 -
JavaScripts used by Adobe Forms
1 -
joule
1 -
NodeJS
1 -
ODATA
3 -
OOABAP
3 -
Outbound queue
1 -
Product Updates
1 -
Programming Models
13 -
Restful webservices Using POST MAN
1 -
RFC
1 -
RFFOEDI1
1 -
SAP BAS
1 -
SAP BTP
1 -
SAP Build
1 -
SAP Build apps
1 -
SAP Build CodeJam
1 -
SAP CodeTalk
1 -
SAP Odata
1 -
SAP UI5
1 -
SAP UI5 Custom Library
1 -
SAPEnhancements
1 -
SapMachine
1 -
security
3 -
text editor
1 -
Tools
17 -
User Experience
5
| User | Count |
|---|---|
| 4 | |
| 3 | |
| 3 | |
| 2 | |
| 2 | |
| 2 | |
| 2 | |
| 2 | |
| 1 | |
| 1 |